Operation Manual © 2016 ZOOM CORPORATION Copying or reprinting this manual in part or in whole without permission is prohibited.
Introduction / Safety and Usage Precautions Contents Introduction……………………………………………… 2 Recording…………………………………………………10 Safety and Usage Precautions……………………… 2 Playback…………………………………………………12 Part Names……………………………………………… 4 Troubleshooting…………………………………………14 Connecting with a Computer/iOS device…………… 6 Specifications……………………………………………15 Introduction Thank you for choosing the ZOOM Handy Audio Interface.
Breakdown and malfunction If the malfunctions or operates abnormally, disconnect it immediately. Contact the store where you purchased the unit, or contact ZOOM customer service with the following information: product model, serial number, and the specific symptoms of the breakdown or malfunction—along with your name, address, and telephone number. Caution Warning Product handling Do not drop, bump or apply excessive force to the unit. Be careful not to allow foreign objects or liquids to enter the unit.
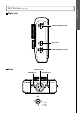
Part Names Part Names Top Power indicator OUTPUT knob GAIN knob 48V indicator Level indicator Back OUTPUT jacks USB 2.
Part Names (continued) Part Names Right side POWER SOURCE switch 48V switch DIRECT MONITOR switch Front MIC/Hi-Z jack LINE IN jack PHONES jack XLR TRS 2 3 5 1 TIP:HOT 1:GND 2:HOT 3:COLD RING:COLD SLEEVE:GND
Connecting with a Computer/iOS device Installing the Driver Do not connect the until installation completes. Windows 1. Download the ZOOM U-22 Driver from http://www.zoom.co.jp/ to your computer. NOTE • You can download the latest ZOOM U-22 driver from the above website. • Download the appropriate driver for your operating system. Installing the Driver 2. Launch the installer and install the driver. Follow the on-screen instructions to install the ZOOM U-22 driver.
Connecting with a Computer/iOS device Choosing a Power Source Using bus power Use a USB cable to connect the to the computer. 1. Open the battery cover on the underside of the 2. Install the batteries. 3. Replace the battery cover. . NOTE • Use only alkaline batteries or rechargeable NiMH batteries. • The power indicator will blink when the battery charge becomes low. Turn the power off immediately and install new batteries.
Connecting with a Computer/iOS device 1. Minimize the volume of any output devices connected to the 2. Use a USB cable to connect the Connecting with a Computer 3. Connecting with a Computer . to the computer. Set to USB or BATTERY/DC IN [TABLET] to turn the power on. NOTE • When using batteries or an external power supply, set [TABLET]. 4. Confirm that the power indicator is lit.
You can connect the to an iOS device when using either the optional AD-17 power adapter, an external DC power supply, or AA batteries. 1. Minimize the volume of any output devices connected to the 2. Install batteries or connect an external power supply. (→ P. 7) 3. . 4. Set After the to BATTERY/DC IN [TABLET]. turns on, it will connect to the iOS device. NOTE • 5. cannot accept bus power from an iOS device. Confirm that the power indicator is lit.
Connecting Instruments and Mics Recording Use a mono instrument/XLR cable to connect an instrument or mic to the MIC/Hi-Z jack. Use a stereo mini cable to connect an iPad or other device to the LINE IN jack. Connecting Instruments and Mics Tablet or other device (stereo mini cable) Condenser mic Guitar Bass guitar (mono instrument cable) Dynamic mic (XLR cable) NOTE · The MIC/Hi-Z jack is disabled when a cable is connected to the LINE IN jack.
Connecting Instruments and Mics (continued) Recording Adjusting Input Gain You can adjust the MIC/Hi-Z jack gain. 1. Use the level indicator to check the input signal status. Green light: Input signal is present. Red light: Input signal is clipping. Connecting Instruments and Mics 2. Adjust the input gain. Turn the . HINT • To avoid distorted recordings, adjust the input gain so the level indicator doesn't light up red. NOTE • The gain is fixed for the LINE IN jack.
Connecting Headphones and Speakers Playback Connect headphones to the PHONES jack, speakers to the OUTPUT jacks, and adjust the volume levels accordingly. 1. Connect headphones or speakers. Connecting Headphones and Speakers Headphones Speakers 2. Adjust the headphones/speakers volume. Turn the .
Using Direct Monitoring 1. Set to ON. Playback Direct monitoring enables you to listen to input signals before they pass through the computer. without latency.
Troubleshooting Troubleshooting Cannot select or use the • Confirm that the computer correctly. device Sound skips during playback or recording • If you can adjust the audio buffer size of the software that you are using, increase the buffer size. is connected to the , • Quit all the software that is using the then disconnect and reconnect the USB cable connected to • Turn the automatic sleep function and other computer power saving settings OFF. . • Reinstall the driver.
Specifications MIC/Hi-Z Specifications TRS/XLR combo jacks (XLR: 2 hot, TRS: TIP hot) Input gain 0 – 43 dB Input impedance 2.6 kΩ (MIC) 484 kΩ (Hi-Z) Maximum input level -0.8 dBu (MIC) / +8.7 dBu (Hi-Z) LINE IN Phantom power +48 V Connector Stereo mini jack Input impedance 22 kΩ Maximum input level +1.0 dBu ANALOG OUT OUTPUT L/R PNONES Connector RCA (coaxial) Maximum output level -0.
ZOOM CORPORATION 4-4-3 Kandasurugadai, Chiyoda-ku, Tokyo 101-0062 Japan http://www.zoom.co.