Operation Manual You must read the Usage and Safety Precautions before use. © 2018 ZOOM CORPORATION Copying or reprinting this manual in part or in whole without permission is prohibited.
Usage and Safety Precautions In this operation manual, symbols are used to highlight warnings and cautions that you must read to prevent accidents. The meanings of these symbols are as follows. WARNING Something that could cause serious injury or death CAUTION Something that could cause injury or damage to the equipment Other symbols used An action that is mandatory An action that is prohibited WARNING ■ Operation using an AC adapter Never use any AC adapter other than a ZOOM AD-17.
■ Interference with other electrical equipment In consideration of safety, the has been designed to minimize its emission of electromagnetic waves and to suppress interference from external electromagnetic waves. However, equipment that is very susceptible to interference or that emits powerful electromagnetic waves could result in interference if placed nearby. If this occurs, and the other device farther apart.
Introduction Thank you for purchasing a ZOOM The has the following features. Field Recorder (hereafter, " "). Wearable and compact Thanks to its compact design, the can be easily attached to clothing during recording sessions. In addition, the dedicated removable shock mount can be used to reduce noise when mounted on a digital SLR camera. Compatible with ZOOM mic capsules The is compatible with all Zoom mic capsules, allowing you to switch microphones according to your audio needs.
Contents Usage and Safety Precautions Introduction Names of parts Display overview Setting the recording file name format Set the recording file type Automatically disable buttons during recording Outputting tone signals when starting and stopping recording (sound marker function) Setting how the counter appears Setting when marks are added when recording/ playing Setting the display backlight Adjusting the display contrast Setting the type of battery used Setting the time until the power turns off automat
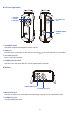
Names of parts ■ Front ① MIC IN connector ③ PLAY/PAUSE button ② Display ④ STOP/OPTION button ⑤ REC button ⑥ REC LED ⑦ REC FORMAT, LO CUT, LIMITER and REC LEVEL buttons ① MIC IN connector Connect a ZOOM mic capsule here. ② Display This shows various types of information. ③ PLAY/PAUSE button Use this to start and pause playback of recorded files. ④ STOP/OPTION button Use this to stop file recording/playback and to switch the functions of the function buttons. ⑤ REC button Use this to start recording.
■ Left and right sides ① VOLUME buttons ③ microSD card slot ② USB port ④ POWER [HOLD] switch ① VOLUME buttons Use these to adjust the headphone output volume. ② USB port Connect this to a computer or iOS device to use the as an audio interface or card reader. ③ microSD card slot Insert a microSD card here. ④ POWER [HOLD] switch Use this to turn the power ON/OFF and to disable button operation. ■ Bottom ① MIC/LINE IN jack ② PHONE OUT jack ① MIC/LINE IN jack Connect an external mic here.
Display overview Home Screen (in recording standby) ① File name ⑤ Remaining battery charge ② Status icon ⑥ Counter ③ Level meter ⑦ Clipping indicator ④ Function buttons ① File name This shows the name of the recording file. ② Status icon This shows the recording status. Ready Recording Paused ③ Level meter This shows the current input level. The number of level meters displayed changes according to the type of recording file and mic capsule.
Playback Screen ① File name ⑦ Remaining battery charge ③ Progress bar ④ Number of selected file/ total number of files ⑨ Remaining playback time ② Status icon ⑧ Counter ⑩ Clipping indicator ⑤ Level meter ⑥ Function buttons ① File name This shows the name of the file being played. ② Status icon This shows the playback status. Playing Paused Searching backward Searching forward ③ Progress bar This shows the current playback location.
Preparations Providing power Using batteries 1. Turn the power off and then remove the battery cover. Unlock and pull the cover open 2. Install the batteries. 3. Replace the battery cover. NOTE • Use only one type of batteries (alkaline, NiMH or lithium) at a time. • If the remaining battery power indicator drops to 0, turn the power off immediately and install new batteries. • After installing the batteries, set the battery type correctly (→ "Setting the type of battery used").
Using an AC adapter 1. Connect the cable of an AD-17 AC adapter to the USB port. 2. Plug the AC adapter into an outlet.
Inserting microSD cards 1. Turn the power off and then open the microSD card slot cover. 2. Insert the microSD card into the card slot. To remove a microSD card, gently push it further into the slot and then pull it out. 3. Close the microSD card slot cover. NOTE • Always make certain that the power is off when inserting or removing a microSD card. Inserting or removing a card while the power is on could result in data loss.
Turning the power on/off Turning the power on 1. Slide toward until the Home Screen appears on the display. NOTE • The first time you turn the power on after purchase, you must set the language (→ "Setting the language shown") and the date/time (→ "Setting the date and time"). • If “No SD Card!” appears on the display, confirm that a microSD card is inserted properly. • If “Invalid SD Card!” appears on the display, the card is not formatted correctly.
Setting the language shown Setting the language Set the language shown on the display. 1. While pressing 2. Use and 3. Press or , press to open the MENU screen. to select "Language", and press to select the language, and press . . HINT The first time you turn the power on after purchase, this screen opens automatically.
Adding languages In addition to Japanese and English, various display languages can be added. 1. Copy the file for the language you want to add to the root directory on a microSD card. HINT Download language files from the ZOOM website (www.zoom.co.jp). 2. Insert the microSD card into the (→ "Inserting microSD cards") to open the MENU screen. 3. While pressing , press . 4. Use and to select "Language", and press 5. Use and to select "Add Language", and press 6.
NOTE • Only one other language can be added at a time. If a different language is added when another language has already been added, the previous language will be deleted. is reset (→ "Restoring default setting values").
Setting the date and time Setting the date and time Set the date and time used when recording files. 1. While pressing 2. Use and 3. Use 4. Use or and , press to open the MENU screen. to select "Date/Time", and press to select "Set Date/Time", and press . . to select the item to change. HINT The first time you turn the power on after purchase, this screen opens automatically after you set the language used.
5. Use and 6. Press . to change the value of the selected item. HINT Press to cancel the setting change. Setting the date format The date format can be changed. This is used when adding dates to file names and when showing the date on the Playback Screen. 1. While pressing 2. Use and , press to open the MENU screen. to select "Date/Time", and press 17 .
3. Use and to select "Date Format", and press 4. Use and to select the date format, and press The following date formats can be used. Setting value Explanation YYMMDD Year, month, day order MMDDYY Month, day, year order DDMMYY Day, month, year order 18 . .
Preventing misoperation In order to prevent misoperation while recording, the hold function can be used to disable the buttons on the . NOTE This can be set to automatically disable button operation only during recording. (→ "Automatically disable buttons during recording") Activating the HOLD function 1. Slide to HOLD. Deactivating the HOLD function 1. Slide back to the middle.
Connections Attaching to a camera Connecting the shock mount This reduces noise when the is mounted on a digital SLR camera. 1. Attach the ends of two arms from the shock mount to one belt loop on the 2. Attach the other arms to the other belt loop, one at a time. . Using the elasticity of the arms, attach their ends to the belt loops while bending them slightly. 2 1 Arms (2 each on left and right) 3. Slide the shock mount onto the camera accessory shoe and tighten the screw to attach it.
Connecting mics Connecting mic capsules 1. Remove the protective caps from the and the mic capsule. 2. While pressing the buttons on the sides of the mic capsule, connect it to the , inserting it completely. 3. To disconnect the mic capsule, pull it away from the unit while pressing the buttons on its sides. Connecting lavalier mics 1. Attach the windscreen and the clip to the lavalier mic. Lavalier mic Windscreen Mic clip 2. Attach the belt clip to the with the screw.
3. Connect the lavalier mic to the MIC/LINE IN jack, and tighten the screw lock. HINT • This jack can provide plug-in power to mics that use it. (→ "Setting plugin power") • Mics without screw locks can also be connected to the MIC/LINE IN jack.
Connection examples Recording is possible in a variety of situations like these. ■ Recording video while using a lavalier mic Record sound of performer with lavalier mic connected to the MIC/LINE IN jack. Lavalier mic MIC/LINE IN jack ■ Recording video Record sound of main subject with shotgun mic capsule connected to the Connect the PHONE OUT jack to the camera mic input. . PHONE OUT jack Mic input HINT to the camera, calibrate the levels of both devices by using the built-in test tone.
Setting plugin power Use this setting when a mic that is compatible with plug-in power is connected to the to the MIC/LINE input jack of a mic capsule connected to the 1. While pressing , press to turn it ON. 24 .
Adjusting the side mic level of a mid-side capsule You can adjust the side mic level (stereo width) before recording when using a mid-side mic capsule 1. When the mic capsule is connected, press , and select the side mic level. HINT This can be set to OFF, 30°, 60°, 90°, 120° or 150°. NOTE This cannot be changed while recording.
Adjusting connected equipment levels (playing test tones) Use the test tone in order to adjust the level of a digital SLR camera or other device connected to the . 1. Turn down the input gain of the other device. NOTE If the automatic gain control function on the other device is on, turn it off. 2. Use an audio cable to connect the external mic jack of the other device with the PHONE OUT jack of the . 3. While pressing , press . This plays a test tone from the PHONE OUT jack.
4. Use and to adjust the output level. While checking the audio level meter of the other device, adjust the audio signal level so that it never exceeds −6 dB. 5. Adjust the input gain of the other device. While checking the audio level meter of the connected device, make small adjustments to the input gain of that device until the audio signal level is about −6 dB. 6. While pressing , press . Stop test tone playback.
Recording Adjusting input levels Adjust the recorded level of signals coming in to the . HINT • Adjust so that the peak level stays around −12 dB. • Plug-in power can be supplied by the MIC/LINE IN jack as well as by the MIC/LINE IN jack of a connected mic capsule (→ "Setting plugin power"). • If the sound distorts even when you lower the input level, try changing mic positions and adjusting the output levels of connected devices.
When using the MIC/LINE IN jack 1. Press , and select the input level. HINT • This can be set to Lo-, Lo, Mid-, Mid, Mid+, Hi-, Hi, Hi+, Hi++ or AUTO. • Select AUTO if you want the input level to be adjusted automatically.
Monitoring recording The sound being recorded can be monitored using headphones. 1. Connect headphones to the PHONE OUT jack on the 2. Use and to adjust the headphone volume. HINT The volume can be set from 0 to 100. 30 .
Reducing noise This function can reduce low-frequency noise, including wind and vocal pops. 1. Press to set the cutoff frequency. HINT Select OFF or 80 Hz, 120 Hz or 160 Hz as the frequency.
Setting the limiter The limiter can prevent distortion by reducing input signals that have excessively high levels. 1. Press to select ON. NOTE When the limiter is ON, noise will be more audible when the input signal level is low.
Selecting the recording format The recording format can be selected in consideration of audio quality and file size. 1. Press to select the recording format. The following recording formats can be set. They are listed in order from highest quality (largest file size) to lowest quality (smallest file size). • 96k 24bit (96 kHz/24-bit WAV) • 48k 24bit (48 kHz/24-bit WAV) • 48k 16bit (48 kHz/16-bit WAV) • 44.1k 16bit (44.
Recording 1. Press 2. Press to record. to pause/resume. Pausing during recording will add a mark at that instant. HINT How pausing occurs and marks are added when is pressed can be changed. (→ "Setting how marks are added when recording/playing") NOTE • Marks are used as cue points. During playback, press or to jump to a mark position. • Up to 99 marks can be added to each recording.
Capturing audio before recording starts (PRE REC) The input signal can be captured for about 2 seconds before starts suddenly, for example. 1. While pressing , press to turn on Pre Rec. 35 is pressed.
Playback Playing recordings 1. Press . The following operations can be performed during playback. Adjust the headphone volume Use and . Pause/resume playback and add a mark (This operation can be changed with a setting.
Setting the playback mode You can set the file playback mode to Play All, Repeat One, or Repeat All. 1. While pressing 2. Use and , press to open the MENU screen. to select "Record/Play", and press 3. Use and to select "Playback Mode", and press 4. Use and to select the playback mode, and press The following playback modes can be set. 37 . . .
Setting value Explanation Play All Every file from the selected one to the last one will be played back. Repeat One The one selected file will be played repeatedly. Repeat All All files will be played back repeatedly.
Deleting marks Marks added to files can be deleted when not needed. 1. Pause playback. and 2. Use 3. Press 4. Use to jump to the mark that you want to delete. . and to select "Delete", and press .
Working with files Checking file information You can view a variety of information about the selected file. 1. Press while the file is playing to check its information. 2. Check the file information. Use and to change the page. HINT The information items that can be viewed are the date and time, the format, the size, and the recording length.
Deleting files You can delete unwanted files. 1. Press 2. Use during playback of the file to delete. and to select "Delete", and press .
Using USB functions Connecting to computers and iOS devices The can be used as a card reader or audio interface when the or other equipment. is connected to a computer, iOS device 1. When the Home Screen is open, use a USB cable to connect the The USB screen will open. NOTE A Lightning to USB Camera Adapter is necessary to connect an iOS device. 42 to a computer or iOS device.
Using as a card reader You can use a computer to check the files saved on the microSD card and copy those files to the computer. 1. Press or on the USB screen to select "Card Reader", and press . 2. Use the computer to transfer the files saved on the microSD card. 3. When you want to disconnect, use the computer to end the USB connection with the Windows: Select from "Safely Remove Hardware". Mac OS: Drag the icon to the Trash and drop it. NOTE Always properly eject the 4. Press 5.
Using as an audio interface input signals can be input directly to a computer, iOS device or other equipment, and playback signals on a computer, iOS device or other equipment can be output from the 1. Press 2. Use or or . on the USB screen to select "Audio I/F", and press to select the type of device, and press . . NOTE power on, follow the instructions on screen, and disconnect the cable once. After selecting "iOS", turn the Then, select "iOS" again and reconnect the cable. 3.
Setting value Explanation Bus Power Power is supplied from the computer through the USB cable. Battery . Select this when connected to a comPower is supplied by the batteries in the puter that has low USB bus power supply capability. NOTE When "iOS" is selected, power is supplied by the batteries in the 4. Monitor playback signals from the computer or iOS device. . This screen will not be shown. HINT When connected to a Windows computer, you can use a dedicated driver for low-latency monitoring.
Enabling direct monitoring This directly outputs the input signal from the enables monitoring without latency. 1. While pressing , press before sending it to the computer or iOS device. This to turn on direct monitoring.
Making various settings Setting the recording file name format The format can be set for the names given to files automatically during recording. 1. While pressing 2. Use and 3. Use and , press to open the MENU screen. to select "Record/Play", and press to select "Rec File Name", and press 47 . .
4. Use or to select the file name format, and press . The following file name formats can be used. Setting value Explanation ZOOM**** Files are named with consecutive numbers from "ZOOM0001.WAV/MP3" to "ZOOM9999.WAV/.MP3". YYMMDD-HHMMSS Files are named with the date and time that the recording started, using a "YYMMDD-HHMMSS.WAV/MP3" format. The "Date Format" setting will be used for the date used as the file name (→ "Setting the date format").
Set the recording file type When using the MIC/LINE IN jack, the recording file type (mono/stereo) can be selected. This cannot be set when using a ZOOM mic capsule. 1. While pressing 2. Use and , press to open the MENU screen. to select "Record/Play", and press 3. Use and to select "Rec File", and press 4. Use and to select the file type, and press 49 . . .
The following file types can be set. Setting value Explanation L ch → Mono The left channel of the input signal is saved as a mono file. L ch → Stereo The left channel of the input signal is saved as a stereo file. The same audio is saved to both the left and right channels of the file. L+R → Mono The left and right channels of the input signal are mixed together and saved as a mono file. L/R → Stereo The input signal is saved as a stereo file.
Automatically disable buttons during recording Button operations can be disabled during recording to prevent misoperation. To stop recording when this function is on, while pressing 1. While pressing 2. Use and 3. Use and 4. Use or , press , press to open the MENU screen. to select "Record/Play", and press to select "Rec Hold", and press to select "On", and press . 51 . . .
Setting value Explanation Off Button operations will not be automatically disabled during recording. On Button operations will be disabled during recording. To stop recording, while pressing , press . HINT Even while button operations have been automatically disabled during recording, 52 and can be used.
Outputting tone signals when starting and stopping recording (sound marker function) Half-second tone signals (sound markers) can be played from the PHONE OUT jack when recording starts and stops. Since sound markers are also written to files, when recording audio for video with the output signal to the camera input can make synchronizing audio and video easier. 1. While pressing 2. Use and 3. Use and 4. Use or , press to open the MENU screen.
Setting how the counter is displayed The counter shown during recording can be set to either the elapsed recording time or the remaining possible recording time. 1. While pressing 2. Use and 3. Use 4. Press and or , press to open the MENU screen. to select "Record/Play", and press . to select "Rec Counter", and press . to select how it is shown, and press 54 .
Setting how marks are added when recording/playing You can set how marks are added when 1. While pressing 2. Use and 3. Use or 4. Use and , press is pressed while recording and playing back. to open the MENU screen. to select "Record/Play", and press to select "PLAY Key Option", and press . . to select "Recording" or "Playing", and press 55 .
5. Use and to select when marks are added, and press Setting value Explanation Pause Pressing will pause without adding a mark. Pause & Mark Pressing will pause and add a mark. Mark Pressing will add a mark without pausing. 56 .
Setting the display backlight You can set the display backlight to turn off after a specific amount of time without use. 1. While pressing 2. Use and , press to open the MENU screen. to select "LCD", and press . 3. Use and to select "Backlight", and press 4. Use and to set the amount of time until the backlight turns off, and press HINT This can be set to Off, On, 30 seconds, or 1 to 5 minutes. 57 . .
Adjusting the display contrast 1. While pressing 2. Use and , press to open the MENU screen. to select "LCD", and press . 3. Use and to select "Contrast", and press 4. Use and to adjust the contrast, and press HINT This can be set from 1 to 10. 58 . .
Setting the type of battery used Set the type of battery used so that the amount of remaining battery charge can be accurately displayed. 1. While pressing 2. Use or 3. Use and , press to open the MENU screen. to select "Battery", and press . to select the battery type, and press 59 .
Setting the time until the power turns off automatically You can set the 1. While pressing 2. Use or 3. Use and to automatically turn off after being unused for a specific amount of time. , press to open the MENU screen. to select "Auto Power Off", and press . to set the time until the power turns off, and press HINT This can be set to Off, 5, 10, 30, or 60 minutes. 60 .
Other functions Formatting microSD cards A microSD card that has been purchased or formatted by a computer should be reformatted for use with the . 1. While pressing 2. Use and , press to open the MENU screen. to select "SD Card", and press 3. Use and to select "Format", and press 4. Use and to select "Execute", and press . . 61 .
NOTE . • Before using a microSD card, it must be formatted by the • Be aware that all data previously saved on a microSD card will be deleted when it is formatted.
Testing microSD card performance Use "Quick Test" or "Full Test" to check the current microSD card's compatibility with the . A Quick Test can be done in a short amount of time, while a Full Test takes longer to examine the entire microSD card. NOTE Even if a performance test result is "OK", there is no guarantee that writing errors will not occur. Use this information as a guide. Conducting a Quick Test 1. While pressing 2. Use and 3. Use or , press to open the MENU screen.
4. Use or 5. Use and to select "Quick Test", and press to select "Execute", and press 6. Check the result when the test completes. 64 . .
Conducting a full test NOTE Use the AC adapter to supply power when conducting a full test (→ "Using an AC adapter"). 1. While pressing 2. Use and , press to open the MENU screen. to select "SD Card", and press 3. Use or to select "Test", and press 4. Use or to select "Full Test", and press . . .
The estimated amount of time required for the full test will be shown. 5. Use and to select "Execute", and press HINT You can press to pause and resume a test. 6. Check the result when the test completes. 66 .
Checking the firmware versions You can check the current firmware versions. 1. While pressing 2. Use and , press to open the MENU screen. to select "Version", and press . 3. Check the firmware versions. HINT If a language file has been added, its version will also be shown.
Restoring default setting values You can restore all 1. While pressing 2. Use and 3. Use and settings to their factory defaults. , press to open the MENU screen. to select "Factory Reset", and press to select "Execute", and press . . After the settings are restored, the power will automatically turn off. NOTE Restoring factory defaults will delete any added language file.
Updating the firmware You can update the to the latest firmware version. 1. Install new batteries in the adapter"). (→ "Using batteries") or connect the dedicated AC adapter (→ "Using an AC NOTE Executing a firmware update is not possible if the remaining battery power is low. 2. Copy the firmware update file to the root directory on a microSD card. HINT Files for the latest firmware updates can be downloaded from the ZOOM website (www.zoom.co.jp). 3.
Troubleshooting If your is not operating as intended, please check the following items first. Recording/playback trouble ■ No sound is played/volume is low • Confirm that the output volume of the is not set too low. • Check the volume of the computer, iOS device or other equipment connected to the . ■ Recorded audio cannot be heard or is very quiet • Confirm that the mic is pointed in the right direction. • Check the input level settings (→ "Adjusting input levels").
Specifications Recording media microSD/microSDHC cards (Class 4 or higher, up to 32 GB) Recording formats WAV 44.1 kHz/16-bit, 48 kHz/16-bit, 48 kHz/24-bit, 96 kHz/24-bit Mono/stereo BWF formats supported MP3 48 kbps, 128 kbps, 192 kbps, 256 kbps, 320 kbps Mono/stereo ID3v1 tags supported Display Inputs 1.
ZOOM CORPORATION 4-4-3 Kanda-surugadai, Chiyoda-ku, Tokyo 101-0062 Japan www.zoom.co.