V2 .P.04.
Contents EN 01 ES 14
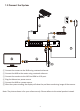
Introduction of System 1.1 PoE NVR POE 15 POE 13 POE 11 POE 9 POE 7 POE 5 POE 3 POE 1 POE 16 POE 14 POE 12 POE 10 POE 8 POE 6 POE 4 POE 2 Power Port NETWORK AUDIO OUT PoE Camera Monitor (HDMI) DC 48V VGA Audio Out Router Mouse/USB 2.0 Monitor (VGA) 1.2 PoE camera A Attach the mounting template, drill screw holes on the wall according to the mounting template, and insert rubber plugs into the holes.
1.3 Connect the System POE 15 POE 13 POE 11 POE 9 POE 7 POE 5 POE 3 POE 1 POE 16 POE 14 POE 12 POE 10 POE 8 POE 6 POE 4 POE 2 NETWORK AUDIO OUT DC 48V VGA ① Connect the camera to the NVR using a network ethernet. ② Connect the NVR to the router using a network ethernet. ③ Connect the monitor to the NVR via HDMI or VGA port. ④ Plug the Mouse to a power source. ⑤ Connect the NVR to a power source.
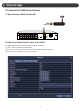
View on App 2.1 Connect the NVR to the Internet A: How to connect NVR to the LAN? POE 15 POE 13 POE 11 POE 9 POE 7 POE 5 POE 3 POE 1 NETWORK B: How to test the network status of the NVR? (1) Right click Mouse > Go to Main Menu > Setup > Network. (2) Tick “ Obtain IP address automatically ”. (3) Click “Test”, if “OK” is displayed, the network is connected successfully. Note: Please ensure DHCP in your router is open.
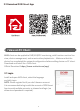
2.2 Download ZOSI Smart App App video operation link View on PC Client AVSS client can be applied to DVR/NVR/IPC monitoring, with functions such as live view, device management, and remote video playback etc... Make sure that the device has completed the network configuration before adding device on PC client. Download and install the AVSS client. Official Download: https://www.zositech.com/app/ 3.1 Login Install and open AVSS client, select the language and click Login.
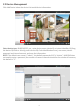
3.2 Device Management Click Add Device below the device list to add device information. Select device type: NVR/DVR/IPC, etc., enter device name, device ID or instant identifier ID (Drag the device QR code or sharing code into the QR Code Identification Zone), user name, device password and channel amount, and save the information.
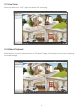
3.3 Live View Select the device on “Live” page and watch live streaming. 3.4 Video Playback Select device, channel, date and time on “Playback” page, click the play icon to start replaying recorded footage.
Connect the Device ① Connect the NVR and camera by RJ-45 cable. ② Enter the NVR interface, right click the mouse, select “IPC Channel Config”. ③ Click “Search”, PoE camera IP address is displayed, then click “Auto Add” to add the camera to NVR system. ④ Wait about 5 seconds, camera would be added to NVR channel sucessfully.
Install a Hard Disk The system may not include Hard Disk, it’s depending on the kit you selected. This system works with most 3.5” SATA Hard Disk or 2.5” SATA Hard Disk. Note: if your system has preinstalled hard disk, please skip this step. ① Unplug your NVR from power, unscrew and remove the top cover. ② Connect the SATA power and data cables from the NVR to the corresponding ports on your hard disk as shown. ③ Place the hard disk into the NVR. Any cable should cross up over the hard disk.
Video Record Right click the mouse > Go to Main Menu > Setup > Record You shall see the record settings for all channels. Modify the record setting based on your needs and apply the changes. 6.1 Motion Detection Set motion Detection,NVR will record only when motion or movement is detected. Right click mouse > Main Menu > Setup > Alarm > Motion > Motion detection. The system starts recording when motion is detected by the camera, and the monitoring picture will show at the bottom left corner.
Click STAR to make the whole viewing range as sensitivity Click Trash Box to remove sensitivity area Click to save setting Click to exit As Color and luminance is important for sensitivity, so it's necessary to adjust its value at specific conditions. The default value is 6 while value range is from 1 to 8. Right click mouse to show or hide control menu at screen bottom. Test the setting by moving something or some one walk through grid area within camera view range.
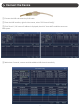
6.4 Video Playback Get into system Main Menu > Search, system presents as following: Search the video you want via time or Event, then play it.
Previous Record: Move to last recorded event. Next Record: Move to next recorded event. Fast Forward: video can be played at different speed, from 1/4 times to 16 times. Rewind: Video play can be rewinded at 1 time, 8 times, 16 times and 32 times. Screen Display Mode: Both single-screen and multi-screen are available. You can choose how many channels you want to playback one time.Channel without records presents blank screen. 6.5 Video Blackup ① Plug an USB flash disk into your NVR’s USB port.
FAQs Q: Why can't I search for devices when adding? A: Make sure that the device and the mobile device are on the same LAN, otherwise please enter the device ID manually; Q: Why can't my device connect to the network? A: Please check · Is the device connected to the Internet? · Is the router working properly? · Is the router's DHCP server open? Q: Why can't I find the video files? A: Please check · Is the hard drive broken? · Is the search period valid? · Whether the equipment system time is correct Q: Why th
Introducción del sistema 1.1 NVR PoE POE 15 POE 13 POE 11 POE 9 POE 7 POE 5 POE 3 POE 1 POE 16 POE 14 POE 12 POE 10 POE 8 POE 6 POE 4 POE 2 Puerto del adaptador NETWORK AUDIO OUT Entrada de cámara PoE Salida de video HDMI DC 48V VGA Puerto LAN Ratón/USB 2.0 Puerto de audio Salida de video VGA 1.
1.3 Diagrama de conexión del sistema POE 15 POE 13 POE 11 POE 9 POE 7 POE 5 POE 3 POE 1 POE 16 POE 14 POE 12 POE 10 POE 8 POE 6 POE 4 POE 2 NETWORK AUDIO OUT DC 48V VGA ① Conecte la cámara al NVR vía un cable Ethernet. ② Conecte el NVR a un enrutador vía un cable Ethernet. ③ Conecte un monitor al puerto VGA o HDMI del NVR. ④ Conecte el ratón al puerto USB del NVR. ⑤ Conecte el NVR al adaptador de corriente. ⑥ Se mostrará la imagen en la pantalla después de unos segundos.
Ver en el móvil 2.
2.2 Descargar la aplicación Enlace de video de operación de la aplicación Ver en el PC El cliente de PC AVSS se aplica a la vista previa de DVR / NVR / IPC, con vista previa en tiempo real, administración de dispositivos, reproducción remota de video y más. Sitio web oficial de ZOSI: www. zositech.com 3.1 Iniciar sesión Abra AVSS, seleccione el idioma e inicie sesión. Nota: Primero cree una cuenta si no tiene una.
3.2 Gestión del dispositivo Haga clic en "Añadir Dispositivo" debajo de la lista de dispositivos para agregar información del dispositivo. Seleccione el tipo de dispositivo: NVR / DVR / IPC, etc., introduzca el nombre del dispositivo, la ID del dispositivo(o arrastre la captura de pantalla del código QR del dispositivo al cuadro de reconocimiento del código QR), el número de canal, el nombre de usuario, la contraseña, luego haga clic en "Guardar" para guardar la configuración.
3.3 Ver en vivo Seleccione el dispositivo en la interfaz En vivo para ver la cámara en vivo. 3.4 Reproducción Haga clic en "Reproducción"; seleccione el dispositivo, el número de canal, la fecha, hora y luego haga clic en "Reproducir" para reproducir las grabaciones.
Conexión del dispositivo ① Conecte la cámara al NVR con un cable Ethernet, como se muestra en la foto. ② Entre en el sistema NVR. Haga clic derecho del ratón y seleccione “Config canal IPC”. ③ Haga clic en “Buscar”, se muestra la dirección IP de la cámara, luego haga clic en “Añadir Auto” para agregar la cámara al sistema NVR, como se muestra en la foto. ④ Espere 5 segundos, la cámara se agregará al NVR con éxito, como se muestra en la foto.
Instalación del disco duro Es posible que el sistema no incluya el disco duro, según el kit que seleccionó. Este sistema funciona con la mayoría de los discos duros con SATA 3.5’’ o discos duros con SATA 2.5". Nota: si su sistema tiene un disco duro preinstalado, omita este paso; ① Desenchufe la fuente de alimentación del NVR, desenrosque los tornillos y retire la cubierta superior.
Ajustes de grabación Haga clic derecho del ratón > Menú Principal > Configuración > Grabar. Puede ver el ajuste de grabación para todos los canales. Cambie la configuración de grabación a su gusto y haga clic en 'Aplicar'. 6.1 Detección de movimiento Al configurar la detección de movimiento, NVR grabará solo cuando se detecte movimiento. Haga clic derecho del ratón> Menú principal> Configuración> Alarma> Movimiento> Detección de movimiento. El sistema graba cuando la cámara detecta movimiento.
Haga clic para hacer que todo el rango de visualización sea un área de sensibilidad. Haga clic para eliminar el área de sensibilidad. Guardar la configuración Salir Como el color y la luminancia son importantes para la sensibilidad, es necesario ajustar el valor en condiciones específicas. El valor predeterminado es 6, mientras que el rango de valores es de 1 a 8 (1 es el más sensible). Haga clic derecho del ratón para mostrar u ocultar el menú de control en la parte inferior de la pantalla.
6.4 Reproducción de grabación Haz clic derecho del ratón > Menú principal > Buscar el sistema presenta la imagen de la siguiente manera. Busque el video que desea a través del tiempo o evento, luego reprodúzcalo.
Reproducir/pausar Avance rápido Rebobinar Pantalla multipantalla Foto anterior Foto siguiente Pantalla única Vídeo anterior Vídeo siguiente Vídeo anterior: Mover al último evento grabado. Vídeo siguiente: Mover al siguiente evento grabado. Avance rápido: El video se puede reproducir a diferentes velocidades, de 1/4 a 16 veces. Rebobinar: La reproducción de vídeo se puede rebobinar 1 vez, 8 veces, 16 veces y 32 veces.
Preguntas frecuentes Pregunta: ¿Por qué no se puede buscar el dispositivo cuando se añade? Respuesta: asegúrese de que el dispositivo y el móvil estén en la misma LAN; de lo contrario, introduzca la ID del dispositivo manualmente.
F921014Z3005830