
User Guide


5
The system may not include Hard Disk depending on the kit you selected. This system works with most 3.5” SATA
Hard Disk or 2.5” SATA Hard Disk.
1. Install a Hard Disk (if your system has preinstalled Hard Disk, please skip this step)
2. Record video
Right click mouse > Go to Main Menu > Setup > Record
You shall see the record settings for all channels. Change the record setting according to your preference and apply the
changes.
Note:
After installing a Hard Disk, you need to first format the Hard Disk before recording.
Right click the mouse > go to Main Menu > Disk Management > Select the Hard Disk > Click Format > Apply.
①
Unplug your DVR from power, unscrew and remove the top cover.
②
Connect the SATA power and data cables from the DVR to the corresponding ports on your Hard
Disk (as shown).
③
Place the Hard Disk into the DVR. Any cable should cross up over the Hard Disk.
④
Holding the Hard Disk and the DVR, gently turn it over and line up the holes on the Hard Disk
with the holes on the DVR. Using a Phillips screwdriver, screw the provided screws into the holes.
Assemble the cover.
①
③
②
④
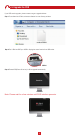
4. Record video
Click “ok” to complete device adding.
Click “PreView” on menu, and double click
the device you want to watch on list, the
image will show up.
REC