
User Guide


8
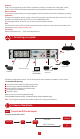
Set Time scheduled record, you may configure each channel to record at specific times based on time of day.
Right click the mouse > go to Main Menu >Setup > Schedule.
The schedule for automatic recording can be set either of two ways.
1 By highlighting individual hours for specific days by using the pencil tool in the upper right of the window. The adjacent
eraser tool removes the highlighting in a block. click on either the pencil or eraser tool to turn them off.
Settings can be copied and applied to any or all of the channels and to any other day.
7. Time scheduled Record
8. Backup the video for memory
Note:
Recording Priority: Alarm Recording > Motion Detection Recording > Manual Recording > Time Scheduled Recording.
2. Blocks of time to be recorded can also be set up by double clicking on a field adjacent to a day. Multiple schedules can be
created and saved with start and stop times down to the minute. These can then be applied to multiple days and cameras.
1. Plug an USB flash disk to your
DVR’s USB port.
2. Right click the mouse > Main
Menu > Backup > choose the
channel and time period > Search >
Choose the video clips you want to
backup > Click Backup.