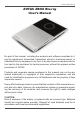
ZOTAC ZBOX Blu-ray ZOTAC ZBOX Blu-ray User’s Manual No part of this manual, including the products and software described in it, may be reproduced, transmitted, transcribed, stored in a retrieval system, or translated into any language in any form or by any means,except documentation kept by the purchaser for backup purposes, without the express written permission of ZOTAC.
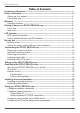
ZOTAC ZBOX Blu-ray Table of Contents Product specifications--------------------------------------------------------------------------- 3 Safety information--------------------------------------------------------------------------------- 4 Setting up your system------------------------------------------------------------------------ 4 Care during use--------------------------------------------------------------------------------- 4 Welcome--------------------------------------------------------------------
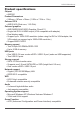
ZOTAC ZBOX Blu-ray Product specifications Chipset • AMD M1 Product Dimensions • 280mm x 187mm x 38mm (11.02in x 7.36in x 1.5in) Onboard CPU • AMD E-450 (Dual-core, 1.65 GHz) Onboard graphics • AMD RADEON HD 6320 Graphics, DirectX11 • Single-link DVI-I & HDMI output (VGA compatible with adapter) • Dual display ready • Support up to 1920x1200 resolution (when using the DVI-to-VGA adapter, the VGA output can support up to 2560x1600 resolution) • Support AMD UVD3.
ZOTAC ZBOX Blu-ray Bluray Combo Driver Support • BD read compliant, max speed: 4X • DVD read and write compliant, max speed: 8X • CD read and write compliant, max speed: 24X • Supports 8cm & 12cm diameter • Supports SMART-X (Smart Monitoring & Adjusting Read-speed Technology for eXtraction) and Seamless Link® (Smart Monitoring & Adapting Recording Technology for Burning) function Safety information Your ZOTAC ZBOX is designed and tested to meet the latest standards of safety for information technology eq
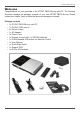
ZOTAC ZBOX Blu-ray Welcome Congratulations on your purchase of the ZOTAC ZBOX Blu-ray mini-PC. The following illustration displays the package contents of your new ZOTAC ZBOX Blu-ray. Please contact your retailer If any of the below items are damaged or missed.
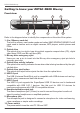
ZOTAC ZBOX Blu-ray Getting to know your ZOTAC ZBOX Blu-ray Front view 1 3 5 2 4 9 7 6 8 10 Refer to the diagram below to identify the components on this side of the system 1. 6-in-1 Memory card slot The built-in memory card reader reads and writes MMC/SD/SDHC/MS/MS Pro/xD cards used in devices such as digital cameras, MP3 players, mobile phones and PDAs. 2. Optical drive The optical drive is a slot-in type drive which supports compact discs (CD), digital video discs (DVD) and Blu-ray discs (BD).
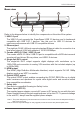
ZOTAC ZBOX Blu-ray Rear view 1 5 3 2 4 7 6 8 Refer to the diagram below to identify the components on this side of the system. 1. USB 3.0 port The USB 3.0 port supports the SuperSpeed USB 3.0 devices and is backwards compatible with USB 2.0/1.1 devices. Use this port for USB 3.0 devices for maximum performance with USB 3.0 compatible devices 2. Ethernet port The eight-pin RJ-45 LAN port supports standard Ethernet cable for connection to a local area network (LAN) with speeds of 10/100/1000Mbps. 3.
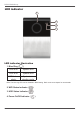
ZOTAC ZBOX Blu-ray LED indicator 1 4 3 2 LED indicator illustration 1. Blue Ring ( ) LED is on System is on LED is off System is off LED flashes slowly System is in standby mode Note: The blue ring LED can be disabled in BIOS setting. Refer to the next chapter for more details. 2. WiFi Status Indicator ( ) 3. HDD Status Indicator ( ) 4.
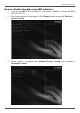
ZOTAC ZBOX Blu-ray How to disable the blue ring LED indicator 1. 2. 3. Turn on the ZBOX Blu-ray mini-PC, then press to enter the BIOS SETUP UTILITY. Use the arrow keys to navigate to the Chipset menu and select Onboard Device Config. Press to display the Onboard Device Config and navigate to Backlight Control.
ZOTAC ZBOX Blu-ray 10 4. Press and select Disabled. 5. Press F10 to save the configuration and exit. The PC will reboot.
ZOTAC ZBOX Blu-ray Blu-ray disc The ZOTAC ZBOX Blu-ray features a Blu-ray combo drive that can read Blu-ray discs, and read/write DVDs and CDs. Ejecting a disc There are two ways to get the disk to eject. 1. Right-click on the Blu-ray Drive in My Computer and left-click on Eject. 2. Press the eject button. Eject Button Setting the region code for Blu-ray movie playback The region code does not need to be set manually.
ZOTAC ZBOX Blu-ray Customizing the ZOTAC ZBOX Blu-ray Please follow the instructions below to remove the cover of the ZOTAC ZBOX Bluray before customizing. 1. Remove the 6 screws securing the bottom cover into place. 2. Gently remove the cover as shown on the image below. Removing a memory module 1. Locate the SO-DIMM memory slot and gently press the two arms securing the memory module outwards, as shown in the image below, to release the memory module.
ZOTAC ZBOX Blu-ray 2. Remove the memory module from the slot at a 45-degree angle. Installing a memory module 1. Locate the SO-DIMM memory slots and insert a SO-DIMM memory module into the slot at a 45 degree angle. Note: When installing two SO-DIMM memory modules, please insert a module into the lower slot first. 2. Gently press down on the memory module until it locks into place by the arms of the memory slot. Note: This ZOTAC ZBOX Blu-ray accomodates two DDR3 SO-DIMM memory modules.
ZOTAC ZBOX Blu-ray Removing a hard disk 1. Locate the hard disk bracket, remove the 4 screws, and remove the cover as shown in the image below. 2. Gently slide the hard disk away from the connector and remove the hard disk. Installing a hard disk 1. Locate the hard disk bracket, remove the 4 screws, and remove the hard disk cover as shown in the image below.
ZOTAC ZBOX Blu-ray 2. Insert a 2.5-inch SATA hard disk into the socket and gently slide into the connector. 3. Reinstall the cover and screws. Note: Due to the 9.5mm-height limit of the hard disk, 12.5mm height drives are not supported by the ZOTAC ZBOX Blu-ray.
ZOTAC ZBOX Blu-ray Installing a Mini-PCIe card 1. Locate the Mini-PCIe slot and insert a Mini-PCIe card into the slot at a 45 degree angle. 2. Gently press down on the Mini-PCIe card with one finger and secure the screws. 3. Connect the WiFi wires to the Mini-PCIe card.
ZOTAC ZBOX Blu-ray Setting up the ZOTAC ZBOX Blu-ray Please connect the peripherals before using the ZOTAC ZBOX Blu-ray. 1 2 4 3 4 5 6 7 8 1. Connecting to USB 3.0 device Connect USB 3.0 devices such as external hard drives, SSDs and flash drives to the USB 3.0 port on the system rear panel. 2. Connecting to a home network Connect one end of a network cable to the LAN port on the system rear panel and the other end to a network hub, switch or router. 3.
ZOTAC ZBOX Blu-ray Positioning the ZOTAC ZBOX Blu-ray • Do not cover or block the ventilation holes on ZOTAC ZBOX Blu-ray. To ensure proper operation and reliability, leave aproximately 4 inches (10 cm) of spacing in front of the ventilation holes. • ZOTAC ZBOX Blu-ray mini-PC systems provide ample expansion in a miniature form factor, please use connectors and cables that are appropriate in size to avoid interference.
ZOTAC ZBOX Blu-ray 3. Connect the ZOTAC ZBOX Blu-ray to your monitor or TV with a HDMI/DVI-I/ VGA cable. Note: The ZOTAC ZBOX Blu-ray mount is VESA75/100 compliant.
ZOTAC ZBOX Blu-ray IR receiver Enjoy more of your favorite entertainment by MCE (Media Center Edition) remote controller with USB IR receiver (connecting to USB 2.0 port). External USB IR receiver Remote control ZOTAC ZBOX Giga is shipped with a remote control. Follow the instructions below to use the remote control.
ZOTAC ZBOX Blu-ray Lithium cell installation 1. Locate the arrow on the rear cover of the remote control, and push the cover as the arrow direction. 2. Remove the rear cover, and insert the CR2032 lithium cells into the battery jar at a 45 degree angle. 3. Gently press down on the CR2032 lithium cells, and reinstall the rear cover.
ZOTAC ZBOX Blu-ray Installing drivers and software Installing an operating system The ZOTAC ZBOX Blu-ray does not ship with an operating system preinstalled. An operating system must be installed before the ZOTAC ZBOX Blu-ray can be used. The following operating systems are supported: • Windows XP • Windows Vista • Windows 7 Follow the instructions below to install an operating system: 1. Insert disk for operating system into the optical drive. 2. Wait for the ZOTAC ZBOX Blu-ray to boot from the disk. 3.
ZOTAC ZBOX Blu-ray • Ralink Wireless driver Note: Each driver must be installed individually to ensure proper operation of the ZOTAC ZBOX Blu-ray. 3. 4. 5. Select the driver you want to install. The driver installer should launch. Follow the onscreen instructions for the selected driver to install. Restart the system. Using your ZOTAC ZBOX Blu-ray Configuring wireless connection Please follow the instructions below to connect to a wireless network: 1.
ZOTAC ZBOX Blu-ray Using a dynamic IP (PPPoE connection) 1. 2. 3. 4. 5. 6. Repeat Step 1-3 in the previous section. Select “Obtain an IP address automatically” and click “OK”. Click “Create a new connection” to start the NEW Connection Wizard. Click “Next”. Select “Connect to the Internet” and click “Next”. Select “Set up my connection manually”. 7. Select your connection type and click “Next”. 8. Enter your ISP Name and click “Next”. 9. Enter your User name and Password. Click “Next”. 10.
ZOTAC ZBOX Blu-ray Configuring the PCIe link state power management Follow the steps below to configure PCIe link state power management to get maximum USB 3.0 speed. 1. Enter “Control Panel > System and Security > Power Options”, and select “Change plan settings” (Balanced (recommended)). 2. In “Change settings for the plan: Balanced” menu, click “Change advanced power settings”.
ZOTAC ZBOX Blu-ray 3. In “Advanced settings” window, select “PCI Express > Link State Power Management”, change Setting “Moderate power savings” to “Off”, and click “Apply” and “OK” to finish the configuration. Note 1: We recommended users to keep the default settings for normal operation. Note 2: The screenshots shown in this section are for the Windows 7 operating system.
ZOTAC ZBOX Blu-ray 27
ZOTAC ZBOX Blu-ray 28 291-MA176-03