ZOTAC ZBOX nano ZOTAC ZBOX nano User’s Manual No part of this manual, including the products and software described in it, may be reproduced, transmitted, transcribed, stored in a retrieval system, or translated into any language in any form or by any means,except documentation kept by the purchaser for backup purposes, without the express written permission of ZOTAC.
ZOTAC ZBOX nano Table of Contents Product specifications--------------------------------------------------------------------------- 3 Safety information--------------------------------------------------------------------------------- 4 Setting up your system------------------------------------------------------------------------ 4 Care during use--------------------------------------------------------------------------------- 4 Welcome-----------------------------------------------------------------------
ZOTAC ZBOX nano Product specifications Chipset • VIA VX900H Product Dimensions • 127mm x 127mm x 45mm Onboard CPU • VIA Nano X2 U4025 (1.2 G/1066 MHz) Internal graphics processor (IGP) • VIA Chrome9 IGP • DirectX 9.0 SM2.0, support HDTV (resolution: 1080i/720P) Memory support • One 204-pin SO-DIMM DDR3-1066 • Up to 4 GB of memory USB ports • Two USB 2.0 ports & two USB 3.0 ports Storage support • SATA 3.0 Gb/s transfer rates • Supports one 2.5-inch SATA HDD or SSD (height limit: 9.
ZOTAC ZBOX nano Safety information Your ZOTAC ZBOX is designed and tested to meet the latest standards of safety for information technology equipment. However, to ensure your safety, it is important that you read the following safety instructions. Setting up your system Read and follow all instructions in the documentation before you operate your system. Do not use this product near water or a heat source such as a radiator. Set up the system on a stable surface with the provided stand.
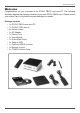
ZOTAC ZBOX nano Welcome Congratulations on your purchase of the ZOTAC ZBOX nano mini-PC. The following illustration displays the package contents of your new ZOTAC ZBOX nano. Please contact your retailer If any of the below items are damaged or missed.
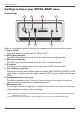
ZOTAC ZBOX nano Getting to know your ZOTAC ZBOX nano Front view 3 1 2 5 4 7 6 Refer to the diagram below to identify the components on this side of the system 1. Power switch The power switch turns the mini-PC ON and OFF. 2. HDD status indicator The HDD status indicator shows when the hard disk is transfering data. 3. WiFi status indicator The WiFi status indicator shows when the WiFi is transfering data. 4. IR receiver The IR receiver is used to receive the signal from the IR remote control. 5.
ZOTAC ZBOX nano Rear view 1 3 5 7 9 10 2 4 6 8 Refer to the diagram below to identify the components on this side of the system. 1. Power input (DC19V) The supplied power adapter converts AC power to DC power for use with this jack. Power supplied through this jack supplies power to the mini-PC. To prevent damage to the mini-PC, always use the supplied power adapter. 2. HDMI output The HDMI (High Definition Multimedia Interface) output supports Full HD 1080p displays such as an HDTV or monitor.
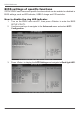
ZOTAC ZBOX nano BIOS settings of specific functions ZOTAC ZBOX nano has some specific functions which can be enabled or disabled in BIOS settings, such as LED indicator, USB2.0 charge and CIR controller. How to disable the ring LED indicator 1. 2. 3. 8 Turn on the ZBOX nano mini-PC, then press to enter the BIOS SETUP UTILITY. Use the arrow keys to navigate to the Advanced menu and select ACPI Configuration. Press to display the ACPI Settings and navigate to Back light LED.
ZOTAC ZBOX nano 4. Press and select Disabled. 5. Press F10 to save the configuration and exit. The PC will reboot. How to enable DeepSleep status 1. In ACPI Settings menu, select DeepSleep (Erp Compliant).
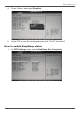
ZOTAC ZBOX nano 2. Press and select Enabled. How to disable USB2.0 charge (for S3/S4 status) 1. 10 In Advanced menu, select USB Configuration.
ZOTAC ZBOX nano 2. Press to display the USB Configuraion and navigate to Charger mode. 3. Press and select Disabled.
ZOTAC ZBOX nano How to enable CIR controller (for internal IR receiver) 12 1. Use the arrow keys to navigate to the Advanced menu and select Super IO Configuration. 2. Press to display the Super IO Configuration and enter CIR Controller Configuration.
ZOTAC ZBOX nano 3. Enter CIR Controller and select Enabled.
ZOTAC ZBOX nano Customizing the ZOTAC ZBOX nano Please follow the instructions below to remove the cover of the ZOTAC ZBOX nano before customizing. 1. Remove the four screws securing the bottom cover into place. 2. Gently remove the cover from the side marked with words: Pull upward.
ZOTAC ZBOX nano Installing a memory module 1. Locate the SO-DIMM memory slot and insert a SO-DIMM memory module into the slot at a 45 degree angle. 2. Gently press down on the memory module until it locks into place by the arms of the memory slot.
ZOTAC ZBOX nano Installing a hard disk 1. Locate the hard disk bracket, remove the 2 screws, and remove the hard disk bracket as shown in the image below. 2. Install the hard disk bracket to a 2.5-inch SATA hard disk with 2 screws. 3. Insert the hard disk into the socket and gently slide into the connector.
ZOTAC ZBOX nano 4. Reinstall the screws of the hard disk bracket. Note: Due to the 9.5mm-height limit of the hard disk, 12.5mm height drives are not supported by the ZOTAC ZBOX nano.
ZOTAC ZBOX nano Setting up the ZOTAC ZBOX nano Please connect the peripherals before using the ZOTAC ZBOX nano. 1 2 3 4 5 1. Connecting a DisplayPort display Connect the DisplayPort connector to the DP port. 2. Connecting USB 3.0 device Connect USB 3.0 devices such as external hard drives, SSDs and flash drives to the USB 3.0 port. 3. Connecting to a Kensington safety lock Connect Kensington Safety Lock to ZBOX nano and lock. 4. Connecting USB 2.0 device Connect USB 2.
ZOTAC ZBOX nano 6 7 8 9 6. Turning on the system Connect the supplied AC adapter to the DC IN jack on the system rear panel and then press the power switch on the front panel to turn on the system. 7. Connecting to an HDMI display Connect one end of an HDMI cable to the HDMI port on the system rear panel and the other end to a HDMI-compatible display such as an HDTV or monitor. (When both the HDMI and the DP are connected, the audio output is from HDMI by default.) 8.
ZOTAC ZBOX nano Positioning the ZOTAC ZBOX nano • Do not cover or block the ventilation holes on ZOTAC ZBOX nano. To ensure proper operation and reliability, leave aproximately 4 inches (10 cm) of spacing in front of the ventilation holes. • ZOTAC ZBOX nano mini-PC systems provide ample expansion in a miniature form factor, please use connectors and cables that are appropriate in size to avoid interference.
ZOTAC ZBOX nano 3. Connect the ZOTAC ZBOX nano to your LCD monitor with an HDMI/DP cable. IR receiver Users can control the LCD monitor/TV by either IR receiver or external USB IR receiver. 1. IR receiver Note: Please refer to page 12-13 to enable CIR controller and install CIR driver from DVD before you use the IR receiver. IR receiver 2.
ZOTAC ZBOX nano Remote control (optional) ZOTAC ZBOX nano is shipped with a remote control. Follow the instructions below to use the remote control. Function keys Playback Buttons OK START OK BACK UP DOWN LEFT RIGHT i Audio and Video Buttons + - VOLUME UP / DOWN MUTE STOP REW PLAY 1 4 7 *.
ZOTAC ZBOX nano Lithium cell installation 1. Locate the arrow on the rear cover of the remote control, and push the cover as the arrow direction. 2. Remove the rear cover, and insert the CR2032 lithium cells into the battery jar at a 45 degree angle. 3. Gently press down on the CR2032 lithium cells, and reinstall the rear cover.
ZOTAC ZBOX nano Installing drivers and software Installing an operating system The ZOTAC ZBOX nano does not ship with an operating system preinstalled. An operating system must be installed before the ZOTAC ZBOX nano can be used. The following operating systems are supported: • Windows® XP 32 bit • Windows® 7 32bit & 64bit Follow the instructions below to install an operating system: 1. Insert disk for operating system into the optical drive. 2. Wait for the ZOTAC ZBOX nano to boot from the disk. 3.
ZOTAC ZBOX nano 3. 4. 5. Select the driver you want to install. The driver installer should launch. Follow the onscreen instructions for the selected driver to install. Restart the system. Using your ZOTAC ZBOX nano Configuring wireless connection Please follow the instructions below to connect to a wireless network: 1. Double-click the crossed wireless network icon (pic) in the notification area. 2. Select the wireless network you want to connect to from the list and click Connect. 3.
ZOTAC ZBOX nano Using a dynamic IP (PPPoE connection) 1. 2. 3. 4. 5. 6. Repeat Step 1-3 in the previous section. Select “Obtain an IP address automatically” and click “OK”. Click “Create a new connection” to start the NEW Connection Wizard. Click “Next”. Select “Connect to the Internet” and click “Next”. Select “Set up my connection manually”. 7. Select your connection type and click “Next”. 8. Enter your ISP Name and click “Next”. 9. Enter your User name and Password. Click “Next”. 10.
ZOTAC ZBOX nano 27
ZOTAC ZBOX nano 28 291-MA179-00