User Guide MF279T 1
Contents Getting Started ......................................................................................................................................3 In the Box .........................................................................................................................................3 Getting to Know Your Device ...........................................................................................................3 Indicators......................................................
Getting Started In the Box The package contains the following items: MF279T Power Cord Phone Cable (Optional) Back-up Battery Get Started Guide Getting to Know Your Device * Allows WPS-enabled devices to be connected via Wi-Fi without typing a Wi-Fi password. For detailed instructions, please refer to page17.
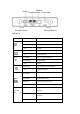
On/Off Ethernet Telephone Ports Power Input External antenna External antenna Indicators Indicator State Power Green steady On AC power Green blinking On battery power Off Voicemail Green blinking Off Wi-Fi No power New voicemail waiting No new voicemail Green steady Wi-Fi on, no data transferring Green flickering Data transferring Off Information Description Green blinking Off Wi-Fi off Check the MF279T new messages No unread messages More than 50% battery power Green steady Battery
Green blinking Red steady LTE roaming ( antenna and 1,2,3,4bars) No service, limited service, or searching for signal (antenna with RED and 0 bar) Red blinking SIM checking, SIM error or other abnormal (antenna with RED and 0 bar. Blinking period: 2s ) How It Works The MF279T uses the TELUS cellular network to provide phone service to your cordless or corded home phone(s) and Internet access to your computer and Wi-Fi enabled devices.
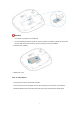
Select which phone and computer/Wi-Fi enabled device you will use with the MF279T: A cordless phone system with multiple handsets should be used to place phones throughout your home. If using an existing phone, unplug it from the wall jack. For Internet access, you may connect up to 20 devices via Wi-Fi and one via Ethernet simultaneously. Installation Guide Install the Back-up Battery and nano-SIM Card(Optional) 1.
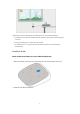
WARNING! Your device only supports a nano-SIM card. To avoid damaging the device, please only use the card that is provided by TELUS and ensure that the nano-SIM card contacts are facing up when inserting it into the nano-SIM slot. 2. Insert the back-up battery. 3. Replace the cover. Turn on Your Device 1. Plug the power cord into an electrical wall outlet. 2. Connect the other end of the power cord into the Power Input port on the back of your MF279T. 3.
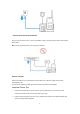
Check the Wireless Signal Wait a few seconds for the signal strength light to turn on, while your device connects to the cellular network. Confirm signal strength light is green for optimal performance. Blue indicates a moderate signal and may be sufficient. Connect Your Phone Unplug Your Phone from the Wall Jack The MF279T is not used with your home phone wall jack. Note: If you have a cordless phone, keep it plugged into a power outlet.
Connect Your Phone to the Device Plug your phone into the “Phone 1” port on the MF279T, using your existing phone cable or the included phone cable. Note: Do not plug the device into your home phone wall jack. Place a Test Call Place a test call from your connected home phone. Make sure to dial the 10-digit phone number, including area code. For best results, place the cordless phone base at least 12 inches from the MF279T. Important Phone Tips Voicemail is included with your service.
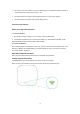
The "Phone 2" port can be used to connect an additional phone or standalone answering machine. It uses the same phone number as the "Phone 1" port. Your MF279T does not support incoming/outgoing fax service or home alarm systems. Your MF279T does not support rotary or pulse-dialing phones. Connect to the Internet Select Your Internet Connection To Connect via Wi-Fi: 1. Open the Wi-Fi network manager on your computer or Wi-Fi enabled device. 2.
Voicemail Your MF279T comes with standard wireless voicemail. Follow the steps below to setup and use your voicemail. Setup Dial 1 on any home phone connected to the MF279T and wait four (4) seconds to connect to your TELUS wireless voicemail. Simply follow the voice prompts to complete setup. To enable remote voicemail retrieval and for added security be sure to create a password during setup.
MF279T Manager The MF279T Manager allows you to easily manage your MF279T. You can: Customize settings Change your Wi-Fi network name and password Check signal strength, data usage, and important messages from TELUS Get help and information To access the MF279T Manager, first connect to your MF279T. In your browser address field, enter http://telus.ztesmarthub or http://192.168.0.1 and log in using "admin".
Note: If you change the operation mode, the device will be restarted automatically. 3. Set the detail parameters for the operation mode. 4. Begin to enjoy your Internet service. Using Your Device Calling Making Calls Using a phone connected to your MF279T, place and receive calls as you normally would. The MF279T supports both cordless and corded phone dialing methods. Note: Make sure to dial the 10-digit phone number, including area code.
Call Waiting You will hear two tones if someone calls while you are already on a call. To hold the current call and accept the waiting call, press the Flash (or Phone/Talk) key. You can press the Flash (or Phone/Talk) key anytime to switch back and forth between calls. To clear the current call and accept the waiting call, enter "1" and press the Flash (or Phone/Talk) key. To reject (User Busy) the waiting call, enter "0" and press the Flash (or Phone/Talk) key.
Forward when unanswered 1. Press *61* on your connected phone. 2. Dial the 10-digit number to which you wish to forward your calls. 3. Press “#” key. (Example: *61*1234567890**10# forwards your calls to the phone number 123-456-7890, if you don't answer the calls for 10 seconds.) 4. Wait for 3 seconds until you hear a confirmation tone for the forwarding process to complete before hanging up. Note: Press #61# to un-forward calls. Forward when unreachable 1. Press *62* on your connected phone. 2.
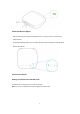
Connect WPS devices Wi-Fi Protected Setup (WPS) allows WPS-enabled devices to be connected to a Wi-Fi network without having to type a Wi-Fi password. 1. With the MF279T powered on, press and hold the WPS button for one (1) second. 2. Within two (2) minutes, press the WPS button on the wireless device you want to connect. 3. Your MF279T and the wireless device will communicate and establish the connection.
Note: Actual billed usage can be higher than the estimated data usage displayed in the usage meter. Helpful Tips Home Answering Machines If you choose to use your home answering machine instead of the voicemail provided by your MF279T, you will need to set your answering machine to pick up calls before network voicemail, which is fewer than four (4) rings. If you have a standalone answering machine, you can connect it to the "Phone 2" port on the back of your MF279T.
Important Information Power Outages The MF279T has a back-up battery in the event of a power outage with talk time of approximately XXX minutes and standby time of approximately XXX hours depending on environmental factors. In the event of a power outage (commercial power no longer being available), the MF279T will automatically begin using the back-up battery, provided there is sufficient battery charge left. If there is no battery charge at the time of the power outage, the device will not be operable.
In-Home Wiring Interconnecting to home telephone wiring is not necessary, but is possible; however, it is not recommended unless you possess sufficient knowledge of electrical systems. Use with home wiring requires the physical disconnection from other services, including the landline coming into your home. Use of a qualified licensed electrician is highly recommended. Improper installation may result in phone equipment damage or even a fire.
AP isolation: If this setting is enabled, all the wireless client device is completely isolated. Security Mode: The security modes are described below: Mode Description OPEN Authentication and encryption won't be active. There are risks that private information can be intercepted or that the network will be used by unauthorized individuals. WPA2(AES)-PSK A more secure version of WPA with implementation of the 802.11i standard. WPA-PSK/WPA2-PSK Apply both the WPA-PSK and WPA2-PSK schemes.
The following information is displayed for each connected device: Device Name: If you have assigned a name to the connected device, the assigned name will appear. If the device name is unavailable, you will need to refer to the MAC Address to identify your device. MAC Address: A unique network identifier for the connected device. WPS WPS, or Wi-Fi Protected Setup, is a standard that allows easy establishment of a secure wireless home network. This feature is set to Enable by default.
Network Selection In My router section, select LTE (or other network type) Settings >Network Selection. You can set the device to search for the network automatically. Automatic: The device will search for the available network automatically. 4G Only: The device searches for 4G network only. Click Apply to confirm your configuration. APN In My router section, select LTE (or other network type) Settings > APN. The APN parameters are shown in the following figure.
To add a new APN profile, follow the steps below: 1. Select Manual mode in the figure above. 2. Click Add New to access the following figure. 3. Enter the related parameters (please see following table), and then click Apply to add a new profile. Parameter Function Mode If a fixed APN is provided by your service provider, select Manual APN. Otherwise, please select Auto APN, and the device will automatically obtain parameters. Profile Shows the profile. Profile Name Type the profile name.
APN Type the APN string. Authentication Password Authentication Protocol (PAP) provides a simple method without encryption for the peer to establish its identity using a 2-way handshake. Challenge-Handshake Authentication Protocol (CHAP) is used to periodically verify the identity of the peer using a 3-way handshake. User Name User name is used to obtain authentication from the ISP when the connection is established.
MAC-IP Bind Switch: Select "Enable" to bind IP Address and MAC Address on your device. MAC Address: The MAC Address is a network identifier. This read-only field displays the MAC Address for the Wi-Fi interface on this device. IP Address: The IP address for this device, as seen from the local network. This is set to a default value. Current Bind List: Lists any MAC-IP Bind you have bound. Firewall A firewall protects your connected devices against malicious incoming traffic from the Internet.
MAC Address: A network identifier unique to each device's hardware. Source IP Address: The source IP address that traffic will be filtered from. Destination IP Address: The internal IP address where traffic will be filtered to. Protocol: You can select from None/TCP/UDP/ICMP as the traffic type you would like to filter. Action: Selecting Drop or Accept will determine if the rule will allow or block traffic based on the criteria specified.
DMZ The DMZ, or De-Militarized Zone, is a selected internal IP address of a device that allows full access and connectivity from outside traffic, through the firewall, to a specific internal device without being filtered or blocked by the MF279T. DMZ Settings: You may choose to enable or disable the DMZ setting here. DMZ is set to Disable by default. DMZ IP Address: Enter the internal IP address of the desired device that will be directly accessible from outside the firewall.
Troubleshooting General Problem Possible Solution None of the LEDs Make sure there is AC power to the MF279T. Do not connect to an AC are illuminated outlet controlled by a wall switch. Slide the ON/OFF button to the ON position on the back of the MF279T until the Power light stays solid green. Red signal strength Move your device to another area with sufficient network signal (Green indicator or Blue Signal Strength light).
Caller Number ID only Like all wireless services, only the calling number is displayed with Caller ID. Your home phone may support the display of names stored in its contacts memory. My answering machine won't pick Set your answering machine settings to pick up calls before network voicemail, which is approximately four (4) rings. up calls Poor voice quality Use the phone cable included with the MF279T. Make sure all connections are firmly in place.
(not dial tone) when I try to place a call Internet Problem Possible Solution Can't access Make sure your MF279T is powered on. Slide the ON/OFF button to the ON the Internet position until the Power light stays solid green. For Wi-Fi: Make sure your MF279T is located in the general area of your Wi-Fi enabled device(s). Check that your device is connected to the MF279T Wi-Fi network (e.g. ZTE MF279T/2.4GXXXX) and you are using the correct Wi-Fi Password.
Can't access Make sure you are trying to access on a device that is currently connected to the MF279T your MF279T either via Wi-Fi or Ethernet connection. Manager Make sure you have entered the correct URL (http://telus.ztesmarthub or http://192.168.0.1) directly into your browser address field on your connected device. Make sure you have entered the correct login, either "admin" or your customized login.
Radio Frequency (RF) Exposure Your device contains a transmitter and a receiver. When it is ON, it receives and transmits RF energy. When you communicate with your device, the system handling your connection controls the power level at which your device transmits. Important safety information regarding radiofrequency radiation (RF) exposure. To ensure compliance with RF exposure guidelines the device must be used with a separation from the body.
IC This radio transmitter (identify the device by certification number, or model number if Category II) has been approved by Industry Canada to operate with the antenna types listed below with the maximum permissible gain and required antenna impedance for each antenna type indicated. Antenna types not included in this list, having a gain greater than the maximum gain indicated for that type,are strictly prohibited for use with this device.
définies pour un environnement non contrôlé. Afin d'éviter la possibilité de dépasser les limites d'exposition aux fréquences radio de la CNR-102, la proximité humaine à l'antenne ne doit pas être inférieure à 20 cm (8 pouces) pendant le fonctionnement normal. CTIA Do not disassemble or open, crush, bend or deform, puncture or shred.
This warranty only applies if the product has been used in accordance with the manufacturer's instructions under normal use and with reasonable care. What this warranty does not cover: a) Defects or damages resulting from the misuse of this product.
Version No. : R1.