TELSTRA MF65 TELSTRA PRE-PAID 3G WI-FI USER MANUAL Telstra MF65 User Manual v1.
CHECK YOUR SYSTEM REQUIREMENTS Your Wi-Fi router will connect to any device that supports Wi-Fi, 802.11 b/g/n A web browser is required to log in to your Wi-Fi router if you wish to make any configuration changes. USB driverless connection is also supported for Windows, MAC and LINUX operating systems: • Windows 8 (not including RT) / 7 / XP / Vista • MAC OS X 10.5.11 and above • Linux Using the USB connection requires administrator rights to install and run the software.
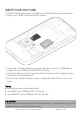
INSERT YOUR USIM CARD 1. Slide the back cover down to access the USIM and memory card slots. 2. Insert your USIM card carefully as shown: 3. If you want to add a memory card you can do it now. Your USB device supports up to 32GB microSD(HC)™ memory. 4. Insert the battery with the gold contacts lined up with the gold springs and slide the cover back on. 5. You are now ready to power up your device and you’ll be on-line in no time.
POWER UP YOUR WI-FI HOTSPOT Press and hold the Power key for 3-4 seconds until the lights flash. The Wi-Fi hotspot will start up in a few seconds. Check the condition of your Wi-Fi hotspot as shown by the LED indicators.
Connection example for Windows 7 computer: 1. On your task bar, next to the clock, click on the Network Interface icon 2. Click on the Wireless device TPPWF_xxxxxx 3. Enter the password exactly as shown on your security card 4. With Connect Automatically enabled your computer will remember the password and connect to your Wi-Fi device when it is on and in range. Handy hint It is also possible to connect via USB connection. See later for details.
DEVICE HOMEPAGE Open a browser and go to 192.168.0.1 to access the device homepage. The default administrator login password is ‘password’ HOMEPAGE ICONS Network signal strength. 2G or 3G technology is also displayed. No USIM or invalid SIM card (PIN, PUK, or Network locked) will result in Disconnected status. Check your SIM card is active, valid and inserted correctly. Number of devices connected via Wi-Fi Number of new SMS messages Charging and Battery status Data usage and connection time.
CONFIGURE YOUR DEVICE USING THE WEB INTERFACE CONNECTION The Connection tab shows the summary device status, how many devices are connected by Wi-Fi and whether you are connected to the mobile broadband network. • The device will automatically connect to the network so it shows the Disconnect button status by default. • To change this behaviour press Disconnect first, then go to Settings > Network Settings > WAN Connection Mode, and select Manual.
SETTINGS > QUICK SETTINGS: Step through the Quick Settings wizard to quickly review your current default settings. Telstra MF65 User Manual v1.
NETWORK SETTINGS > WAN CONNECTION MODE: • The default connection setting will automatically connect to the network. The setting is greyed out if you are connected. • Press the Disconnect button to change this setting and to enable International Roaming if required. • If you make any changes, press Apply to save the change • Press the Help icon to get in context tips. Telstra MF65 User Manual v1.
SETTINGS > NETWORK SELECTION: • • • • • Network Selection is set to Automatic. You can change to 3G or 2G only. Press the Disconnect button to change this setting if required. If you make any changes, press Apply to save the change Press the Help icon to get in context tips. Normally there is no need to change these settings unless you change service provider. • The device is locked to Telstra. If you use a SIM card from another provider you may not be able to connect to the network.
SETTINGS > APN: • Press the Disconnect button on the device home page to change this setting if required. • Press Add New to create a new APN • Add the Profile Name, eg Telstra WAP • Enter the correct APN details eg telstra.wap • Press Save to save your new APN • Press the Profile drop down box • Select the new APN profile • Click on ‘Set as default’ to set the new APN as your preferred setting • Press the Help icon to get in context tips. Telstra MF65 User Manual v1.
• Normally there is no need to change these settings unless you change service provider. • The device is locked to Telstra. If you use a SIM card from another provider you may not be able to connect to the network. • Consult your new carrier to obtain alternate APN details for your device. SETTINGS > DEVICE SETTINGS > ACCOUNT MANAGEMENT • Use the Account Management settings to change the administrator password if required. • The default password is password.
SETTINGS > DEVICE SETTINGS > USIM PIN MANAGEMENT: • Press the Disconnect button on the device home page to change the PIN settings if required. • Enter your current PIN code to change or disable the PIN • If you make any changes, press Apply to save the change • If you enter the incorrect PIN code three times in succession you will lock your USIM card. • Contact your service provider to obtain your PUK code SETTINGS > DEVICE SETTINGS > RESET Press Reset to restore your original factory settings.
SETTINGS > DEVICE SETTINGS > POWER SAVE • If there is no Wi-Fi traffic detected then the device will switch off Wi-Fi as determined by the Wi-Fi sleep setting. SETTINGS > DEVICE SETTINGS > SOFTWARE UPDATES • Press Check Now to check for updates for your device. Telstra MF65 User Manual v1.
SETTINGS > FIREWALL > PORT FILTERING Telstra MF65 User Manual v1.
• Select Enable to turn on the Port Filtering settings • You can apply filters based on MAC Address, Source IP Address, Destination IP Address and select the action to drop or accept the packets. • Firewall settings are for advanced users and network administrators. • Press the Help icon to get in context tips. SETTINGS > FIREWALL > PORT FORWARDING • Select Enable to turn on the port forwarding settings.
SETTINGS > FIREWALL > PORT MAPPING • Select Enable to turn on the port mapping settings. • Port mapping can be used to allow a specific external server or computer access to your machines located on your LAN. Typical applications will be for multi party gaming, requiring specific control and communications channels between the remote server and the local machine.
SETTINGS > FIREWALL > SYSTEM SECURITY • Enable or Disable Remote Management (via WAN) and PING • Firewall settings are for advanced users and network administrators.
SETTINGS > ROUTER SETTINGS Telstra MF65 User Manual v1.
SMS > DEVICE SMS OR USIM SMS • Click New to write a new SMS • Click in the top box to add Contacts • You can enter Contact names in the Contacts field and the device will search and list applicable matches • Click in the bottom box to type your message • Press the Send button when done • Threaded messages (messages sent and received to the same Contact) are displayed in the main panel.
PHONEBOOK • Click Phonebook to view your USIM card contacts. • Contacts are automatically read into the device but you can also copy and save on your device. • Select the Contact to view more details, click Edit to make any changes, then select the Save location as Device. • Contacts stored on the device can include additional fields. • Select New to create a new contact and choose the save location as Device or SIM card. Telstra MF65 User Manual v1.
SD CARD • Enable Web Share to share the contents of your SD card with other users connected to your device. • Read only or Read / Write access can be configured. • Custom sharing can be enabled to restrict access to certain paths. • Press the Web Share button to view all the files. Telstra MF65 User Manual v1.
INFORMATION > DEVICE INFORMATION • View the device IMEI number, Signal strength and other details. Telstra MF65 User Manual v1.
INFORMATION > RECORD • View your data usage on the Record tab. • Data usage is approximate and your carrier may charge you different data block sizes so their records and charges are likely to be different. • Typical carrier data is charged in 1MB blocks. • Contact your carrier for more details. USB INSTALLATION FOR TETHERED CONNECTION You can also connect your device via the USB lead provided. The installation software is pre-loaded onto your USB device.
USB INSTALLATION NOTES • The installation will create a new shortcut on your desktop and a new program listing under Start-Programs • If you have problems with the installation please contact your supplier or see our website, zte.com.au for more assistance and FAQ’s or call our hotline on 1300 789 475 available between 9am and 5pm AEST. • If you can’t connect to the internet check your SIM card is inserted correctly, contact your service provider and check your account is active.
microSD™ MEMORY CARD If you use a microSD™ memory card in your device your computer will display a removable disk drive. You can use the device as an external drive to store and transfer files. microSD™ cards supported to 2GB are FAT 16 format. microSDHC™ cards supported to 32GB are FAT 32 format. If using a memory card use the Safe Removal of Hardware process or Eject the device. Consult your operating system guidelines. Telstra MF65 User Manual v1.
TROUBLESHOOTING If you have any problems with your connection or device please consult the manual and check this section. If the problem still exists contact your service provider or check our website for more details at zte.com.au Problem Possible Causes Suggested Solution I cannot connect via Wi-Fi Security settings, password has been changed. SIM card requires a PIN or PUK number. Check the security settings SSID and Password shown on your Security Card.
Problem Possible Causes Suggested Solution The battery goes flat even though I am connected to the charger The internal device temperature exceeds 45C so battery charging is shut down for safety reasons. Switch off the device and allow it to cool down. Operate the device in a cooler environment. PRECAUTIONS AND SAFETY INFORMATION • Some electronic devices are susceptible to electromagnetic interference.
outside. In such cases there could be condensing moisture inside the device which can cause internal damage. Unplug the device and leave it for 30 minutes before use. • Always handle the device with care. Be careful not to drop or bend the device. • There are no user serviceable parts inside the device. Unauthorised dismantling or repair will void the warranty. RF SAFETY INFORMATION The wireless device has an internal antenna.
TECHNICAL SPECIFICATIONS Network compatibility Dimensions UMTS 850, 2100 MHz GSM 850, 900, 1800, 1900 MHz 102 x 50 x 13.7mm. Approx 75g Data Rates* HSPA+ Mode up to 21.6Mb/s HSPA+ Mode up to 5.76Mb/s 5V Resting: 100mA rms. Nominal 500mA rms Max: 700mA rms Windows 8 (not RT), 7, XP SP3, Vista MAC OS X 10.