Available applications and services are subject to change at any time.
Table of Contents Get Started 1 Your Device at a Glance 1 Set Up Your Device 2 Activate Your Device 3 Sprint Account Information and Help 3 Sprint Account Passwords 4 Manage Your Account 4 Device Basics 5 Your Device’s Layout 5 Specifications 7 Connecting Your Device 7 Turn Your Device On and Off 8 Turn Your Screen On and Off 8 Touchscreen Navigation 9 Your Home Screen 10 Home Screen Overview 10 Customize the Home Screen 10 Status Bar 11 Enter Text 12 Android Keyboard
Google Play Store 21 Find and Install an App 21 Create a Google Wallet Account 22 Request a Refund for a Paid App 22 Open an Installed App 23 Uninstall an App 23 Get Help with Google Play 23 Google Maps 24 Music 24 Music Player 24 Google Play Music App 26 Google Play Movies & TV App YouTube 28 28 Web and Data 29 Wi-Fi 29 Turn Wi-Fi On and Connect to a Wireless Network 29 Check the Wireless Network Status 30 Connect to a Different Wi-Fi Network 30 Browser 30 Launch the Web
Add a VPN Connection 39 Connect to or Disconnect from a VPN 40 Bluetooth Tethering 40 Mobile Hotspot 41 Set Up Mobile Hotspot 41 Connect to Mobile Hotspot 41 The Wi-Fi Hotspot Settings Menu 41 Show SSID Password in Hotspot Widget 42 Manage Users 42 WPS 43 Pictures and Video View Pictures and Videos Using Gallery 44 44 Open or Close Gallery 44 View Pictures and Videos 44 Zoom In or Out on a Picture 45 Watch Video 45 Share Pictures and Videos 45 Send Pictures or Videos Using Bl
Unmount the microSDHC Card 54 Use the Device’s microSDHC Card as a USB Drive 54 Transfer Files Between Your Device and a Computer 55 Update Your Device 56 Update Your Device Firmware 56 Update Your Android Operating System 57 Update Your Profile 57 Update Your PRL 57 Settings 58 Airplane Mode 58 Wi-Fi Settings 58 Bluetooth Settings 59 Mobile Networks 59 Enable Data Services 59 Data Usage Settings 60 Wi-Fi Hotspot Settings 60 More Settings 61 VPN Settings 61 Bluetooth Teth
Android Keyboard Settings 66 Swype Settings 66 TouchPal Keyboard Settings 66 Text-to-Speech Output Settings 66 Pointer Speed 67 Storage Settings 67 Internal Memory 67 SDHC Card Storage 67 Battery Settings 68 Apps 68 Connect to PC 68 Location Access 69 Security Settings 69 Screen Lock 69 Owner Information 71 Encrypt device 71 Encrypt External SDHC Card 71 Make Passwords Visible 72 Device Administrators 72 Unknown Sources 72 Verify Apps 72 Credential Storage 72 Back
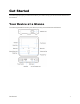
Get Started The following topics give you all the information you need to set up your device and wireless service the first time. Your Device at a Glance The following illustrations outline your device’s primary external features and buttons.
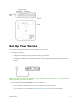
Set Up Your Device You must first charge the battery to begin setting up your device. 1. Charge your battery. l l Plug the AC adapter into the power socket on your device. Plug the AC adapter into an electrical outlet. Fully charging a battery may take up to three hours. Note: Your device’s battery should have enough charge for the device to turn on. You should fully charge the battery as soon as possible. 2. Press and hold the Power Button to turn the device on.
Activate Your Device Follow the instructions below to activate your device if it has not already been activated. Depending on your account or how and where you purchased your device, it may be ready to use or you may need to activate it on your Sprint account. n n If you purchased your device at a Sprint Store, it is probably activated and ready to use. If you received your device in the mail and it is for a new Sprint account or a new line of service, it is designed to activate automatically.
Sprint Account Passwords You will need to create passwords to protect access to your personal account information, your data services account. As a Sprint customer, you enjoy unlimited access to all your information. Account User Name and Password If you are the account owner, you will create an account user name and password when you sign on to sprint.com/mysprint. (Click Sign in/Register and then click Sign up now! to get started.
Device Basics Your device is packed with features that simplify your life, and it provides you entertainment based on exceptional technology and high standards. The following topics will introduce the basic functions and features of your device. Your Device’s Layout The illustrations and descriptions below outline your device’s basic layout.
Key Functions n n Indicator displays charging status. Touchscreen displays all the information needed to operate your device, such as the shortcuts and widgets, and the date and time. It also provides one-touch access to all of your features and applications. n Back Key lets you return to the previous screen, or close a dialog box, options menu, the Notifications panel, or onscreen keyboard. n Home Key returns you to the Home screen. Press and hold to open the recently-used applications window.
n Power Bank Button allows you to charge other devices. n Reset Button allows you to reset your device. n Card Slot allows you to install and remove a microSDHC card or Micro-SIM card. n Adjust Focus Wheel lets you to adjust the focus of the projector. n Projector Lens lets you project your device’s display. CAUTION! Inserting an accessory into the incorrect jack may damage the device. Specifications The table below shows the device’s physical specifications. Feature Description Dimensions 4.
Turn Your Device On and Off The instructions below explain how to turn your device on and off. Turn Your Device On n Press and hold the Power Button. Turn Your Device Off 1. Press and hold the Power Button to open the device options menu. 2. Touch Power off to turn the device off. Your screen remains blank while your device is off (unless the battery is charging).
Note: For information on how to adjust the time before the screen turns off, see Sleep. Turn the Screen On and Unlock It 1. To turn the screen on, touch 2. Touch and hold l on the touchscreen. at the center of the screen. If you have set up a different screen lock, you will be prompted to draw the pattern or enter the password or PIN. See Screen Lock. Touchscreen Navigation Your device’s touchscreen lets you control actions through a variety of touch gestures.
Your Home Screen The home screen is the starting point for your device’s applications, functions, and menus. You can customize your home screen by adding application icons, shortcuts, folders, widgets, and more. Home Screen Overview Your home screen extends beyond the initial screen. Swipe the screen left or right to display additional screens. Tip: Touch to return to the main home screen from any other home screen. Customize the Home Screen Learn how to add, move, or remove items from the home screen.
Move or Remove Items on the Home Screen n Touch and hold the item you want to move or remove from the home screen. l To move the item, drag it to a new area and release it. l To remove the item, drag it to the at the top-left of the screen and release it. Note:Removing an item from the home screen will not remove it from your apps list. Status Bar The Status bar at the top of the home screen provides device and service status information on the right side and notification alerts on the left.
Icon Notification USB connection Enter Text You can type on your device using one of the available touchscreen keyboards. Android Keyboard The Android Keyboard provides a layout similar to a desktop computer keyboard. n Touch the alphabetic keys to enter letters. Touch and hold specific keys to enter associated accented letters or numbers. For example, to enter è, touch and hold accented letters appear, slide your finger to choose è and release. n Touch to use uppercase.
Swype The Swype™ keyboard lets you enter words by drawing a path from letter to letter in one continuous motion. When you lift your finger after the last letter of a word, a space is automatically added. n Touch the alphabetic keys to enter letters. Touch and hold a key to enter the number or symbol located on the top of the key. Keep holding the key to bring up a series of characters available on that key, including associated accented letters, symbols or numbers.
n Touch to start a new line. n Touch and hold to open the Swype settings. To enter text via Swype: Move your finger from letter to letter to trace a word without lifting the finger until you reach the end of the word. To enter the word “here”. Put your finger on “h”, and without lifting, slide it to “e”, and then to “r”, and back to “e”. When complete, lift your finger off the screen and the matched words are displayed.
n Touch the alphabetic keys to enter letters. n Touch n Slide right on prediction. n Touch and hold n Touch to use uppercase or lowercase. Double-tap to lock uppercase. to enable word prediction. Slide left on to disable word to change the input language or TouchPal keyboard settings. to enter digits, symbols, emoticons and other pre-defined texts. Touch more. Touch to find to go back to enter letters. n Touch n Touch or hold n Touch n Touch to open text editing options.
Projector Use the projector embedded in your device to project your device’s display onto large surfaces. Project a File Saved in Your Device You can project the file storage on your device. 1. Touch the Projector Key to turn on the projector. 2. Open the file you want to project. 3. Adjust the projection distance and place the device on a flat surface. Note: For best results, project onto a flat screen at a 90° angle to the floor. 4.
Note: Don't look directly into the lens when the projector is on. Project an HDMI Source You can project the HDMI source via connecting with a PC or TV Box. 1. Connect your device with your PC or TV Box via a HDMI cable. 2. Touch the Projector Key 3. Touch to turn on the projector. > from the Home screen. 4. Operate your PC or TV Box to select the program you want to view. Project a File Saved in Your USB Device You can project the file storage on your USB device. 1.
5. When you see the name of your device displayed in the avaliable devices section, touch the name. The phone then automatically tries to pair with your device. 6. Touch Accept on your device. After successful connection, the contents in your phone will be displayed on the Projector. 7. Choose the content you want to display.
Accounts With wireless service, you have the opportunity to share information through many different channels and accounts. Google You will need a Google Account to access several device features such as Google Maps, and the Google Play applications. Before you are able to access Google applications, you must enter your account information. These applications sync between your device and your online Google Account.
should you ever encounter problems or forget your password. It is strongly encouraged for Android users so you can regain access to Google services and purchases on your device. 7. On the Finish account screen, select your Web history and additional Google Play options and then touch . 8. Enter the letters from the Authenticating screen and then touch . 9. After your device connects with the Google servers, select the items you would like to sync with your device and then touch .
Apps and Entertainment All your device’s features are accessible through the Apps list. Note: Available applications and services are subject to change at any time. Google Play Store Google Play™ is the place to go to find new Android apps, books, movies, and music for your device. Choose from a wide variety of free and paid content ranging from productivity apps and games to bestselling books and blockbuster movies and music.
l Search for an app. Touch app to search for it. on the Google Play home screen and enter the name or type of 4. Touch an app to read a description about the app and user reviews. 5. Touch INSTALL or DOWNLOAD (for free applications) or the price (for paid applications). Note: You need a Google Wallet account to purchase items on Google Play. See Create a Google Wallet Account to set up a Google Wallet account if you do not have one. 6.
1. Touch > 2. Touch > My apps > INSTALLED tab. > Play Store . 3. Touch the app you want to uninstall for a refund. The details screen for the app opens. 4. Touch REFUND. Your app is uninstalled and the charge is cancelled. Open an Installed App There are options for opening an installed app. > locate the app, and then touch the icon. 1. Touch > > Play Store 2. Touch > My apps > INSTALLED tab. n Touch – or – . 3. Touch the app and then touch OPEN to open it.
Google Maps Use the Google Maps app to determine your location, find directions, browse local businesses and attractions, rate and review places, and more. Enable Location Services on Your Device Before using any location-based services, you must enable your device’s GPS location feature. For more information about location services, see Location Access. Launch Google Maps n Touch > > Maps . If GPS is enabled, the GPS icon bar and blink until the device connects with GPS.
Note: For information about loading music onto your device, see Transfer Files Between Your Device and a Computer. Listen to Music Using the Music Player 1. Touch > > Music . 2. Your device will find the audio files in the microSDHC card and the device storage. 3. Flick the left of the screen to select Albums / Artists / Songs / Playlists / Folders / GenreList to view the songs you want to play. 4. Touch a song from the list to start playing it in the music player.
Create a Playlist Music playlists help you organize your music files. 1. Touch 2. Touch the > > Music . icon beside a music file in the music library. 3. Touch Add to playlist > New. 4. Enter the playlist name and touch Save. Manage Playlists You can play, rename or delete the playlists, or add more songs to a playlist. 1. Touch > > Music . 2. Touch Playlists on the left of the screen to view all music playlists. 3. Touch the icon beside a playlist to open the options menu. 4.
Play Music with Google Play 1. Touch > > Play Music . 2. Touch > My library, select GENRES / ARTISTS / ALBUMS / SONGS and view the songs you want to play. 3. Touch a song in your library to listen to it. Note: Adjust the volume with the Volume Keys. You can touch to view more player options. The following options of the music player are available: Create a New Playlist Music playlists help you organize your music files. 1. Touch > > Play Music . 2.
Google Play Movies & TV App The Google Play Movies & TV app lets you connect to Google Play, download a movie or TV show, and then watch it instantly. Choose from thousands of movies and TV shows, including new releases and HD titles, and stream them on your Android device. Previously rented or purchased titles are automatically added to your library across your devices or other Android devices. For more information about Google Play Movies & TV, visit play.google.com/about/movies. 1.
Web and Data Your device’s data capabilities let you wirelessly access the Internet or your corporate network through a variety of connections, including Wi-Fi, 4G, 3G, hotspot and Virtual Private Networks (VPN). The following topics address your device’s data connections and the built-in Web browser. Additional data-related features can be found in Accounts, Apps and Entertainment, and Tools. Wi-Fi Wi-Fi provides wireless Internet access over distances of up to 300 feet.
Note: Wi-Fi networks are self-discoverable, which means no additional steps are required for your device to connect to a Wi-Fi network. It may be necessary to provide a user name and password for certain closed wireless networks. Check the Wireless Network Status Check the status of your current wireless network, including speed and signal strength, through the Wi-Fi settings menu. 1. Touch > (Settings) > Wi-Fi. 2. Touch the wireless network that the device is currently connected to.
Learn to Navigate the Browser Navigating through menus and websites during a data session is easy once you have learned a few basics. Scrolling As with other parts of your device’s menu, you’ll have to drag up and down to see everything on some websites. To scroll through a website’s page: n In a single motion, touch and drag across or up and down a page. Selecting To select onscreen items or links: n Touch an item or touch an onscreen link to select the link.
Go to a Web Page 1. Touch the Address field (top of the browser window) and enter a new Web address. l As you enter the address, possible matches are displayed within an onscreen list. Touch an entry to launch the desired website. 2. Touch Go to launch the new page. Browser Menu The browser menu offers additional options to expand your use of the Web on your device. Open the Browser Menu The browser menu may be opened anytime you have an active data session, from any page you are viewing. 1.
1. Touch > (Browser) and navigate to a Web page. 2. Touch and hold to the area of the page containing the desired text. 3. Drag the tabs on either side of the selected text to adjust the highlighted text. 4. Select an option: l SELECT ALL to select all of the highlighted text. l COPY to copy the selected text. l SHARE to share the selected text via Bluetooth, Drive, etc. l Find to search for all instances of the selected text in the current Web page.
l l l o Form auto-fill: Allows the device to store form data so that it can fill out similar forms in Web pages for you automatically. Remove the checkmark to disable this function. o Auto-fill text: Set the form data for the auto-fill function. Privacy and security o Clear cache: Deletes all currently cached data. Touch OK to complete the process. o Maintain history: Check this option to allow the device to keep a record of your browsing history.
l l o Set search engine: Set the search engine you want to use when entering keywords in the Address field for searching. o Enable JavaScript: Enables javascript for the current Web page. Without this feature, some pages may not display properly. Remove the checkmark to disable this function. o Enable plug-ins: Allows you to determine the way your device handles program enhancements. Select Always on, On demand, or Off. o Website settings: Views advanced settings for individual websites.
1. Touch > (Browser). 2. From any open Web page, touch > Settings > Advanced > Website settings. 3. Select the settings you want to configure for the current website. Reset the Browser to Default You always have the option to restore your browser to its default settings. 1. Touch > (Browser). 2. From any open Web page, touch > Settings > Advanced > Reset to default. 3. Touch OK to complete the process. Set the Browser Home Page Customize your Web experience by setting your browser’s home page.
l l l BOOKMARKS: Displays a list of your current Web bookmarks. HISTORY: Displays a record of your browsing history. These records are organized into folders such as: Today, Yesterday, 5 days ago, and 1 month ago. SAVED PAGES: Displays a list of Web pages that you saved previously. Touch an entry to display it. 2. Touch Add bookmark. 3. Enter a descriptive name for the new bookmark and touch OK to store the new entry to your Bookmarks list. Create Bookmarks from Other Tabs 1.
Note: The availability and range of the network depends on a number of factors including your distance to a base station, and infrastructure and other objects through which the signal passes. Set Your Network Options 1. Touch > (Settings) > Mobile networks > Network Mode. 2. Select LTE/CDMA or CDMA. The device will scan for the best available Sprint network and will automatically connect to it.
Icon Notification 3G (data service): Your phone is connected to the 3G network. When the icon is blue, your phone is transferring or receiving data. Virtual Private Networks (VPN) From your device, you can add, set up, and manage virtual private networks (VPNs) that allow you to connect and access resources inside a secured local network, such as your corporate network.
l l Information may include Name, Type, Server address, PPP encryption (MPPE), and advanced options. Set up all options according to the security details you have obtained from your network administrator. 3. Touch Save. The VPN is then added to the VPNs section of the VPN settings screen. Connect to or Disconnect from a VPN Once you have set up a VPN connection, connecting and disconnecting from the VPN is easy. Connect to a VPN 1. Touch > (Settings) > More… > VPN. 2.
4. Check Bluetooth tethering. Your computer is now sharing your device's data connection. 5. To stop sharing your data connection, uncheck Bluetooth tethering. Mobile Hotspot Mobile Hotspot allows you to turn your device into a Wi-Fi hotspot. The hotspot feature works on both 4G LTE Spark or 3G CDMA based on availability. Set Up Mobile Hotspot Use the settings menu to enable or disable your device’s Wi-Fi hotspot capabilities. 1. From the Home screen, touch 2. Touch . to activate the service.
1. From the Home screen, touch > . 2. Touch Set up Wi-Fi hotspot to set up your hotspot options. l Network SSID: Enter or edit a network SSID (name) that other devices see when scanning for Wi-Fi networks. l Broadcast SSID: Set whether to broadcast the name of the network. l Channel: Select the channel of the Wi-Fi hotspot. l Security: Choose a security option: Open (not recommended), WPA PSK or WPA2 PSK (other users can access your mobile hotspot only if they enter the correct password).
WPS If your client device supports WPS, you don’t have to input the password manually after WPS has been available. 1. From the Home screen, touch 2. Touch . to start Wi-Fi Protected Setup authentication process. 3. Enable the WPS function on your client to respond this authentication process. 4. Follow the system prompts on your client to finish the connection. Note: If the current security mode of the device is OPEN, the WPS function is useless.
Pictures and Video Using the Gallery application, you can view pictures and watch videos that you’ve downloaded. View Pictures and Videos Using Gallery For pictures that are on your storage card or device memory, you can do basic editing such as rotating and cropping. You can also easily assign a picture as wallpaper and share pictures with your friends. Open or Close Gallery The Gallery app opens in the Albums tab where your pictures and videos are organized by albums for easy viewing.
1. Touch > > Gallery . 2. Touch an album (such as Bluetooth), and then touch a thumbnail to view the picture or touch to browse the album contents in a slideshow. After selecting an album from the Albums tab, you can browse through the pictures and videos of that album. Touch a picture or video to view it in full screen. By default, the pictures and videos in an album are displayed in grid view.
Send Pictures or Videos Using Bluetooth You can select several pictures, videos, or both and send them to someone’s device or your computer using Bluetooth. 1. Touch > > Gallery . 2. Touch the album that contains the pictures or videos you want to share. 3. Touch the pictures or videos you want to share. l To select multiple items, touch and hold an image to turn on multiple select. Touch all the items you want to include. 4. Touch and then on the Share menu, touch Bluetooth. 5.
1. Touch > > Gallery . 2. Touch the album that contains the videos you want to share. 3. Touch and hold the videos you want to share. l To select multiple videos, touch and hold an image to turn on multiple select. Touch all the videos you want to include. 4. Touch and then on the Share via menu, touch YouTube. 5. Touch the account that you want to sign in with. 6. Enter the prompted information, such as description and tags, and select a privacy option. 7. Touch Upload.
Tools Learn how to use many of your device’s productivity-enhancing features. Power Bank Power Bank allows you to charge other devices. Charging Other Devices when Power on Follow the steps below to charge other devices. 1. Connect your device with your phone or other devices via a USB cable. 2. Press and hold the Power Bank Button until the Power Bank icon bar. is displayed in the status Note: Projector and Power Bank can’t be enabled at the same time.
3. Touch and hold an item to access options such as copy, move, share or delete. 4. To copy or move an item, navigate to a new location and touch PASTE. Bluetooth Bluetooth is a short-range communications technology that allows you to connect wirelessly to a number of Bluetooth devices, such as headsets and hands-free car kits, and Bluetooth-enabled handhelds, computers, printers, and wireless devices. The Bluetooth communication range is usually approximately 33 feet.
Connect a Bluetooth Headset or Car Kit You can listen to music over a Bluetooth stereo headset, or have hands-free conversations using a compatible Bluetooth headset or car kit. It's the same procedure as for setting up other hands-free devices. To listen to music with your headset or car kit, the headset or car kit must support the A2DP Bluetooth profile. 1. Touch > (Settings) > Bluetooth. 2. If Bluetooth is not switched on, touch the on/off slider to turn Bluetooth on . 3.
5. If prompted to enter a passcode, try 0000 or 1234, or consult the headset or car kit documentation to find the passcode. 6. If you still cannot reconnect to the headset or car kit, follow the instructions in Disconnect or Unpair from a Bluetooth Device, and then follow the instructions in Connect a Bluetooth Headset or Car Kit. Disconnect or Unpair from a Bluetooth Device You can manually disconnect or unpair from a Bluetooth device through the Bluetooth settings menu. Disconnect a Bluetooth Device 1.
1. Set the receiving device to discoverable mode. You may also need to set it to “Receive Beams” or “Receive Files”. Refer to the device’s documentation for instructions on receiving information over Bluetooth. 2. Open the application that contains the information or file you want to send. For example, if you want to send a picture, touch > > Gallery . 3. Follow the steps for the type of item you want to send: l Pictures and videos (in Gallery).
microSDHC Card A microSDHC™ card is an optional accessory that allows you to store images, videos, music and documents on your device. Insert a microSDHC Card Follow the steps below to insert a microSDHC card into your device. 1. Insert your fingernail into the slot of the card slot cover and lift the cover up gently. 2. Carefully insert the microSDHC card into the slot. 3. Close the cover.
Note: Make sure your battery is fully charged before using the microSDHC card. Your data may become damaged or unusable if the battery runs out while using the microSDHC card. View microSDHC Card Memory The Storage settings menu gives you access to your microSDHC card memory information. n With the microSDHC card inserted, touch available memory space will be displayed.) > (Settings) > Storage.
1. Connect the device to your computer using the supplied USB cable. 2. Drag the status bar down to open the Notifications panel and touch . 3. You will see the Connect to PC window, and then select Media device (MTP). See Connect to PC for details. 4. On your computer, the connected device is recognized as a portable media device. Navigate to this removable disk and open it. You can now copy and move files between the microSDHC card and your computer. 5. After copying the files, unplug the USB cable.
Update Your Device From time to time, updates may become available for your device. You can download and apply updates through the > (Settings) > System updates menu. Update Your Device Firmware You can update your device's software using the Update firmware option. Before Updating Your Firmware Updating your device firmware will erase all user data from your device. You must back up all critical information before updating your device firmware.
Update Your Device Firmware Once you have backed up all your data, use the Update firmware option to update your device firmware. 1. Touch > (Settings) > System updates. 2. Touch Update Firmware. (Your device automatically downloads and installs any available updates. You may be required to power your device off and back on to complete the software upgrade.) Confirm Your Current Device Firmware 1. Touch > (Settings) > About device. 2. Locate the Baseband version read-only field.
Settings The following topics provide an overview of items you can change using your device’s Settings menus. Airplane Mode Airplane Mode allows you to use many of your device’s features, such as Gallery and Music, when you are on an airplane or in any other area where data is prohibited. When you set your device to Airplane mode, it cannot access online information. To quickly turn Airplane mode on or off: n Press and hold the Power Button, and then touch Airplane mode.
l l l Network notification: Get notifications in the status bar when Wi-Fi is on and an open network is available. Keep Wi-Fi on during sleep: Set whether to keep Wi-Fi on in sleep mode. Avoid no internet connections: Only use Wi-Fi networks that have an internet connection. l Wi-Fi frequency band: Specify the frequency range of operation. l Wi-Fi optimization: Automatically minimize battery usage when Wi-Fi is on. l MAC address: Check the MAC address. l IP address: Check the device’s IP address.
Data Usage Settings The Data usage menu lets you view your device’s mobile data usage, set data limits, restrict hotspot usage, and more. To turn Mobile data on or off: n Touch > (Settings) > Data usage and touch the ON/OFF slider. > (Settings) > Mobile networks and touch the Data enabled check box. – or – Touch To set mobile data limit: 1. Touch > (Settings) > Data usage and touch the Set mobile data limit check box. 2. Touch OK. 3.
More Settings The More settings menu provides additional options, including VPN and Bluetooth tethering. VPN Settings Use the VPN Settings menu to set up and manage Virtual Private Networks (VPNs). For details on your device’s VPN settings, see Virtual Private Networks (VPN). Bluetooth Tethering Settings If your computer can obtain an Internet connection via Bluetooth, you can configure your device to share its mobile data connection with your computer. See Bluetooth Tethering.
l Off to turn silent mode off (all sounds are active). l Vibrate to turn off all sounds but keep vibrate on for notifications. l Mute to turn all sounds and vibration off. SRS Sound Enhancement The SRS sound enhancement menu lets you to select SRS sound effects. 1. Touch > (Settings) > Sound. 2. Touch SRS sound enhancement. 3. Turn the SRS sound effects and Volume boost slider on. 4. Touch Stereoscopic to select your preferred SRS music settings from the list.
Vibrate on Touch Set to Vibrate as you touch the screen. 1. Touch > (Settings) > Sound. 2. Touch Vibrate on touch. Display Settings Adjusting your device’s display settings not only helps you see what you want, it can also help increase battery life. Brightness Settings Adjust your screen’s brightness to suit your surroundings. 1. Touch > (Settings) > Display > Brightness. 2. Drag the slider to adjust the brightness to your desired level and touch OK.
Note:A long screen backlight setting will reduce the battery life time. Font Size The Font size settings menu allows you to change the font size of onscreen text, useful for users with sight problems. 1. Touch > (Settings) > Display > Font size. 2. Select your preferred font size from the list. Pulse Notification Light When there is a notification, the LED indicator will light up to remind you. 1. Touch > (Settings) > Display. 2. Touch Pulse notification light.
3. Check Automatic time zone to use the network provided time zone or uncheck it and touch Select time zone, then select one from the list. 4. Touch the Use 24-hour format box if you want to change the time format. 5. Touch Choose date format to select the one you prefer. Language & Input Settings Your device’s language and input settings let you select a language for the device’s menus and keyboards, select and configure keyboard settings, and configure speech input settings.
Default Text Input This menu allows you to set the default input method. 1. Touch > (Settings) > Language & input > Default. 2. Select the input method you want to use, or touch Set up input methods to configure the input method options. Android Keyboard Settings This menu allows you to configure your Android keyboard settings. 1. Touch 2. Touch > (Settings) > Language & input. next to Android keyboard (AOSP) to configure your Android keyboard options.
l l Speech rate: Select how quick you want the synthesizer to speak. Listen to an example: Play a brief sample of the speech synthesizer, using your current settings. Pointer Speed The Pointer speed menu allows you to select how fast the pointer should move when you connect the device with a trackpad or mouse accessory. 1. Touch > (Settings) > Language and input > Pointer speed. 2. Use the sliders to adjust the pointer speed, and touch OK.
Format SDHC Card 1. Touch > (Settings) > Storage. 2. Scroll down the screen, touch Erase SD card > Erase SD card. 3. Touch Erase everything to confirm the process. Battery Settings Monitor your device’s battery usage through this settings menu. View which functions are consuming your battery’s charge and at what percentage. 1. Touch > (Settings) > Battery. 2. View your device’s battery usage statistics. 3. For additional details and settings options, touch a usage category.
n n n Media device (MTP): Use device as USB storage and transfer files when it is connected to Windows PC or Mac. Don’t ask me again: Determines whether to receive the prompts to select the connection type each time you connect the device and the PC. Help: Read the help information. Location Access Your Location Services settings menu lets you select how your device determines its location (using Wi-Fi and mobile networks, Google search, both, or neither). 1. Touch > (Settings) > Location access. 2.
n PIN n Password Important: To protect your device and data from unauthorized access, it is recommended that you use the highest security level available (Password protection). It is also recommended you frequently change your password to ensure the safety of your device and personal data. Use Nothing or a Long Press to Unlock the Screen 1. Touch > (Settings) > Security > Screen lock. 2. Touch None or Long press to save the setting. Use a Screen Unlock Pattern 1.
3. Enter a password, touch Continue, and then enter your password again to confirm it. If you fail to enter the correct password after five attempts, you will be prompted to wait for 30 seconds before you can try again. Important: To protect your device and data from unauthorized access, it is recommended that you use the screen unlock password (highest security). It is also recommended that you frequently change your password to ensure the safety of your device and personal data.
Make Passwords Visible Select whether or not device and application passwords are visible on the screen as you enter them. n Touch visible. > (Settings) > Security, and then check or uncheck Make passwords Device Administrators You can disable the authority to be a device administrator for certain applications. To select device administrators: n Touch > (Settings) > Security > Device administrators, and then select a device administrator to follow the prompts.
1. Touch > (Settings) > Security. 2. Scroll down the screen. l Trusted credentials: Display trusted CA certificates. l Install from SD card: Install certificates from the microSDHC card. l Clear credentials: Delete all certificates. Back Up & Reset Your device’s Back up & reset menu lets you back up your device’s data and settings to Google servers before resetting your device to the original factory settings.
4. Touch Erase everyting. Your device will power down and reset itself, which may take up to 10 minutes. Once the device has reset, it will run through the Hands-Free Activation and update processes again. Accounts The Accounts settings menu lets you add and manage all your Google servers accounts. Set Up a New Account 1. Touch > (Settings) > Add account. 2. Touch Existing. 3. Enter your Gmail username and password, and then touch or Done. 4.
l l l l Accessibility shortcut: Enable this option to get spoken feedback when you touching the screen or pressing the key. Text-to-speech output: Select the speech synthesis engine and configure the text-tospeech settings. Touch & hold delay: Select the time delay for the device to distinguish finger touch and hold gestures. Enhance web accessibility: Enable this option to have the apps install scripts from Google that make their web content more accessible.
n Kernel version: View the kernel version of your device. n SW Version: View the software version of your device. n HW Version: View the hardware version of your device.
Important Safety Information The following topics concern important safety information. FCC Regulations This device complies with part 15 of the FCC Rules. Operation is subject to the following two conditions: (1) This device may not cause harmful interference, and (2) this device must accept any interference received, including interference that may cause undesired operation. This device has been tested and found to comply with the limits for a Class B digital device, pursuant to Part 15 of the FCC Rules.
The exposure standard for wireless employs a unit of measurement known as the Specific Absorption Rate, or SAR. The SAR limit set by the FCC is 1.6W/kg. Tests for SAR are conducted using standard operating positions accepted by the FCC with the device transmitting at its highest certified power level in all tested frequency bands. The FCC has granted an Equipment Authorization for this model device with all reported SAR levels evaluated as in compliance with the FCC RF exposure guidelines.
For those host devices that utilize a USB port as a charging source, the host device's user manual shall include a statement that the phone shall only be connected to CTIA certified adapters, products that bear the USB-IF logo or products that have completed the USB-IF compliance program.
Copyright Information ©2014 Sprint. Sprint and the logo are trademarks of Sprint. Other marks are trademarks of their respective owners. No part of this publication may be quoted, reproduced, translated or used in any form or by any means, electronic or mechanical, including photocopying and microfilm, without the prior written permission of ZTE Corporation. is a trademark of SRS Labs, Inc. TruMedia technology is incorporated under license from SRS Labs, Inc.
Index 4 4G 37 A About Device 75 Accessibility 74 Account Passwords 4 Accounts 19 Add new 74 Manage 74 Settings 74 Activate this Device 75 Activation 3 Airplane Mode 58 Android Keyboard 12 Settings 66 Android OS Update 57 Application Manager 68 Applications 21 Apps 21 Find and install 21 Open 23 Request refunds 22 Uninstall 23 Brightness Settings 63 Browser 30 Bookmarks 36 Go to a website 33 Home page 36 Launch connection 30 Menu 32 Navigate 31 Reset 36 Select text on a Web page 32 Settings 33 Website setti
F Factory Data Reset 73 FCC Regulations 77 FCC RF Exposure Information 77 File Manager 48 Files Transfer between phone and computer 55 Flick 9 Font Size 64 Format SD Card 68 Front Key Light 64 G Gallery 44 Close 44 Open 44 View pictures and videos 44 Gestures 9 Gmail Create account 19 Google 19 Create account 19 Sign in 20 Google Maps 24 Google Music Create Playlist 27 Google Play Find and install apps 21 Help 23 Movies & TV 28 Store 21 Google Play Music 26 Google Wallet 22 GPS Satellites 69 H Haptic Feedba
Notification Icons 11 Notifications 11 S O Open or Close Gallery 44 Owner Information 71 P Passwords Make visible 72 Personal Dictionary 65 Phone Illustration 1 Phone Layout (illustration) 5 Phone Memory 67 Phone Update Android OS 57 Firmware 56 PRL 57 Profile 57 Picasa Share pictures 46 Pictures Share via Bluetooth 46 View 44 Zoom 45 Picures Share via Picasa 46 Pinch 9 Play Music 26 Play Store 21 Find and install apps 21 Pointer Speed 67 Power Bank 48 Power Button 6 Power Off 8 Power On 8 PRL Update 57 P
Tools 48 Touch 9 Touch and Hold 9 Touch Sounds 62 Touchscreen Keyboard 14 Navigation 9 Turn off 8 Turn on 9 Turn Device Off 8 Turn Device On 8 Turn Device On and Off 8 Turn Screen On and Off 8 Typing 12 WPS 43 Y YouTube 28 Share videos 46 Z Zoom 9 U Unknown Sources 72 Update Your Device 56 Use the microSDHC Card as a USB Drive 54 V Verify Apps 72 Videos Share via Bluetooth 46 Share via YouTube 46 View 44 Watch 45 Voice Recognizer Settings 66 Volume Button 6 Volume Settings 61 VPN 39 Add connection 39 Conn