LEGAL INFORMATION Copyright © 2014 ZTE CORPORATION. All rights reserved. No part of this publication may be excerpted, reproduced, translated or utilized in any form or by any means, electronic or mechanical, including photocopying and microfilm, without the prior written permission of ZTE Corporation. The manual is published by ZTE Corporation. We reserve the right to make modifications on print errors or update specifications without prior notice. 4G LTE™ is not available in all areas. See uscellular.
SIM Card Limited Warranty Subject to the exclusions contained below, United States Cellular Corporation (“U.S. Cellular”) warrants to the original purchaser (“You” or “Your”) of the device with which the SIM card was provided that the SIM card will be free from defects in material and workmanship for a period of one (1) year from the date You purchased the device (the “Warranty Period”). This warranty is not transferable. Should a defect appear during the Warranty Period, U.S.
REPLACEMENT OF THE SIM CARD AS PROVIDED HEREIN IS YOUR EXCLUSIVE REMEDY UNDER THIS LIMITED WARRANTY, AND IS IN LIEU OF ALL OTHER WARRANTIES, EXPRESS OR IMPLIED INCLUDING, WITHOUT LIMITATION, ANY WARRANTIES OF TITLE, FITNESS FOR A PARTICULAR PURPOSE, MERCHANTABILITY, NON-INFRINGEMENT OR ARISING FROM COURSE OF DEALING OR USAGE OF TRADE. NEITHER U.S.
THIS LIMITED WARRANTY SHALL BE CONSTRUED UNDER THE LAWS OF THE STATE OF ILLINOIS, EXCLUDING ITS CONFLICTS OF LAW PROVISIONS. SOME STATES AND JURISDICTIONS DO NOT ALLOW LIMITATIONS ON HOW LONG AN IMPLIED WARRANTY LASTS, OR THE DISCLAIMER OR LIMITATION OF INCIDENTAL OR CONSEQUENTIAL DAMAGES, SO THE ABOVE LIMITATIONS AND DISCLAIMERS MAY NOT APPLY TO YOU. No agent, employee, dealer, retailer, representative or reseller is authorized to modify or extend the terms of this Limited Warranty. Version No. : 1.
Getting Started The following figure shows the appearance of the device. It is only for your reference. The actual device may be different. 1. Power Button Press and hold the Power button to switch on/off the device. 2. Charger/USB port Charge your device. 3. OK Key Enter or select an item. 4. Left Key Check the on-screen menu from right to left.
5. Right Key Check the on-screen menu from left to right. 6. Back Key Go back to the previous screen. 7. LCD Screen It indicates the signal type, signal strength, battery, Wi-Fi, etc. 8. microSDHC card slot It is where you insert the microSDHC card. NOTE: microSDHC logo is a trademark of SD- 3C, LLC.
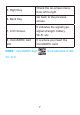
Screen Indicators When the device is powered on, the following icons will appear on the LCD screen, with the corresponding indicators listed in the table below: Icon Indication Icon Indication Network signal strength. Roaming network indication. Network type. 1X/3G/4G LTE ™ icons will appear on the LCD screen according to the network being connected. The device has been connected to the Internet. Connected to the Internet manually. There are new messages or unread messages.
Battery is low. Show and check the device information. Battery power indication. Show and check the data connection information. The battery is fully charged. Show and check the devices connected to your Unite II. Set the WPS function. Set your device. About Your SIM Card This SIM card will only work with your ZTE Unite II. Once the SIM card has been inserted, do not remove! If your SIM card is ever separated from your ZTE Unite II or damaged, the device will not function.
Installing the SIM Card and the microSDHC card If you have not already done so, please follow these instructions for the installation of your new SIM card which is in the package: 1. Remove the SIM card from the outer card, being careful not to touch the gold contacts. 2. Turn the power off. Remove the battery cover and take the battery out. Locate the SIM card slot. Hold the card so the writing on the back of the card is facing you and the gold contact points are properly aligned with the SIM card slot.
3. Insert the SIM card into the slot until it clicks into place. NOTE: Do not bend or scratch your SIM card. Avoid exposing your SIM card to static electricity, water or dirt. 4. Insert the microSDHC card if necessary. Inserting and Charging the Battery 1. Remove the battery cover and align the battery contacts with the terminals in the battery compartment as shown. Push the battery down until it clicks into place.
2. Place the battery cover over the battery compartment and press it downward until it clicks into place. 3. Your ZTE Unite II comes with a wall charger. To charge: Plug one end of the wall charger into an electrical outlet and the other end into the ZTE Unite II’s micro USB port. NOTE: The charge time varies depending upon the battery level. The device will stop charging if the temperature of the battery exceeds 113 °F/45 °C.
Connecting to the Internet With your ZTE Unite II, a wireless Internet connection can always be at your fingertips Connecting Wi-Fi Enabled Devices to Your ZTE Unite II NOTE: It is recommended the battery be fully charged in order to use your ZTE Unite II via Wi-Fi for the first time, or connect the device to the wall adapter for power. Please note upload and download speeds may change depending on the number of deceives connected to the ZTE Unite II.
Once your ZTE Unite II is powered on and has been activated, it automatically connects to the Internet, provided that Mobile Broadband service is available, and one or more Wi-Fi devices are connected. The Service (4G LTE™, 3G, and 1X), Signal Strength , and Data Connected icons on your ZTE Unite II indicate it is in service and ready to connect. Follow these Steps: 1. Use your normal Wi-Fi application on your computer, or other Wi-Fi enabled device to establish a connection to your ZTE Unite II. 2.
Device Customization and Configuration To configure the ZTE Unite II using the Web User Interface, go to http://192.168.1.1 or http://uscc.hotspot Input the default password which is printed under the battery of your ZTE Unite II, and then click Login to access the Web User Interface. Now, you can customize your ZTE Unite II, such as the configuration on Internet connection, network selection, WLAN settings, password and security settings, data usage, etc.
Navigating the Device Press and hold the Power button to turn on the ZTE Unite II.
Resetting Your ZTE Unite II Simply press and hold the Reset button on right side of the device bottom surface for 3 seconds to restore your ZTE Unite II to the factory default settings, as shown below. Device Info Select the device info icon and press the OK Key to check the WAN information. Use the Left and Right key to view the following information: Network Name (SSID): Displays the default SSID. WiFi Password: Displays the default Wi-Fi password.
Admin Password: Displays the default login password of the web user interface. Mobile Number: Displays your mobile number. MEID (H) / IMEI (D): Displays the MEID (H) / IMEI (D). Firmware Version: Displays the firmware version. Hardware Version: Displays the hardware version. Connection Info Select the connection info icon and press the OK Key to check the connection information.
WiFi Settings: Enable or disable Wi-Fi function. Network Select: Select the network type. Software Update: Update the software. Sound Alert: Turn on or off the sound alert. It is on by default, so you will hear an alert when there are one or more devices connected to your ZTE Unite II. Screen Timeout: Set time for screen timeout. Dial *228: Active your SIM card manually in 1X network. Messages Settings: Turn on or off the Receive Messages during power up.