
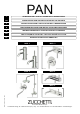
Owners Manual


ISTRUZIONI PER LO SMONTAGGIO DELLA CARTUCCIA JOYSTICK
GB - INSTRUCTIONS FOR DISASSEMBLY OF JOYSTICK CARTRIDGE
Warning: before all assembly or disassembly operations, turn off the water supply.
For internal checks or replacements, read the following instructions carefully:
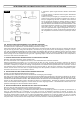
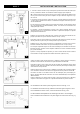
Unscrew (by hand) the handle (7) and the cap (6), together with the white teflon gasket on the inside (5). Remove the cover (4). Using
a 30 mm spanner, unscrew the ring nut (3) and remove the cartridge (2), replacing it, if necessary, with an appropriate replacement
part. When inserting the cartridge, take care with its positioning; the two pins at the bottom must be aligned with the corresponding
holes in the bottom of the cartridge housing (1). Once the cartridge has been correctly positioned, the ring nut can be screwed on
once again, with a tightening torque of 12 Nm. Now reassemble all the other components in the reverse order from that described
above. Pay particular attention to the positioning of the cover (4), which must fit correctly over the broach of the cartridge rod (see
diagrams).
F - INSTRUCTIONS POUR LE DÉMONTAGE DE LA CARTOUCHE JOYSTICK
Attention: avant toute intervention, fermer l’arrivée d’eau.
En cas de vérifications ou de remplacements internes, suivre attentivement les instructions suivantes :
Dévisser (manuellement) la poignée (7) et le capuchon (6), muni à l'intérieur d’un joint en téflon blanc (5). Extraire la calotte (4). Dé-
visser, à l’aide d’une clé de 30 mm, l’écrou de fixation (3), extraire la cartouche (2) et, si nécessaire, la remplacer par la pièce de re-
change correspondante. Faire attention lors du positionnement de la cartouche : les deux axes inférieurs devront coïncider avec les
trous percés sur le fond du siège (1). Une fois que la cartouche a été correctement positionnée, remonter l’écrou et le serrer avec un
couple de serrage de 12 Nm. À présent, remonter tous les autres composants en procédant dans le sens inverse à ce qui est indiqué
ci-dessus. Faire particulièrement attention au positionnement de la calotte (4) qui doit s’encastrer correctement sur la broche de la
tige de la cartouche (voir dessins).
D - ANLEITUNGEN FÜR DEN AUSBAU DER KARTUSCHE JOYSTICK
Achtung: Vor jedem Eingriff Hauptwasserhahn zudrehen.
Bei Kontrollen oder Teileersatz im Innern die nachstehenden Anleitungen genau befolgen:
Den Griff (7) (von Hand) und die innen mit einer weißen Teflon-Dichtung (5) versehene Kappe (6) aufschrauben. Die Abdeckhaube
(4) abnehmen. Mit Hilfe eines 30-mm-Schlüssels die Mutter (3) lösen und die Kartusche (2) herausnehmen und falls erforderlich erse-
tzen. Beim Wiedereinsetzen der Kartusche auf ihre Einbaulage achten; die zwei unteren Stifte müssen mit den entsprechenden
Löchern am Boden des Sitzes (1) zusammenfallen. Nachdem die Kartusche korrekt positioniert wurde, kann die Mutter wieder einge-
setzt, und nicht fester als 12 Nm angezogen werden. Anschließend die anderen Teile in umgekehrter Reihenfolge wie oben be-
schrieben wieder einbauen. Unbedingt auf die Positionierung der Abdeckhaube (4) achten. Sie muss korrekt am Profil der Kartu-
schenstange aufgesetzt werden (siehe Zeichnungen).
E - INSTRUCCIONES PARA EL DESMONTAJE DEL CARTUCHO JOYSTICK
Atención: antes de cada intervención cerrar la entrada de las aguas.
En caso de controles o sustituciones internas seguir atentamente las siguientes instrucciones:
Desenroscar (a mano) la manija (7) y el capuchón (6), provisto en su interior de guarnición de teflón blanca (5). Extraer el casquete
(4). Desenroscar con una llave de 30 mm la abrazadera de fijación (3) y extraer el cartucho (2), sustituyéndolo si fuera necesario con
el repuesto correspondiente. Al insertar el cartucho, prestar atención a su posicionamiento; los dos pernos inferiores deben coincidir
con los orificios correspondientes realizados en el fondo del asiento (1). Una vez colocado correctamente el cartucho se puede volver
a montar la abrazadera apretándola con un par de apretamiento correspondiente a 12 Nm. A este punto volver a montar todos los
otros componentes en sucesión contraria a la descrita precedentmente. Prestar particular atención al posicionamiento del casquete
(4) que debe calzar correctamente sobre el brochado del vástago del cartucho (ver diseños).
I - Attenzione: prima di ogni intervento chiudere l’entrata delle
acque.
In caso di verifiche o sostituzioni interne seguire attentamente
le seguenti istruzioni:
Svitare (a mano) la maniglia (7) ed il cappuccio (6), munito al
suo interno di guarnizione in teflon bianca (5). Estrarre la calot-
ta (4). Svitare con l’utilizzo di una chiave da 30 mm la ghiera di
fissaggio (3) ed estrarre la cartuccia (2), sostituendola se ne-
cessario con l’apposito ricambio. Nell’inserire la cartuccia, fare
attenzione al suo posizionamento; i due perni inferiori dovranno
coincidere con i relativi fori realizzati sul fondo della sede (1).
Una volta posizionata correttamente la cartuccia si potrà rimon-
tare la ghiera stringendola con una coppia di serraggio pari a
12 Nm. A questo punto rimontare tutti gli altri componenti in
successione inversa a quella sopra descritta. Fare particolare
attenzione al posizionamento della calotta (4) che deve calzare
correttamente sulla brocciatura dell’asta cartuccia (vedere dise-
gni).
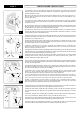
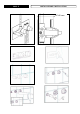
Position of
cover with
respect to feet
Place the cover over the
cartridge rod, as shown
FIG. 2