
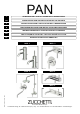
Owners Manual


INSTALLAZIONE / INSTALLATION
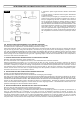
MOD. 1
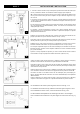
I - Avvitare il perno filettato 1 sul corpo del monocomando 2. Inserire l’asta di scarico 3 nell’ap-
posito foro.
GB - Screw the threaded pin 1 on the body of the single lever tap 2. Insert the pop-up waste
rod 3 in the appropriate hole.
F - Visser le pivot fileté 1 sur le corps du mitigeur 2. Introduire la tirette de vidage 3 dans le
trou fait exprès.
D - Den Gewindestift 1 mit dem Körper des Einhebelmischers 2 verschrauben. Die Zugstange
3 in die dafür vorgesehene Öffnung einführen.
E - Atornillar el perno con filete 1 sobre el cuerpo del monomando 2. Insertar la varilla desa-
gue 3 en su agujero.
Inserire sul fondo del monocomando l’anello di base 4 ed il relativo o-ring 5, facendo passare
al proprio interno l’astina, i flessibili ed il perno filettato.
At the bottom of the mixer, insert the base ring 4 and the relative o-ring 5, passing the rod,
flexible pipes and threaded pin through the inside.
Insérer sur le fond de la monocommande la bague de base 4 et le joint torique 5, en faisant
passer à l'intérieur la tige, les flexibles et l’axe fileté.
An der Unterseite des Einhebelmischers den Basisring 4 und den dazu gehörenden O-Ring 5
einsetzen, dann die Stange, die Schläuche und den Gewindestift durchziehen.
Insertar en el fondo del mono-mando el anillo de base 4 y el correspondiente o-ring 5,
haciendo pasar en su interior la varilla, los flexibles y el perno roscado.
1
1
3
2
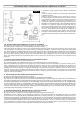
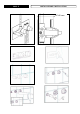
Posizionare il rubinetto in corrispondenza del foro del sanitario (min. 34 mm - max. 39 mm) e procedere
con il fissaggio mediante la guarnizione sagomata 6, forcella metallica 7 e dado 8, che va avvitato sul
perno filettato 1 (chiave da 12 mm).
Place the tap at the hole of the sanitaryware appliance (min. 34 mm - max 39 mm) and go on with the
fixing by using the seal 6, the metal fork 7 and the nut 8, that has to be screwed on the threaded pin 1 (12
mm spanner).
Poser le robinet en correspondance du trou du sanitaire (min. 34 mm - max 39 mm) et continuer avec le
fixage à l’aide d’une 6, fourche 7 et d’un écrou 8, qui doit être serré sur le pivot fileté 1 (clé de 12 mm).
Die Armaturen am Loch der Sanitäreinrichtung (min. 34 mm - max. 39 mm) einführen. Die Befestigung
erfolgt mit der Formdichtung 6, der Gabelhalterung aus Metall 7 und der Mutter 8, die am Gewindezapfen
1 (Schlüssel 12 mm) eingeschraubt wird.
Colocar el grifo en correspondencia con el agujero del sanitario (min. 34 mm - máx. 39 mm) y proceder a
su fijación mediante la empaquetadura perfilada 6, horquilla metálica 7 y tuerca 8, que va apretada al
perno roscado 1 (llave de 12 mm).
3
8
7
6
1
5
4
2