
Owners Manual


INSTALLAZIONE / INSTALLATION
MOD. 2
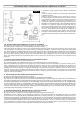
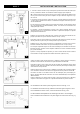
I - Posizionare il corpo del mix 1 all’interno del muro facendo attenzione che la distanza dal centro delle
tubature al rosone 2 rientri nei limiti indicati. Effettuare i collegamenti e verificarne la tenuta. Portare a
termine il rivestimento murale.
GB - Fit the mixer body 1 into the wall, ensuring that the distance from the centre of the pipes to the ro-
sette 2 is within the stated limits. Connect the various components and check for water tightness. Com-
plete the wall covering.
F - Positionner le corps de l’élément 1 dans le mur en veillant ce que la distance du centre des tuyauteries
à la rosace 2 se situe dans les limites indiquées. Effectuer les raccordements et vérifier l’étanchéité. Finir
le revêtement mural.
D - Den Körper des Mischers 1 in der Wand positionieren. Dabei darauf achten, dass der Abstand von der
Mitte der Leitungen zur Rosette 2 innerhalb der angegebenen Grenzen liegt. Die Anschlüsse vornehmen
und kontrollieren, ob sie dicht sind. Die Wandverkleidung fertig stellen.
E - Posicionar el cuerpo del mix 1 en el interior del muro prestando atención a que la distancia desde el
centro de las tuberías al rosetón 2 esté dentro de los límites indicados. Efectuar las conexiones y controlar
la estanqueidad. Terminar el revestimiento mural.
Completare l’articolo con il rosone 2 e la maniglia 3 (da assemblare). Per gli articoli con bocca 4, avvitare il
raccordo 5 sulla tubatura. Innestare la bocca (completa del suo rosone 6) sul raccordo e fissarla con l’ap-
posito grano 7 (ch. a brugola da 2 mm).
Complete the article with the rosette 2 and handle 3 (to be assembled). For articles with nozzles 4, screw
the joint 5 onto the pipe. Attach the nozzle (complete with rosette 6) onto the joint and fix it in place using
the dowel provided 7 (using a 2 mm Allen wrench).
Compléter le composant avec la rosace 2 et la poignée 3 (à assembler). Pour les composants avec
bouche 4, visser le raccord 5 sur la tuyauterie. Emboîter la bouche (avec sa rosace 6) sur le raccord et la
fixer avec le goujon 7 (clé Allen de 2 mm).
Den Artikel mit der Rosette 2 und dem Griff 3 fertig stellen (zusammenbauen). Bei den Artikeln mit Auslauf
4 das Passstück 5 an der Rohrleitung festschrauben. Den Auslauf (mitsamt Rosette 6) auf das Passstück
aufsetzen und mit dem Stift 7 befestigen (Inbusschlüssel 2 mm).
Completar el artículo con el rosetón 2 y la manija 3 (a ensamblar). Para los artículos con boca 4, atornillar
la unión 5 sobre la tubería. Colocar la boca (completa de su rosetón 6) sobre la unión y fijarla con el
pasador correspondiente 7 (llave Allen de 2 mm).
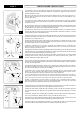
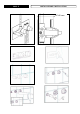
Anche l’incasso con piastra 8 va posizionato come il singolo (limiti 20-48mm). Svitare il tappo 9 ed avvitare
al suo posto il raccordo 10 (teflon/canapa). Quest’ultimo va eventualmente tagliato secondo la sporgenza
del corpo. Inserire la piastra 11.
The wall-plate tap fitting 8 should be positioned in the same way as the single fitting (limits of 20-48 mm).
Unscrew the stopper 9, and in its place screw on the pipe fitting 10 (teflon/hemp). This can be cut accord-
ing to how much the body juts out. Attach the wall plate 11.
L’encastrement avec la plaque 8 doit également être positionné comme la monocommande simple
(limites : 20 – 48 mm). Dévisser le bouchon 9 et visser le raccord 10 (téflon/chanvre) à sa place. Ce der-
nier doit éventuellement être coupé selon la saillie du corps. Insérer la plaque 11.
Auch der UP-Einhebelmischer mit Platte 8 wird wie der einzelne Einhebelmischer positioniert (Grenzen 20-48 mm).
Den Deckel 9 aufschrauben und an seiner Stelle das Passstück 10 (Teflon/Hanf) festschrauben. Das Passstück
muss je nach Länge des vom Körper herausragenden Teils abgeschnitten werden. Die Platte 11 einsetzen.
También el empotramiento con placa 8 debe ser colocado como el individual (límites 20-48mm).
Desenroscar el tapón 9 y enroscar en su lugar la unión 10 (teflón/cáñamo). Si fuera el caso, este último
debe ser cortado según la protuberancia del cuerpo. Insertar la placa 11.
Completare l’articolo con la maniglia 12 (da assemblare) e con la bocca 13, che va inserita a pressione sul
raccordo 10. Infine bloccare la bocca con il grano 14 (chiave a brugola da 2 mm).
Complete the article with the handle 12 (to be assembled) and the nozzle 13, which should be squeezed
on to the pipe fitting 10. Lastly, block the nozzle in position with the dowel provided 14 (using a 2 mm Allen
wrench).
Compléter le composant avec la poignée 12 (à assembler) et la bouche 13, qui doit être insérée par pres-
sion sur le raccord 10. Enfin, bloquer la bouche avec le goujon 14 (clé Allen de 2 mm).
Den Artikel mit dem Griff 12 (zusammenbauen) und dem Auslauf 13 fertig stellen. Letzterer wird auf das
Passstück 10 gedrückt und dann mit dem Stift 14 befestigt (Inbusschlüssel 2 mm).
Completar el artículo con la manija 12 (a ensamblar) y con la boca 13, que debe ser insertada a presión
sobre la unión 10. Finalmente bloquear la boca con el pasador 14 (llave Allen de 2 mm).
1
1
2
3
9
8
10
11
4
12
13
14
10
2
4
5
6
7
3
2