
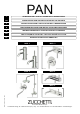
Owners Manual
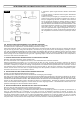


INSTALLAZIONE / INSTALLATION
MOD. 3
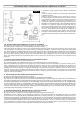
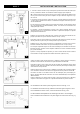
I - Incassare e mettere “in bolla” il corpo 1 nella parete, prestando attenzione alle distanze (30-
50 mm) a rivestimento ultimato. La rubinetteria è dotata di tappi per prova impianti 2.
GB - Sink the body 1 into the wall and ensure it is level, being careful with the distances (30-
50 mm) once the wall covering has been completed. The tap is fitted with stoppers for a sys-
tem check 2.
F - Encastrer et mettre à niveau le corps 1 dans le mur, en faisant attention aux distances (30
- 50 mm) quand le revêtement est terminé. La robinetterie est équipée de bouchons pour l’es-
sai des installations 2.
D - Den Körper 1 in die Wand einsetzen und waagerecht ausrichten. Auf die Distanzen (30-35
mm) nach Fertigstellung der Wandverkleidung achten. Die Armatur ist mit Deckeln für die
Anlagenprüfung 2 versehen.
E - Empotrar y colocar horizontalmente el cuerpo 1 en la pared, prestando atención a las
distancias (30-50 mm) con el revestimiento terminado. La grifería está equipada con tapones
para prueba de instalaciones 2.
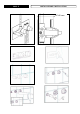
Applicare nel corpo incassato i particolari 3 e 4, calzare il rosone 5 sul monocomando 6. Con-
giungere quest’ultimo al corpo 1 e bloccarlo tramite le viti 7 (ch. 2,5 mm).
Attach parts 3 and 4 to the recessed body, and slip the rosette 5 onto the mixer 6. Join this to
the body 1 and fix it in place using the screws provided 7 (2,5 mm spanner).
Appliquer dans le corps encastré les pièces 3 et 4, positionner la rosace 5 sur la monocom-
mande 6. Assembler cette dernière au corps 1 et la bloquer avec les vis 7 (clé 2,5 mm).
Am unterputz eingebauten Körper die Teile 3 und 4 anbringen, die Rosette 5 auf den Einhe-
belmischer 6 setzen. Letzteren mit dem Körper 1 verbinden und mit den Schrauben 7 befesti-
gen (2,5-mm-Schlüssel).
Aplicar en el cuerpo empotrado las piezas 3 y 4, calzar el rosetón 5 sobre el mono-mando 6.
Unir este último al cuerpo 1 y bloquearlo mediante los tornillos 7 (llave 2,5 mm).
Valutare la distanza della colonna dalla parete e applicare il supporto 9 (corto) o 10 (lungo).
Innestare la colonna 8 al mix 1 e fissarla con il grano 11. Avvitare il soffione 12.
Evacuate the distance of the column from the wall and apply the appropriate support, either
short 9 or long 10. Attach the column 8 to the mixer 1 and fix it in place using the dowel provid-
ed 11. Screw on the tap head 12.
Évaluer la distance de la colonne du mur et appliquer le support 9 (court) ou 10 (long). Emboî-
ter la colonne 8 sur l’élément 1 et la fixer avec le goujon 11. Visser la pomme de douche 12.
Die Distanz der Säule von der Wand messen und die Halterung 9 (kurz) oder 10 (lang) an-
bringen. Die Säule 8 am Mischer 1 einsetzen und mit dem Stift 11 befestigen. Die Kopfbrause
12 festschrauben.
Evaluar la distancia de la columna desde la pared y aplicar el soporte 9 (corto) o 10 (largo).
Acoplar la columna 8 al mix 1 y fijarla con el pasador 11. Atornillar el inyector de aire 12.
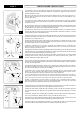
Per l’installazione del lavello a parete seguire le istruzioni come fig. 1 e 2.
For installation of the wall lever tap, follow the instructions given in figures 1 and 2.
Pour l’installation de l’évier au mur, suivre les instructions des fig. 1 et 2.
Für die Installation des Spültisches die Anleitungen der Abb. 1 und 2 befolgen.
Para la instalación del lavamanos en la pared seguir las instrucciones de la fig. 1 y
2.
4
1
2
4
5
6
7
3
3
9
8
11
12
10
1
1
2
1