
Exploded Parts
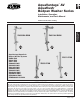

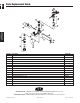

AquaVantage AV
Bedpan Washer, Trap Primer,
and Foot Pedal Valves
Z6000AV-BWN
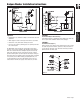
Bedpan Washer Installation Instructions
Z6011AV-BWN
Important:
• All plumbing is to be installed according to state and local codes and
regulations.
• Water supply lines need to allow proper water flow for each fixture.
• Flush all lines of any debris before making connections.
• Do not use pipe sealant or plumbing grease on any fitting other than
the control stop inlet.
The AquaVantage valve is designed to operate under various water
pressures. The pressures fall between 10 and 100 psi (69 to 689 kPa).
Each valve is tested at the lowest and highest pressures before being
shipped. The minimum pressure is determined by the type of fixture
purchased and the gallons per flush requested. Consult your catalog for
flow options. Most low consumption valves (1.6 gallon) require a minimum
of 25 psi flow pressure. When installing your quality Zurn valve, it is
recommended that to protect the polished finished you do not use a
toothed wrench. This will cause gouges and scratches on your valve.
STEP NO. 1
Install Sweat Adaptor and Control Stop
For detailed instructions on installing the sweat adaptor and control stop,
refer to specific valve installation manuals in this catalogue.
STEP NO. 2
Install Outlet Tube (Figure 2)
Slide the diverter sleeve, diverter friction washer, diverter valve coupling
nut, spud nut, spud friction washer, spud sleeve, and spud escutcheon
over the diverter outlet tube. Insert outlet tube into fixture spud. Hand
tighten spud nut onto fixture spud.
Figure 2
FV335 Page 3