
Exploded Parts
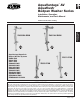

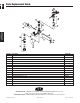

AquaVantage AV
Bedpan Washer, Trap Primer,
and Foot Pedal Valves
Bedpan Washer Installation Instructions
, continued
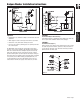
Figure 3
STEP NO. 3
Install Diverter Valve (Figure 3)
Insert top of diverter outlet tube into diverter valve and secure
with diverter coupling nut. Hand tighten diverter coupling nut.
STEP NO. 4
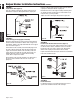
Install Wall Support Flange (Figure 4A and 4B)
Determine required length of support rod by measuring distance
between finished wall and back of diverter valve at support rod
hole. Add 1/4" [6mm] to the length determined and cut the support
rod to size. Refer to Figure 3.
Turn the diverter valve assembly to allow threading support rod
into back of diverter valve body. Slide wall support flange onto
support rod and turn the diverter valve assembly so that wall
support flange is flush with wall. Use wall support flange as a
template and mark off holes on finished wall for mounting
screws. Refer to Figure 4A for details.
Remove diverter valve assembly and drill a 1/4" [6mm] hole at
the three locations marked. Install an anchor in each 1/4"
[6mm] hole.
Figure 4A
Figure 4B
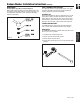
STEP NO. 5
Install Vacuum Breaker Flush Connection (Figure 5)
Slide tube nut onto flush tube. Slide the diverter valve coupling
nut, diverter friction washer, and diverter sleeve over vacuum
breaker tube and secure tube to diverter valve. Hand tighten
diverter valve coupling nut onto diverter valve assembly.
Length of vacuum breaker tube may be shortened to accommodate
lower valve installation height.
Insert top of diverter tube into diverter valve and secure diverter
coupling nut. Hand tighten diverter coupling nut.
Rotate diverter valve so that support rod flange mounting holes
are aligned with three mounting holes in finished wall. Secure
using the three (3) screws provided.
Tighten setscrew in wall support flange. Refer to Figure 4B.
Figure 5
STEP NO. 6
Install Flushometer
For detailed instructions on installing the flushometer, refer to
specific valve installation manuals in this catalogue.
Page 4 FV335