
Installation Guide


FV211
AquaVantage
™
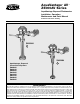
Rough-In, Product Specification, Models and Options
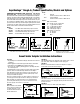
Sweat Solder Adaptor Installation Instructions
Flows:
-FF Full Flow
3.0 Gal. for Urinal, 4.5 Gal. for Water Closet
-WS1 Low Consumption
1.0 Gal. for Urinal, 1.6 Gal. for Water Closet
Options:
-BG BioCare Handle
-H Handle on Front of Flush Valve
-L 1" [25] Metal Push Button
-L3 3" [76] Metal Push Button
-YJ Split Ring Pipe Support
-YK Solid Ring Pipe Support
-YO Bumper on Stop Angle
-1 16" Rough-In
-2 24" Rough-In
Other
Models: Z6000AV, Z6000AV-1, Z6000AV-2, Z6000AV-3,
-WS1 (water saver) 1.6 Gal. Low Consumption
Models: Z6010AV, Z6010AV-1, Z6010AV-2,
-WS1 (water saver) 1.6 Gal Low Consumption
Models: Z6001AV (1-1/4" urinal flush valve)
Z6003AV (3/4" urinal flush valve)
-WS1 (water saver) 1.0 Gal Low Consumption
ENGINEERING SPECIFICATION: ZURN AquaVantage
™
‘AV’ Exposed
Closet Flush Valve – Exposed, quiet diaphragm-type, chrome plated,
flushometer valve with a polished exterior. Complete with Zurn’s AquaVan-
tage TPE, chloramine resistant, dual seal diaphragm with a clog resistant,
triple filtered by-pass. The valve is ADA compliant with a non-hold open
and no leak handle feature, high back pressure vacuum breaker, one piece
hex coupling nut, adjustable tailpiece, spud coupling and flange for top
spud connection. Control stop has internal siphon-guard protection, vandal
resistant stop cap, sweat solder kit, and a cast wall flange with set screw.
Internal seals are made of chloramine resistant materials.
Models:
Z6000AV- 1-1/2" Water Closet valve with top spud connection
Z6010AV- 1-1/2" Water Closet valve with back spud connection
Z6001AV- 1-1/4" Urinal Valve with top spud connection
Z6003AV- 3/4" Urinal Valve with top spud connection
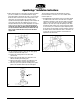
Important:
• All plumbing is to be installed according to state and local codes and
regulations.
• Water supply lines need to allow proper water flow for each fixture.
• Flush all lines of any debris before making connections.
• Do not use pipe sealant or plumbing grease on any fitting other then
the control stop inlet.
The AquaVantage™ valve is designed to operate under various water
pressures with a recommended range between 10 and 100 psi
(69 to 689 kPa). Each Zurn valve is tested for proper performance at
the factory before being shipped. Consult the product pages of the
catalog for available flow options.
Most low consumption fixtures (1.6 gallon) require a minimum of 25
psi running pressure through the valve to obtain proper evacuation.
When installing your quality Zurn valve it is recommended that to
protect the polished finish you do not use a toothed wrench. This
will cause gouges and scratches on your valve.
STEP NO. 1
Measure distance from finished
wall to center line of fixture spud;
cut water supply pipe 1-1/4"
shorter than this measurement.
Chamfer O.D. and I.D.
STEP NO. 2
Slide threaded adapter onto supply pipe until shoulder stops on end of
pipe. Then sweat-solder the adapter to water supply pipe.
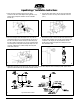
STEP NO. 3
Measure from finished wall to first thread of adapter for length of
chrome tube. Cut chrome tube this length ‘x’.
STEP NO. 4
Slide wall escutcheon over chrome tube and slide both chrome tube
and wall escutcheon over supply pipe pushing the wall escutcheon all
the way to the wall.
STEP NO. 5
Screw control stop onto water supply water adaptor.