
Install Instructions


FV343 Rev N 4/16/10
Page 5
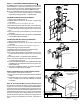
FLASHING RED LIGHT
STEP 11 - CUSTOMIZED SENSOR RANGE SETTING
The ZEMS-IS is factory set to accommodate most closet and
urinal installations. If this factory setting does not accommo-
date your specific environment, follow steps below to custom-
ize your range settings for your specific ZEMS-IS model.
NOTE: If your ZEMS-IS actuator has a rubber override button,
consult your local Zurn representantive for customized
sensor range setting procedure. 1-800-997-3876.
CALIBRATION INSTRUCTIONS FOR ZEMS-IS
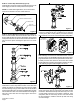
1. Obtain a target. SEE FIGURE 12.
2. PRESS and HOLD button for 10 seconds * until the LED
turns solid.
(*Unit will blink and flush once while button is being held)
3. RELEASE finger when LED turns solid. Unit is calibrating.
4. Set target at desired distance, (No less than 16") from sen-
sor face and verify NO other objects are in view of sensor
face.
5. Keep target steady until the calibration cycle ends with two
fast blinks.
6. For closet installations continue to "VERIFY CALIBRATION
FOR CLOSET INSTALLATIONS".
CALIBRATION INSTRUCTIONS FOR ZEMS-IS III
1. Obtain a target. SEE FIGURE 12.
2. PRESS and HOLD button for 10 seconds * until the LED
turns solid.
(*Unit will blink four times and flush once while button is being held)
3. RELEASE finger after LED turns solid.
4. PRESS and HOLD button when LED starts blinking.
5. RELEASE finger when LED turns solid.
6. Set target at desired distance, (No less than 16") from sen-
sor face and verify NO other objects are in view of sensor
face.
7. Keep target steady - Unit will blink while calibrating.
8. After 15 seconds, calibration ends with a fast double blink
or a solid LED for 5 seconds.
9. IF THE LED REMAINS SOLID FOR 5 SECONDS AFTER
CALIBRATION, the calibration was NOT successful. RE-
PEAT STEPS 2-8
10. For closet installations continue to "VERIFY CALIBRA-
TION FOR CLOSET INSTALLATIONS".
VERIFY CALIBRATION FOR CLOSET INSTALLATIONS
1. Stand outside closet stall and close door.
2. Slowly open door to closet stall while looking at ZEMS-IS
sensor.
3. If led blinks while door is opening, recalibrate to a shorter
range. FAILURE TO DO SO W ILL RESULT IN GHOST
FLUSHING.
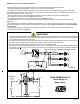
STEP 12 - Activating the Motor Actuator with the Sensor
To activate the motor actuator with the sensor, simply place a
target in front of the sensor. A single red light will flash indicat-
ing the sensor has recognized the target. If the target stays in
view for eleven seconds, two flashing red lights will occur. This
indicates that the target has been in view for the required time
and upon leaving the view, a signal will be sent to the motor
actuator to flush the flush valve. NOTE: If the target does not
stay in view for the required eleven seconds, a flush will not
occur.
Figure 10
Figure 11
Figure 12
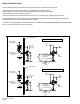
Recommended Distance Settings: *
Urinal 22" from sensor face.
Closet 6" - 8" beyond front lip of
toilet bowl.
TARGET
MANUAL BUTTON
RECOMMEND
BROW N CARDBOARD
TARGET
(16" X 16")
*W arning: Calibrating to a
distance less than 18"
may result in false
activations.