
Install Instructions


FV669 Rev. D 4/14/2020
Page 7
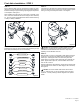
STEP 4
Place valve head with diaphragm kit back onto valve body.
Tighten locking ring back to original position with strap wrench
(supplied) by turning clockwise.
STEP 5
Turn control stop back on by turning counter-clockwise using a
at head screw driver.
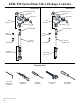
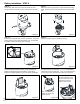
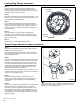
Orice
Diaphragm Kit
Manifold Stem
Volume
Control Ring
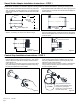
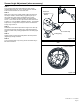
Diaphragm Replacement and Cleaning (when necessary)
STEP 1
Turn o control stop using a at head screw driver turning
clockwise (See Figure 16 above). Then, use the electronic
override button to ush the water out of the ush valve.
STEP 2
Mark down Locking ring original position relative to valve body
with tape or marker. Uninstall valve head by loosen locking ring
(See Figure 16 above) using strap wrench (supplied) turning
counter-clockwise.
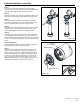
STEP 3B - Replace Diaphragm Kit
Slide out existing diaphragm kit o manifold stem. If the o-rings
are worn, replace them with the new o-rings provided in the
diaphragm repair kit. Then replace the old diaphragm kit with a
new diaphragm kit (of the same ow rate) on the manifold stem
carefully orienting the orice opposite of the control stop. (There
is no need to replace the Volume Control Ring unless it is missing
or broken)
STEP 3A - Cleaning Diaphragm Kit
Slide out existing diaphragm kit o manifold stem. Wash
diaphragm and orice thoroughly with water. Slide cleaned
diaphragm back on to manifold stem orienting the orice opposite
of the control stop. If cleaning diaphragm and orice do not
resolve issue, follow step 3B.
Do not to damage or enlarge orice. Doing so will result in
incorrect ush rate.
Figure 17