
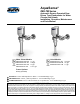
Install Instructions


FV669 Rev. D 4/14/2020
Page 8
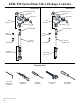
Retrot Installation Instruction
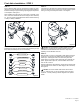
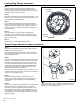
Figure 18A
Orice
Diaphragm Kit
Manifold Stem
Volume
Control Ring
Figure 18B
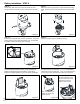
STEP 1
Turn o control stop using a at head screw driver turning
clockwise. Then, use the electronic or manual override button or
manual handle to ush the water out of the ush valve.
STEP 2
Remove the existing valve cap/head and diaphragm kit from the
valve body to get the valve to either state shown in Figure 18A.
STEP 3
Ensure the Volume Control Ring is installed on the manifold
stem. Slide the diaphragm kit on to the manifold stem orienting
the orice opposite of the control stop. See Figure 18B
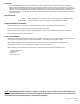
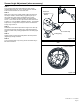
STEP 4
Install valve head and diaphragm kit onto the valve body. Rotate
the valve head so the sensor window is facing outward. See
Sensor Angle Adjustment section if more detail is needed.
STEP 5
Hand tighten the locking ring onto the valve body. If the locking
ring will not thread onto the valve body go to the Locking Ring
Change Section. Finish tightening the locking ring using the strap
wrench. Turn the locking ring at least 1/3 of a turn with the strap
wrench.
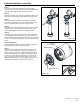
STEP 6 (if applicable)
Remove the Manual Handle. Place the Handle Cap Seal in the
Handle Cap and torque the handle cap in place.
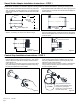
STEP 7
Slowly turn on the control stop using a at head screw driver
turning counter-clockwise and check for leaks. If leaks occur,
tighten locking ring further. Go to Battery Installation section to
power on the unit and check for leaks once more after ushing
the valve. If you nd leaks are still present. Then remove the
valve cap from the valve head shown in Step 4.1 & 4.2 of the
Battery Installation Section. Use the supplied strap wrench or a
large wrench on the ats of the locking ring to tighten it.