
Use and Care Manual
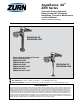

FV237 Rev. F 6/25/2018
Page 3
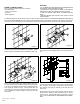
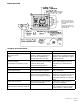
7.) VISUAL INDICATOR GUIDE
USER-IN-VIEW L.E.D. Yellow light ashes 3 times – after
5-second delay – when a user is in view. The yellow light
ashes constantly when a user is in view during the 10-minute
start-up sequence.
OBJECT LOCK SENSOR
BATTERY L.E.D. Red light ashes indicating it is time to
replace batteries with 4 new “C” batteries.
COURTESY MANUAL FLUSH BUTTON Allows manual
activation of ush when needed.
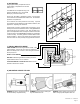
STEP A Use battery compartment wrench
to remove battery compartment tray.
STEP B Pull cover off by rotating bat-
tery side forward and out.
STEP C Sensor Adjustor Tool comes in a
built-in storage pocket. Replace after use.
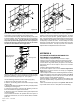
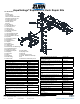
8.) ADJUSTING YOUR E-Z FLUSH
Figure 6
6.) ACTIVATION
Using supplied battery compartment wrench,
remove battery compartment from the E-Z
Flush™ unit.
Load batteries into compartment tray (note
position of batteries in tray), and reinstall
battery tray into the E-Z Flush unit.
Secure tray with battery compartment wrench. The last three
turns of the wrench will activate the E-Z Flush unit. The E-Z Flush
System is now operational.
Your E-Z Flush unit comes preset from the factory. If special
circumstances require adjustment of the activation distance, see
Appendix A – Adjusting Your E-Z Flush.
The E-Z Flush unit has a 10-minute start-up sequence in which
the Object Lock Sensor will ash the User-In-View yellow L.E.D.
continuously as long as a user is in view. After the start-up se-
quence is completed and when the Object Lock Sensor has a user
in view, the User-In-View yellow L.E.D. will ash only 3 times after
a 5-second delay. This delay prevents needless ushes when
someone walks by. Sensor units should not be located across
from each other or in close proximity to highly reective surfaces.