PHOTO HARDDISK User Manual V2.
CONTENTS Care and Safety Information .............................................................................................................. 1 System Requirements........................................................................................................................ 1 Introduction...................................................................................................................................... 2 PHOTO HARDDISK Components..............................................
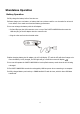
Care and Safety Information Do not drop, shake, or hit this product as this may cause permanent damage on the internal hard disk. Do not use or store this product in a hot or humid environment such as the glove compartment or trunk of a car, or bathroom. Do not operate this product with wet hands. If the battery is leaking, discontinue use of the product. When using the AC adapter, insert the plug securely into the electrical outlet. Do not use if the AC adapter cord is damaged.
Introduction The PHOTO HARDDISK is the perfect companion for the digital photographer as well as the mobile computer user. You can easily use this product to back up most popular digital camera flash media or use it as an external hard disk and a card reader. If you fill up your flash card with pictures and would like to keep shooting. No worry. Just transfer the entire contents of your flash media card to the PHOTO HARDDISK with on one press of a button.
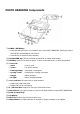
PHOTO HARDDISK Components ① POWER / ENTER Key: • Press and hold this key for 2~3 seconds to turn on the PHOTO HARDDISK. Inserting a memory card will also automatically turn the unit on. • Press this key to execute a menu selection. ② UP and DOWN Key: Move the selection up and down or change setup setting. ③ BACK Key: Return to the previous screen or return to the main menu, or cancel an operation.
Standalone Operation Battery Operation Fully charge the battery before first time use. Please charge your new battery or battery that has not been used for over 6 months for at least 6 hours before use to make sure maximum battery performance. You can recharge the battery with the AC adapter. Pull and flip open the USB connector cover on top of the PHOTO HARDDISK and connect the USB-mini plug of the AC adapter into the connector slot. Plug the other end into the electrical outlet.
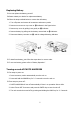
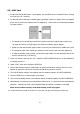
Replacing Battery You can replace the battery yourself. Please contact your dealer for replacement battery. Follow the steps outlined below to remove the old battery: 1. Turn off power and remove all connectors and memory cards. 2. Remove two screws on top cover as ➋ indicates in the figure below. 3. Remove top cover by pulling it out gently as ➌ indicates. 4. Remove battery by pulling out the battery removal tab as ➍ indicates. 5. Disconnect battery connector as ➎ and the enlarged drawing indicates.
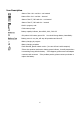
Icon Description Status of the 4-in-1 card slot – not inserted Status of the 4-in-1 card slot – inserted Status of the CF / MD card slot – not inserted Status of the CF / MD card slot – inserted Work in progress, wait. Folder name prompt Battery capacity indicator, about 80%, 60%, 30% full Only about 10% battery power left. You should charge battery immediately. Battery power is very low, will stop all operations and shut off. Battery charging in progress. Battery charging complete.
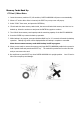
Memory Cards Back Up CF Card / Micro Drive 1. Insert the memory card into CF / MD card slot, PHOTO HARDDISK will power on automatically. 2. When a CF card or Micro Drive is inserted, the EJECT key on top cover will pop up. 3. Select “COPY” from menu, and press the ENTER key. 4. If both card slots have memory cards inside, the screen will ask which memory card slot is to be backed up. Select the card source and press the ENTER key again to continue. 5.
SD / MMC Card 1. For Mini SD and RS-MMC cards, a card adapter (not provided) must be attached before inserting them into the 4-in-1 card slot. 2. For Mini SD card in particular, insulation paper (provided) needs to be taped on the card adapter before use to prevent any malfunctions from happening. Please refer to the following illustration for taping location: • The dotted line on the left figure shows the location where the insulation paper needs to go.
MS / MS Pro Card 1. For MS Duo and MS Pro Duo cards in this card group, a card adapter (not provided) must be attached before inserting them into the 4-in-1 card slot. 2. For both MS Duo and MS Pro Duo cards, insulation paper (provided) needs to be taped on the card adapter before use to prevent any malfunctions from happening. Please refer to the following illustration for taping location: • The dotted line on the left figure shows the location where the insulation paper needs to go.
Notes on Folders and Files on Memory Card Maximum number of files and folders on memory card supported by PHOTO HARDDISK: • Maximum number of total folders: 255 • Maximum number folder depth: 8 layers • Maximum number of total files: 9999 Filename length of memory cards: PHOTO HARDDISK will use the original filename when its length does not exceeding 39 Unicode characters. If the filename on the memory card is longer than 39 Unicode characters, the filename will be automatically adjusted to DOS 8.
Menu Language The PHOTO HARDDISK supports two menu languages. The 2nd language can be set up with the utility program for PHOTO HARDDISK. language. Please refer to “PC Operation” for details in setting up the 2nd To change the menu language: 1. Select “Language” from main menu, and press the ENTER key. Current menu language will be displayed. 2. Press the UP or DOWN key to change the display language; Press ENTER key to select or BACK key to cancel. 3.
PC Operation You can use a PC to access the internal hard disk and card reader slots of the PHOTO HARDDISK, just like they are USB 2.0 external HD and card reader. For Windows 98SE users, a device driver needs to be installed before connecting the PHOTO HARDDISK. The installation CD contains the device driver, utility program and the electronic format of this manual. The installation CD will automatically install the necessary components based on the operating system of your computer.
Driver and Utility Installation 1. Do not connect PHOTO HARDDISK to computer yet. 2. Insert the installation CD into computer’s optical drive, the installation window should automatically appear on the screen. If the installation window doesn’t show up, go to “My Computer” and select the optical drive containing the CD, select and execute “autorun.exe,” the installation window will appear. 3.
Connecting to PC Note: Windows 98SE user needs to install device driver first before connecting the PHOTO HARDDISK to the computer. Please follow the procedures described in “Software Installation” to install the device driver. 1. Use your index finger to push aside the USB connector cover on top of PHOTO HARDDISK. the mini-USB plug to the connector. Connect Then connect USB Type A connector to computer. (Referring to the figure below.) 2. Press the ENTER key on PHOTO HARDDISK to start the connection.
PHOTO HARDDISK Utility Program The PHOTO HARDDISK Utility Program is provided to allow you to configure the startup screen and the 2nd menu language. You can select the startup screen from the one provided by the utility program or import from your own creation. You can also load the 2nd menu language to the PHOTO HARDDISK. You can select the active menu language from the two available menu languages. But the main language can not be changed. Only the 2nd language can be changed via the utility program.
¾ When creating your own startup image, use with sharp outline and sharp contrast to achieve better results ¾ There are three commands that allow you to rotate ( ), enlarge ( ), and shrink ( ) the loaded image before updating the PHOTO HARDDISK 4. To change the 2nd menu language in PHOTO HARDDISK, checkbox “Sub language” and select the one you need from the drop down list. 5.
Troubleshooting If you use Mini SD, RS-MMC, MS Duo, or MS Pro Duo, a card adapter (not provided) must be used before inserting them into the 4-in-1 card slot. If you encounter operation errors while you are using any of these 3 cards - Mini SD, MS Duo, MS Pro Duo, please check whether you have taped the card with insulation paper as instructed. For details about using insulation paper, please refer to “Memory Cards Back Up” section. PHOTO HARDDISK only supports FAT32 in standalone mode.