
User manual

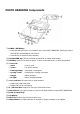

SD / MMC Card
1. For Mini SD and RS-MMC cards, a card adapter (not provided) must be attached before inserting
them into the 4-in-1 card slot.
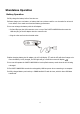
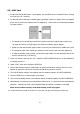
2. For Mini SD card in particular, insulation paper (provided) needs to be taped on the card adapter
before use to prevent any malfunctions from happening. Please refer to the following illustration
for taping location:
• The dotted line on the left figure shows the location where the insulation paper needs to go.
The white-out area on the right figure show after the insulation tape is applied.
• Please note that the insulation paper needs to cover the pins exposed in the middle of the card.
• The insulation paper will not affect the operation of the memory card with other appliances.
• To make an insulation tape yourself, you can take a paper label of 0.1mm thickness and cut it to
the size of 8.0mm (W) x 20.5mm (L).
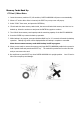
3. Insert your memory card into the 4-in-1 card slot; PHOTO HARDDISK will turn on automatically if
not already turned on.
4. Select “COPY” from menu, and press ENTER key.
5. If both card slots have memory cards inside, the screen will ask which memory card slot is to be
backed up. Select the card source and press the ENTER key again to continue.
6. The LCD will display memory card capacity and the remaining capacity of PHOTO HARDDISK.
7. Press the ENTER key to start the back up operation.
8. This screen will display memory card capacity and the remaining capacity of PHOTO HARDDISK.
9. While backup is in progress, press and hold the BACK key for 2~3 seconds will cancel the backup
operation. Backup Log screen will be displayed after the backup is complete or cancelled.
Note: Do not remove memory card while backup is still in progress.
10. To take the memory card out of the 4-in-1 card slot, just pull it out directly from the slot.
8