
User`s guide


Chapter 6 Basic Setting
GS3700/XGS3700 Series User’s Guide
76
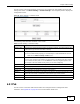
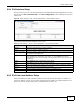
6.9.3 IPv6 Global Setup
Use this screen to configure the global IPv6 settings. Click the link next to IPv6 Global Setup in
the IPv6 Configuration screen to display the screen as shown next.
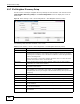
Figure 33 Basic Setting > IPv6 > IPv6 Configuration > IPv6 Global Setup
The following table describes the labels in this screen.
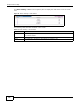
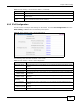
IPv6 Neighbor Setup Click the link to go to a screen where you can create a static IPv6 neighbor entry in the
Switch’s IPv6 neighbor table.
DHCPv6 Client Setup Click the link to go to a screen where you can configure the Switch DHCP settings.
Table 18 Basic Setting > IPv6 > IPv6 Configuration (continued)
LABEL DESCRIPTION
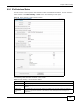
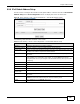
Table 19 Basic Setting > IPv6 > IPv6 Configuration > IPv6 Global Setup
LABEL DESCRIPTION
IPv6 Hop Limit Specify the maximum number of hops (from 1 to 255) in router advertisements. This
is the maximum number of hops on which an IPv6 packet is allowed to transmit before
it is discarded by an IPv6 router, which is similar to the TTL field in IPv4.
ICMPv6 Rate Limit
Bucket Size
Specify the maximum number of ICMPv6 error messages (from 1 to 200) which are
allowed to transmit in a given time interval. If the bucket is full, subsequent error
messages are suppressed.
ICMPv6 Rate Limit
Error Interval
Specify the time period (from 0 to 2147483647 milliseconds) during which ICMPv6
error messages of up to the bucket size can be transmitted. 0 means no limit.
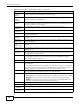
Apply Click Apply to save your changes to the Switch’s run-time memory. The Switch loses
these changes if it is turned off or loses power, so use the Save link on the top
navigation panel to save your changes to the nonvolatile memory when you are done
configuring.
Cancel Click Cancel to begin configuring this screen afresh.
Clear Click Clear to reset the fields to the factory defaults.