
user manual


Chapter 19 Auto-Attendant
X6004 User’s Guide
180
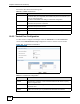
19.4.1 Add/Edit Auto-Attendant
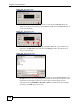
Use this screen to add or edit an auto-attendant. To access this screen, click the Add or Edit
icon in the Configuration > PBX > Outbound Line Management > Auto-Attendant screen
to view the screen as shown.
" Only the Add Auto-Attendant screen is shown. In the Edit Auto-Attendant
screen, the field names change from Add to Edit.
Figure 162 Add/Edit Auto-Attendant
Each field is described in the following table.
19.4.2 Auto-Attendant Menu Settings
Use this screen to edit auto-attendant menu settings. Click the Advanced icon in the
Configuration > PBX > Outbound Line Management > Auto-Attendant screen to view a
screen as shown next.
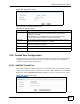
Description This field displays the description for an Auto-Attendant.
Add, Advanced,
Edit, Delete
Click:
• Add - to create a new Auto-Attendant.
• Advanced - to configure an Auto-Attendant.
• Edit - to change the name or description of an Auto-Attendant.
• Delete - remove an existing Auto-Attendant.
Table 72 Configuration > PBX > Outbound Line Management > Auto-Attendant
LABEL DESCRIPTION
Table 73 Add/Edit Auto-Attendant
LABEL DESCRIPTION
Name
Type a name for this Auto-Attendant. You can use alphanumeric characters as
well as the underscore “_”. Spaces are not allowed.
Description
Type a description for this Auto-Attendant. You can use alphanumeric characters
as well as the underscore “_”. Spaces are allowed.
Add/Edit
Click Add to save your changes.
Cancel
Click Cancel to go back to the previous screen without saving your changes.