P-2301/2R-P1C VoIP ATA / Station Gateway P-2301RL-P1C VoIP ATA / Station Gateway with Lifeline User’s Guide Version 3.60 3/2007 Edition 1 Copyright © 2007.
P-2301/2R-P1C / P-2301RL-P1C User’s Guide 1 Overview This guide helps you set up and use your ZyXEL P-2301RP1C, P-2301RL-P1C or P-2302R-P1C (the “ZyXEL Device”). This guide contains the following sections: Section Page Description Installation Requirements 4 A checklist of things you need before you install the ZyXEL Device. Making Hardware 5 Connections How to connect the ZyXEL Device to your network, your computer and telephone(s).
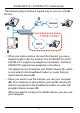
P-2301/2R-P1C / P-2301RL-P1C User’s Guide The following figure shows a typical way to use your ZyXEL Device. • When you make a phone call over the Internet, you use a telephone (A) to dial the number. The P-2301R-P1C and P2301RL-P1C support one telephone connection, and the P2302R-P1C supports two telephone connections. The telephone is connected to your ZyXEL Device (C), which is connected to the broadband modem or router that provides Internet access (D).
P-2301/2R-P1C / P-2301RL-P1C User’s Guide • P-2301RL-P1C only: use your telephone (A) to make calls over the regular telephone network (PSTN or Public Switched Telephone Network). The following table contains useful information about your ZyXEL Device. Default management IP Address 192.168.1.1 Default Subnet Mask 255.255.255.0 Default Password 1234 2 Installation Requirements Make sure you have the following things before you set up your ZyXEL Device.
P-2301/2R-P1C / P-2301RL-P1C User’s Guide 3 Making Hardware Connections 1 LINE (P-2301RL-P1C only): Use a telephone cable to connect the telephone jack to this port.
P-2301/2R-P1C / P-2301RL-P1C User’s Guide 2 PHONE / PHONE 1: Use a telephone cable (and any telephone adaptor provided with your ZyXEL Device) to connect your telephone to this port. 3 PHONE 2 (P-2302R-P1C only): connect another telephone to this port. If you have only one phone, use the PHONE 1 port. 4 ETHERNET: Use an Ethernet cable to connect your computer to this port. 5 WAN: Use an Ethernet cable to connect your broadband modem or router to this port.
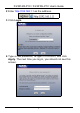
P-2301/2R-P1C / P-2301RL-P1C User’s Guide 2 Enter http://192.168.1.1 as the address. 3 Click Login. 4 Type a new password, re-type it to confirm, and click Apply. The next time you log in, you should not see this screen.
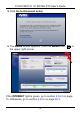
P-2301/2R-P1C / P-2301RL-P1C User’s Guide 5 Click Go to Advanced setup. 6 The Status screen appears. Click the Wizard icon ( the upper right corner. ) in If the INTERNET light is green, go to section 4.34.3 on page 16. Otherwise, go to section 4.24.2 on page 94.2.
P-2301/2R-P1C / P-2301RL-P1C User’s Guide 4.2 Connection Wizard If you subscribe to a Roadrunner service, you cannot use the Connection Wizard to set up your Internet connection. In this case, please use the Network > WAN > Internet Connection screen to enter your information. " You must have an Internet account set up and ready to use to complete this section. 1 In the Wizard Setup screen, click Connection Wizard.
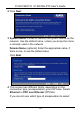
P-2301/2R-P1C / P-2301RL-P1C User’s Guide 2 Click Next. 3 System Name is used to identify the ZyXEL Device on the network. Use the default value, unless you know the name is already used in the network. Domain Name (optional): Enter the appropriate name, if there is one, or use the default value. Click Next. 4 This screen has different fields, depending on the connection type (encapsulation) your ISP uses. Select Ethernet or PPP over Ethernet (PPPoE).
P-2301/2R-P1C / P-2301RL-P1C User’s Guide • If your ISP gave you a user name and password, select PPP over Ethernet. • If your ISP did not give you a username and password, select Ethernet. Then, follow the instructions in the appropriate section below. 4.2.1 Connection Wizard (Ethernet) Follow these steps if your ISP uses an Ethernet connection. 1 Click Next. 2 Select Get automatically from your ISP if your ISP did not give you a static IP address. Then, click Next, and go to step 4 below.
P-2301/2R-P1C / P-2301RL-P1C User’s Guide Select Use fixed IP address provided by your ISP if your ISP gave you a static IP address. Then, click Next. 3 Enter the information provided by your ISP. If your ISP did not provide information for any of the fields in this screen, leave them at their default settings. Then, click Next.
P-2301/2R-P1C / P-2301RL-P1C User’s Guide 4 Select Factory default, unless you need to spoof your computer’s MAC address. Then, click Apply. 5 Click Finish. 6 Launch another web browser, and go to any web site (for example, http://www.zyxel.com). If you cannot access the Internet, see Troubleshooting on page 27. 4.2.2 Connection Wizard (PPP over Ethernet) Follow these steps if your ISP uses a PPP over Ethernet (PPPoE) connection.
P-2301/2R-P1C / P-2301RL-P1C User’s Guide 1 Enter the information provided by your ISP. If your ISP did not provide information for any of the fields in this screen, leave them at their default settings. Then, click Next. 2 Select Get automatically from your ISP if your ISP did not give you an IP address. Then, click Next, and go to step 4. Select Use fixed IP address provided by your ISP if your ISP gave you a static IP address. Then, click Next, and go to step 3.
P-2301/2R-P1C / P-2301RL-P1C User’s Guide 3 Enter the information provided by your ISP. If your ISP did not provide information for any of the fields in this screen, leave them at their default settings. Then, click Next. 4 Select Factory default, unless you need to spoof your computer’s MAC address. Then, click Apply.
P-2301/2R-P1C / P-2301RL-P1C User’s Guide 5 Click Finish. 6 Launch another web browser, and go to any web site (for example, http://www.zyxel.com). If you cannot access the Internet, see Troubleshooting on page 40. 4.3 VoIP Setup Wizard " You must have Internet access and a VoIP account before you can complete this section.
P-2301/2R-P1C / P-2301RL-P1C User’s Guide 1 In the Wizard Setup screen, click VoIP Setup. 2 Enter the information provided by your VoIP service provider. If you have a VoIP account like “1234@VoIPprovider.com”, the SIP Number is “1234”, and the SIP Service Domain is “VoIP-provider.com”. If your VoIP service provider did not provide information for any of the fields in this screen, leave them at their default settings.
P-2301/2R-P1C / P-2301RL-P1C User’s Guide Click Apply. P-2302R-P1C Only 3 Wait while the ZyXEL Device tries to register the VoIP account(s). 4 Click Finish. The PHONE light should be green.
P-2301/2R-P1C / P-2301RL-P1C User’s Guide 4.4 Bandwidth Management Wizard This Bandwidth Management Wizard allows you to specify the amount of bandwidth you allow certain applications to use on the ZyXEL Device. Use this wizard only if you want to ensure that certain applications, such as you VoIP calls, get enough bandwidth. If you want to use the wizard, click Bandwidth Management Wizard in the Wizards screen. The following screen displays.
P-2301/2R-P1C / P-2301RL-P1C User’s Guide 1 Click Next. In the screen that appears, select the Active checkbox. Enter the total amount of traffic the device can send to the WAN in the Managed Bandwidth (kbps) field. " This does not affect the total amount of traffic the device can send to the LAN. You should enter the maximum amount of data the ZyXEL Device can send to the WAN. For example, set this field to 1000 kbps if a broadband device connected to the WAN port has a maximum speed of 1000 kbps.
P-2301/2R-P1C / P-2301RL-P1C User’s Guide 2 In the next screen, select the services you want to have higher priority. The following table describes the services available in this screen. Service Description XBox Live This is Microsoft’s online gaming service that lets you play multiplayer XBox games over the Internet via broadband technology. VoIP (SIP) Sending voice signals over the Internet is called Voice over IP or VoIP.
P-2301/2R-P1C / P-2301RL-P1C User’s Guide You should select at least one service. If you do not select a service, or do not see its name in this screen, it receives a lower priority. Click Next. 3 Set the priority of each service. If a service has higher priority than other services, then it can use as much remaining bandwidth as it needs. If there is no more bandwidth left, other services have to wait. Click Apply.
P-2301/2R-P1C / P-2301RL-P1C User’s Guide 4 Click Finish. 4.5 PSTN Phone Line Configuration (P2301RL-P1 only) When one of your VoIP accounts is registered, the ZyXEL Device normally uses the Internet (VoIP) rather than the regular PSTN phone line to make phone calls. Use this section to set certain phone numbers (emergency services, for example) to always use the regular (PSTN) line. You can also set the PSTN line prefix number you enter on your telephone keypad before dialing a phone number.
P-2301/2R-P1C / P-2301RL-P1C User’s Guide In the main screen, click VoIP > PSTN Line. PSTN Line Pre-fix Number: Enter a number of 1 ~ 4 digits. When you enter this number on your telephone keypad, the ZyXEL Device uses the PSTN line to call the number you dial next. Relay to PSTN Line: Enter phone numbers for regular phone calls (that do not use the Internet) that you always want to dial without the prefix number. For example, enter emergency phone numbers here. Click Apply. 4.
P-2301/2R-P1C / P-2301RL-P1C User’s Guide • There is another router or gateway in the network, AND • You only want to use the ZyXEL Device for VoIP and Internet access. You do not want to use other features, such as the firewall, even with their default settings. If you want to use Bridge mode, follow these steps. 1 In the main screen, click Maintenance > System > General. 2 In the Mode field, select Bridge.
P-2301/2R-P1C / P-2301RL-P1C User’s Guide The ZyXEL Device automatically restarts. When the POWER light stops blinking and stays on, follow the directions in section 4 on page 64.1 to log in to the web configurator again. However, use the Management IP Address you set up in step 3, instead of http://192.168.1.1. If your computer’s IP address is in a different subnet, follow the directions in Setting Up Your Computer’s IP Address on page 31 to change your computer’s IP address.
P-2301/2R-P1C / P-2301RL-P1C User’s Guide For the P-2301RL-P1, follow these directions to make phone calls that do not use the Internet. • If the PHONE light is off (indicating that you do not have a VoIP account registered) just dial the phone number. • If you set up the phone number in the Relay to PSTN section (section 4.5 on page 23), just dial the phone number. • Otherwise, first dial the prefix you set in section 4.5 on page 23, and then dial the phone number. 5.
P-2301/2R-P1C / P-2301RL-P1C User’s Guide Make sure the power source is turned on. If the problem continues, contact your vendor. V The POWER light is red. Unplug the device, and plug it in again. If the problem continues, contact your vendor. V I can open the web browser, but I cannot see the Login screen. Make sure your web browser meets the requirements identified in section 2. Check the connection between your computer and the ZyXEL Device. See section 3.
P-2301/2R-P1C / P-2301RL-P1C User’s Guide Make sure your computer’s Ethernet adapter is installed and functioning properly. If you changed the ZyXEL Device’s mode or IP address, make sure you use the new IP address in the Address or URL field in the web browser. If the problem continues, contact your local vendor. V My password is not working. or I forgot my password for the ZyXEL Device. Make sure you enter the password correctly. It is case-sensitive. If you changed the password in section 4.
P-2301/2R-P1C / P-2301RL-P1C User’s Guide V When I pick up the phone’s receiver, I hear no dial tone. Check the connection between your telephone and the ZyXEL Device. See section 3. Test the telephone wire. 1 Connect the wire to a telephone and a regular telephone outlet. 2 If you cannot hear the dial tone, the wire might be broken. Use a different one. If the problem continues, contact your local vendor. V I cannot make VoIP phone calls. or The dial tone beeps or pulses. Log in to the ZyXEL Device.
P-2301/2R-P1C / P-2301RL-P1C User’s Guide 6.1 Resetting the ZyXEL Device This changes all the ZyXEL Device’s settings to their original values. You have to make all of your changes again. See section 1 on page 2 for information on default settings. " Make a note of your settings before you reset the ZyXEL Device. To reset the ZyXEL Device, 1 Press the RESET button until the POWER light starts to blink. (This usually takes ten seconds or less.) 2 Release the RESET button. 6.
P-2301/2R-P1C / P-2301RL-P1C User’s Guide 2 In Windows XP, click Network Connections. In Windows 2000/NT, click Network and Dial-up Connections. 3 Right-click on your network connection (for example, Local Area Connection). A menu appears, like the one shown here. 4 In the menu, click Properties. The network connection’s properties screen appears. 5 In the list in the middle of the screen, look for Internet Protocol (TCP/IP), and select it.
P-2301/2R-P1C / P-2301RL-P1C User’s Guide 6 Click Properties underneath the list. The Internet Protocol (TCP/IP) Properties screen appears. 7 Select Obtain an IP address automatically. 8 Select Obtain DNS server address automatically. 9 Click OK. 10Close the other windows. 6.2.
P-2301/2R-P1C / P-2301RL-P1C User’s Guide 1 Click Start > Settings > Control Panel and double-click the Network icon to open the Network window. The Network window Configuration tab displays a list of installed components. You need a network adapter, the TCP/ IP protocol and Client for Microsoft Networks. 2 If you need the adapter: • In the Network window, click Add. • Select Adapter and then click Add. • Select the manufacturer and model of your network adapter and then click OK.
P-2301/2R-P1C / P-2301RL-P1C User’s Guide • Select TCP/IP from the list of network protocols and then click OK. If you need Client for Microsoft Networks: • • • • Click Add. Select Client and then click Add. Select Microsoft from the list of manufacturers. Select Client for Microsoft Networks from the list of network clients and then click OK. If you added any of these components, restart your computer so the changes you made take effect.
P-2301/2R-P1C / P-2301RL-P1C User’s Guide • If you have a static IP address, select Specify an IP address and type your information into the IP Address and Subnet Mask fields. 5 Click the DNS Configuration tab. • If you do not know your DNS information, select Disable DNS.
P-2301/2R-P1C / P-2301RL-P1C User’s Guide • If you know your DNS information, select Enable DNS and type the information in the fields below (you may not need to fill them all in). 6 Click the Gateway tab. • If you do not know your gateway’s IP address, remove previously installed gateways. • If you have a gateway IP address, type it in the New gateway field and click Add. 7 Click OK to save and close the TCP/IP Properties window. Click OK to close the Network window. Insert the Windows CD if prompted.
P-2301/2R-P1C / P-2301RL-P1C User’s Guide 1 Click the Apple menu, and click System Preferences to open the System Preferences window. 2 Click Network in the icon bar. • Select Automatic from the Location list. • Select Built-in Ethernet from the Show list. • Click the TCP/IP tab.
P-2301/2R-P1C / P-2301RL-P1C User’s Guide 3 For dynamically assigned settings, select Using DHCP from the Configure list. 4 For static settings, do the following: • From the Configure box, select Manually. • Type your IP address in the IP Address box. • Type your subnet mask in the Subnet mask box. • Type the IP address of your gateway in the Router address box. 5 Click Apply Now and close the window. If prompted, restart your computer.
P-2301/2R-P1C / P-2301RL-P1C User’s Guide 7 Wall Mounting Instructions Do the following to hang your ZyXEL Device on a wall. 1 Select a position free of obstructions on a sturdy wall. 2 Drill two holes for the screws. Make sure the distance between the centers of the holes, and the size of screws you use, match what is listed in section 8 on page 41. " Be careful to avoid damaging pipes or cables located inside the wall when drilling holes for the screws.
P-2301/2R-P1C / P-2301RL-P1C User’s Guide 5 Align the holes on the back of the ZyXEL Device with the screws on the wall. Hang the ZyXEL Device on the screws. 8 Specifications Specifications are accurate at the time of writing. Feature Specification Default IP address 192.168.1.1 Default subnet mask 255.255.255.
P-2301/2R-P1C / P-2301RL-P1C User’s Guide Feature Specification Phone ports P-2301R-P1C and P-2301RL-P1C: One FXS (Foreign eXchange Station) POTS port. P-2302R-P1C: Two FXS (Foreign eXchange Station) POTS ports.
P-2301/2R-P1C / P-2301RL-P1C User’s Guide 9 Features Voice Functions SIP (RFC 3261) version 2 SDP (RFC 2327) RTP (RFC 1889) RTCP (RFC 1890) G.168 Echo Cancellation VAD (Voice Activity Detection) Silence Suppression CNG (Comfort Noise Generation) QoS Supports ToS and Diffserv Tagging Compression: G.711 (PCM), G.
P-2301/2R-P1C / P-2301RL-P1C User’s Guide Management Embedded Web Configurator CLI (Command Line Interpreter) Remote Management via Telnet or Web FTP/TFTP for firmware downloading, configuration backup and restoration Syslog Built-in Diagnostic Tools for FLASH memory, RAM and LAN port Firewall Stateful Packet Inspection. Prevent Denial of Service attacks such as Ping of Death, SYN Flood, LAND, Smurf etc. Real-time E-mail alerts. Reports and logs. Content Filtering Service blocking.
P-2301/2R-P1C / P-2301RL-P1C User’s Guide 10 Safety Warnings 1 For your safety, be sure to read and follow all warning notices and instructions. • Do NOT use this product near water, for example, in a wet basement or near a swimming pool. • Do NOT expose your device to dampness, dust or corrosive liquids. • Do NOT store things on the device. • Do NOT install, use, or service this device during a thunderstorm. There is a remote risk of electric shock from lightning.
P-2301/2R-P1C / P-2301RL-P1C User’s Guide to order a new one. • Do not use the device outside, and make sure all the connections are indoors. There is a remote risk of electric shock from lightning. • Do NOT obstruct the device ventilation slots, as insufficient airflow may harm your device. • Use only No. 26 AWG (American Wire Gauge) or larger telecommunication line cord. • If you wall mount your device, make sure that no electrical lines, gas or water pipes will be damaged. • This product is recyclable.
P-2301/2R-P1C / P-2301RL-P1C User’s Guide 11 Legal Information Certifications Federal Communications Commission (FCC) Interference Statement The device complies with Part 15 of FCC rules. Operation is subject to the following two conditions: • This device may not cause harmful interference. • This device must accept any interference received, including interference that may cause undesired operations.
P-2301/2R-P1C / P-2301RL-P1C User’s Guide 3 Select the certification you wish to view from this page. ZyXEL Limited Warranty ZyXEL warrants to the original end user (purchaser) that this product is free from any defects in materials or workmanship for a period of up to two years from the date of purchase.
P-2301/2R-P1C / P-2301RL-P1C User’s Guide • Warranty Information. • Date that you received your device. • Brief description of the problem and the steps you took to solve it. Corporate Headquarters (Worldwide) • • • • • • • Support E-mail: support@zyxel.com.tw Sales E-mail: sales@zyxel.com.tw Telephone: +886-3-578-3942 Fax: +886-3-578-2439 Web Site: www.zyxel.com, www.europe.zyxel.com FTP Site: ftp.zyxel.com, ftp.europe.zyxel.com Regular Mail: ZyXEL Communications Corp.
P-2301/2R-P1C / P-2301RL-P1C User’s Guide • Web Site: www.zyxel.fi • Regular Mail: ZyXEL Communications Oy, Malminkaari 10, 00700 Helsinki, Finland France • • • • • E-mail: info@zyxel.fr Telephone: +33-4-72-52-97-97 Fax: +33-4-72-52-19-20 Web Site: www.zyxel.fr Regular Mail: ZyXEL France, 1 rue des Vergers, Bat. 1 / C, 69760 Limonest, France Germany • • • • • • Support E-mail: support@zyxel.de Sales E-mail: sales@zyxel.de Telephone: +49-2405-6909-69 Fax: +49-2405-6909-99 Web Site: www.zyxel.
P-2301/2R-P1C / P-2301RL-P1C User’s Guide 92806-2001, U.S.A. Norway • • • • • • Support E-mail: support@zyxel.no Sales E-mail: sales@zyxel.no Telephone: +47-22-80-61-80 Fax: +47-22-80-61-81 Web Site: www.zyxel.no Regular Mail: ZyXEL Communications A/S, Nils Hansens vei 13, 0667 Oslo, Norway Poland • • • • • E-mail: info@pl.zyxel.com Telephone: +48 (22) 333 8250 Fax: +48 (22) 333 8251 Web Site: www.pl.zyxel.com Regular Mail: ZyXEL Communications, ul.
P-2301/2R-P1C / P-2301RL-P1C User’s Guide Ukraine • • • • • • Support E-mail: support@ua.zyxel.com Sales E-mail: sales@ua.zyxel.com Telephone: +380-44-247-69-78 Fax: +380-44-494-49-32 Web Site: www.ua.zyxel.com Regular Mail: ZyXEL Ukraine, 13, Pimonenko Str., Kiev, 04050, Ukraine United Kingdom • • • • • • • Support E-mail: support@zyxel.co.uk Sales E-mail: sales@zyxel.co.uk Telephone: +44-1344 303044, 08707 555779 (UK only) Fax: +44-1344 303034 Web Site: www.zyxel.co.uk FTP Site: ftp.zyxel.co.
P-2301/2R-P1C / P-2301RL-P1C User’s Guide Communications, Inc. Other trademarks mentioned in this publication are used for identification purposes only and may be properties of their respective owners.