
Operation Manual


Chapter 10 Applications
Cloud Storage User’s Guide
208
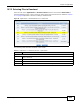
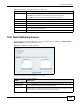
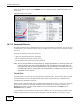
Click Applications > Copy/Sync Button to open the following screen.
Figure 104 Applications > Copy/Sync Button
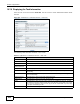
The following table describes the labels in this screen.
Table 66 Applications > Copy/Sync Button
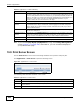
LABEL DESCRIPTION
Copy Settings
NAS Copy Target Select the NAS share to use with the copy function.
USB Volume If your USB or SD device has multiple partitions, select which partition to use with the
copy function.
Copy Direction Select USB -> NAS to copy files from your USB or SD device to the NAS.
Select NAS -> USB to copy files from the NAS to your USB or SD device.
Create a New Folder
for Copied Files
Select this option to place the copied files in a new folder.
The name of the folder created for the copied files consists of the date and time of the
copy in year_month_day_hour_minute_second format.
Backup Files to be
Replaced
This option is only available if you do not select Create a New Folder for Copied
Files. Select this option to save the files that will be replaced by the source files.
Backup Target Select a share in which to save the backup files.
Note: The NAS will not create a new folder to store the backup files. It is recommended to
create a specific share (such as “backup”) for backup purposes.
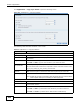
Sync Settings
NAS Sync Target Select the NAS share to use with the synchronization function.
USB Volume If your USB device has multiple partitions, select which partition to use with the
synchronization function.
Sync Direction Select USB -> NAS to synchronize files from your USB or SD device to the NAS.
Select NAS -> USB to synchronize files from the NAS to your USB or SD device.
Select NAS <-> USB to synchronize files in both directions simultaneously.