
Operation Manual

Chapter 10 Applications
Cloud Storage User’s Guide
214
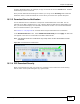
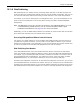
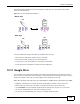
1 Click Applications > Web Publishing and configure the screen as shown (enable the web
publishing and move FamilyPhotos over to Published Shares) and click Apply.
Figure 110 Applications > Web Publishing (Example)
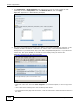
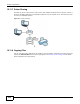
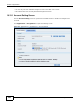
2 Now open your web browser and type in the address of the NAS’s FamilyPhotos web page. In this
example, the NAS’s IP address is 192.168.1.33, and the name of the web-published share is
FamilyPhotos. So you would enter “http://192.168.1.33/MyWeb/FamilyPhotos/” in your browser’s
address bar. Then press [ENTER] or click Go. A screen displays listing the share’s files.
Figure 111 Browsing to an NAS Share Example
• Click a file’s link to open the file.
• Right-click a file’s link and select Save Target As.. (in Internet Explorer) to save a copy of the
file.
• Click a label in the heading row to sort the files by that criteria.
• To customize how the page looks and works, create an index.html or index.htm file and store it in
the share.