
Operation Manual


Chapter 17 Shares
Cloud Storage User’s Guide
274
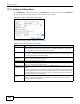
17.3.1 Adding or Editing Share
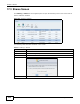
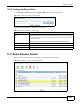
Click Add Share to create a new share. In the Shares screen, select a share and click Edit Share
to open the following screen. Use this screen to create or edit a share.
Figure 150 Shares > Add Share (or Edit Share)
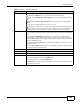
The following table describes the labels in this screen.
Table 92 Shares > Add Share (or Edit Share)
LABEL DESCRIPTION
Share Name Type a share name from 1 to 239 single-byte (no Chinese characters allowed for example)
ASCII characters. The name cannot be the same as another existing share. See Section
4.5.6 on page 82 for more information on share names.
Volume You should have already created volumes (a single accessible storage area with a single
file system) on the NAS. Select the one that contains the folder that you want to share out.
You cannot modify this when editing a share.
Make this share
owned by
Select the administrator or user account that can own (manage) this share. The share
owner controls access rights to the share.
Enable this share Click this to allow access to this share.
Enable Recycle
Bin
Click this to activate the recycle bin. When you delete a file from this share, a recycle
folder is created to store the deleted item.
Publish this share
to Media Server
This option is available only when you enable the Media Server (Section 10.5 on page
190
).
Select this option to have the NAS make media files in this share available to media clients
and through the Playzone screens. When you publish a share, you can also select whether
or not to publish music tracks, photos, and videos. The media clients do not have to use a
password to play the shares you publish.
Publish this share
to Web
This option is available when you enable the Web Publish (Section 10.8 on page 205).
Select this option to let people use a web browser to access this share’s files without
logging into the Web Configurator.