
User's Manual


P-2024 Quick Start Guide
11
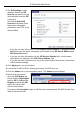
2 The SIP Settings screen
displays. Select the SIP
Account you want to set up
(this example uses the SIP
1 account).
Ensure that Active SIP
Account is selected. Enter
the account information
provided by your ITSP in the
relevant fields.
• If you do not have information for the Register Server Address or Register Server
Port fields, use the same information you entered in the SIP Server Address and
SIP Server Port fields.
• If you do not have information for the SIP Service Domain field, use the same
information you entered in the SIP Server Address field.
• If you do not have information for any of the other fields in this screen, leave them
at their default settings.
3 Click Apply when you are finished.
4 Look at the P-2024’s LEDs. Analog phone port 1’s LED turns on.
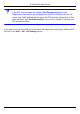
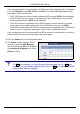
5 Click the Status icon in the navigation panel. The Status screen displays.
6 Scroll down the screen.
Click the VoIP Status tab.
Check that the Registration
field for SIP 1 displays On
Register and that the URI
shows the correct SIP
account information.
If you press the Unregister button, the SIP account is deactivated. DO NOT do this if you
want to use the account.