P-27xx Series Models: P-2701RL VoIP ATA / Gateway with Lifeline P-2702R VoIP ATA / Gateway Default Login Details IP Address http://192.168.1.1 User Name admin Password 1234 Firmware Version 1.01 www.zyxel.com Edition 1, 09/2010 www.zyxel.
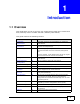
CHAPTER 1 Introduction 1.1 Overview This guide helps you set up and use your ZyXEL Device (either the P-2702R VoIP ATA / Gateway or the P-2701RL VoIP ATA / Gateway with Lifeline). This guide contains the following sections: SECTION PAGE DESCRIPTION Installation Requirements 5 A checklist of things you need before you install the ZyXEL Device. Making Hardware Connections 6 How to connect the ZyXEL Device to your network, your computer and telephone(s).
Chapter 1 Introduction SECTION PAGE DESCRIPTION Wall Mounting Instructions 47 How to attach the ZyXEL Device to a wall. Safety Warnings 49 Using the ZyXEL Device safely. Open Software Announcements 49 Description of ZyXEL’s open software use and where to download open source components modified by ZyXEL. Legal Information 51 Certifications, warranty and customer support information. 1.
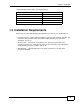
Chapter 1 Introduction Important information about your ZyXEL Device: Default Management IP Address 192.168.1.1 Default Subnet Mask 255.255.255.0 Default Admin User Name admin Default Admin Password 1234 Default User Name user Default User Password user 1.3 Installation Requirements Make sure you have the following things before you set up your ZyXEL Device: • Internet Account - Information provided by your ISP (the company that lets you connect to the Internet).
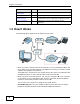
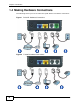
Chapter 1 Introduction 1.4 Making Hardware Connections The following shows you how to make the ZyXEL Device’s hardware connections.
Chapter 1 Introduction 1 LINE (P-2701RL only): Use a telephone cable to connect the telephone jack (or the TEL or PHONE jack on a splitter, if one is already installed) to this port. 2 PHONE 1 / PHONE 2: Use a telephone cable (and any telephone adaptor provided with your ZyXEL Device) to connect your telephone to this port. 3 LAN: Use an Ethernet cable to connect your computer to this port. 4 WAN: Use an Ethernet cable to connect your broadband modem or router to this port.
Chapter 1 Introduction 8 P-27XX Series User’s Guide
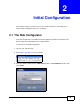
CHAPTER 2 Initial Configuration This chapter shows you how to set up your ZyXEL Device by connecting to its built-in Web Configurator with your computer. 2.1 The Web Configurator The web configurator is an HTML-based management interface that allows easy device setup and management via a web browser. To connect to the Web Configurator: 1 Launch your web browser. 2 Enter http://192.168.1.1 as the address. 3 Enter the default administrator Username (admin) and Password (1234), then click Login.
Chapter 2 Initial Configuration 4 Click Go to Wizard setup. 5 The Configuration Wizard opens. 2.2 The Connection Wizard This section shows you how to configure your Internet connection settings using the Connection Wizard. Note: You must have an active Internet account with a service provider in order to complete this section. 10 1 In the Wizard Setup screen, select Connection Wizard. 2 In the Welcome screen, click Next.
Chapter 2 Initial Configuration 3 In the Time Zone Setting screen, select Enable NTP Client Update if you want to maintain the ZyXEL Device’s internal clock by synchronizing it with a time server. If you do this, choose a Time Zone and an NTP Server closest to your location from their respective menus, then click Next to save your settings and go to the next screen. 4 The WAN Interface Setting screen has different fields, depending on the type of Internet access your ISP uses.
Chapter 2 Initial Configuration 2.2.1 Static IP Connection Settings Follow these steps if your ISP uses a static IP connection. 1 Select Static IP from the WAN Access Type menu. The screen changes to provide options for this setting. 2 Enter the settings as provided by your ISP. 3 Click Finished to save your settings. 2.2.2 DHCP Connection Settings Follow these steps if your ISP uses a dynamic IP connection. 1 Select Dynamic IP from the WAN Access Type menu. 2 Click Finished to save your settings.
Chapter 2 Initial Configuration 2 Enter the User Name and Password assigned to you by your ISP. 3 Click Finished to save your settings. 2.2.4 Test Your Internet Connection Open another tab in your web browser and go to any web site (for example, http://www.zyxel.com). If you cannot access after using the configuration settings provided by your ISP, see Troubleshooting on page 37. 2.
Chapter 2 Initial Configuration 3 P-2702R Only: The Phone 2 SIP Settings screen appears next. If you want to set up a second VoIP account, select Enable SIP then enter the information for the second VoIP account as you did for the first one in step 2. If you do not want to configure a second VoIP account at this time, you can do so later in the VoIP > SIP > SIP Settings screen of the advanced Web Configurator. 4 Click Finish to save your settings. 2.3.
CHAPTER 3 Phone Use and Configuration This chapter describes basic phone setup and usage, as well as select advanced VoIP configuration options for your ZyXEL Device. 3.1 PSTN Phone Set Up (P-2701RL Only) When one of your VoIP accounts is registered, the ZyXEL Device normally uses the Internet (VoIP) rather than the regular PSTN phone line to place and receive phone calls.
Chapter 3 Phone Use and Configuration 3.3 Advanced Phone Configuration Click VoIP > SIP to open the SIP Settings screen. This screen allows you to manage up to two SIP accounts. Figure 3 The SIP Settings Screen To have the ZyXEL Device add a “user=phone” parameter to the SIP URI before sending a SIP INVITE request, select the Enable option next to Set User Header To Phone. This parameter indicates the user part of the SIP URI (@) the ZyXEL Device is calling is a valid telephone number.
Chapter 3 Phone Use and Configuration Figure 4 The Phone SIP Settings screen The following table describes the labels in this screen. Table 1 SIP Setting LABEL DESCRIPTION Active SIP Account Select this if you want the ZyXEL Device to use this account. Clear it if you do not want the ZyXEL Device to use this account. Account Name Enter a descriptive name for this SIP account. You can use up to 127 printable ASCII characters. Number Enter your SIP number.
Chapter 3 Phone Use and Configuration Table 1 SIP Setting (continued) LABEL DESCRIPTION Outbound Select this if your VoIP service provider has a SIP outbound server to Proxy Server handle voice calls. This allows the ZyXEL Device to work with any type of NAT router and eliminates the need for STUN or a SIP ALG. Turn off any SIP ALG on a NAT router in front of the ZyXEL Device to keep it from re-translating the IP address (since this is already handled by the outbound proxy server).
Chapter 3 Phone Use and Configuration Note: Enter any advanced SIP configuration information as it was given to you by your SIP service provider. If you do not have any advanced configuration information, you can skip this section. Figure 5 Advanced SIP Settings (part 1) The following table describes the labels in this screen. Table 2 SIP Setting LABEL DESCRIPTION SIP Port Enter the port number on your ZyXEL Device that SIP calls made with the selected phone should use.
Chapter 3 Phone Use and Configuration Table 2 SIP Setting (continued) LABEL DESCRIPTION DTMF Relay Dual-Tone Multi-Frequency (DTMF) relay detects DTMF signals and sends them out-of-band (via SIP or RTP) to the remote party. DTMF relay is used when a low-bitrate voice codec might distort DTMF signals sent over the voice channel. The available relay types are: • • • RFC2833 Payload Type RFC2833 - Relays DTMF tones in outband RTP packets. SIP INFO - Relays DTMF tones in outband SIP packets.
Chapter 3 Phone Use and Configuration The following table describes the labels in this screen. Table 3 SIP Setting LABEL DESCRIPTION Forward Setting Immediate Forward to Select Enable to turn this feature on, and Off to disable it. Immediate Number Enter a SIP number to receive calls forwarded from the ZyXEL Device. When enabled, all incoming calls are forwarded immediately to the Immediate Number. Busy Forward to Select Enable to turn this feature on, and Off to disable it.
Chapter 3 Phone Use and Configuration Figure 7 Advanced SIP Settings (part 3) The following table describes the labels in this screen. Table 4 SIP Setting LABEL DESCRIPTION Session Timer Enable Select Enable if you want to define how long the ZyXEL Device waits to receive a session-alive packet for a voice session from the SIP server. Minimum Expiration Time Enter the minimum time the ZyXEL Device waits for a session-alive packet (90-65536 seconds).
Chapter 3 Phone Use and Configuration Table 4 SIP Setting (continued) LABEL Dial Plan Rules DESCRIPTION Enter the dial plan rules pattern. A rules pattern may look something like this: (*xx|[3469]11|[2-9]xxx|011x) A dial plan defines the dialing patterns, such as the length and range of the digits for a telephone number. It also includes country codes, access codes, area codes, local numbers, long distance numbers or international call prefixes. • • • • The collection of rules is in parentheses ().
Chapter 3 Phone Use and Configuration Figure 8 Advanced SIP Settings (part 4) The following table describes the labels in this screen. Table 5 SIP Setting LABEL DESCRIPTION Codec Setting Type This lists the available voice codecs. Priority Use this section to indicate the codec priority. Codecs are engaged in order of priority from 1 to 8, with 1 being the highest on the list.
Chapter 3 Phone Use and Configuration the telephone number for local information, ‘411’, then when you press #01 on your phone’s keypad and wait 3 seconds, the ZyXEL Device dials 4-1-1. Figure 9 The Speed Dial Screen The following table describes the labels in this screen. Table 6 Speed Dial LABEL DESCRIPTION Port Setting Select the phone port you want to configure in this screen. (P-2702R only) Position This indicates the speed dial number.
Chapter 3 Phone Use and Configuration 3.5 Dial Plan with URL Click VoIP > Phone Book > Dial Plan with URL to open this screen. Use this screen to create dial plan with URL entries which allow you to make peer-to-peer calls. In peer-to-peer calls, you call another VoIP device directly without going through a VoIP service provider’s SIP server. Enter the callee’s IP address or domain name.
Chapter 3 Phone Use and Configuration The following table describes the labels in this screen. Table 7 Dial Plan with URL LABEL DESCRIPTION Index This indicates the index number of each entry. Port Setting Select the phone port you want to configure here. (P-2702R only) SIP Number Enter the SIP number you want the ZyXEL Device to call. Destination Enter the IP address or domain name of the party you want to call when you dial the corresponding SIP number to make a peer-to-peer call.
Chapter 3 Phone Use and Configuration Table 8 Call Features (continued) FUNCTION KEY COMBINATIONS USA FLASH 2 Call-Waiting 3-way Calling FLASH EUROPE (DEFAULT) Switch back and forth between two calls. Put the current call on hold to answer an incoming call. FLASH 0 Reject an incoming call which is waiting for an answer. FLASH 1 Drop the current call and answer the incoming call. FLASH 2 Put the current call on hold to answer an incoming call.
Chapter 3 Phone Use and Configuration Table 8 Call Features (continued) FUNCTION KEY COMBINATIONS USA Internal Call #### Call the phone(s) connected to the ZyXEL Device's other phone port. Speed dial #01 ~ #10 Press a speed dial number on your phone to have the ZyXEL Device automatically dial the pre-configured telephone number. See Section 3.4 on page 24 for more information. IVR Main Menu #120 Tell you the ZyXEL Device’s WAN IP address. #121 Tell you the ZyXEL Device’s IP type.
Chapter 3 Phone Use and Configuration 30 P-27XX Series User’s Guide
CHAPTER 4 Maintenance This chapter shows you how to configure system related settings, such as operating mode and system password, and auto-provision and TR-069 autoconfiguration settings. 4.1 System Mode and Accounts Use this screen to configure your ZyXEL Device as a router or a bridge, and the system passwords. 4.1.1 Operating Mode The ZyXEL Device is in router mode by default and functions as a router. In bridge mode, the DHCP server on the ZyXEL Device is disabled.
Chapter 4 Maintenance Click Maintenance > System > General to open this screen. Figure 11 System General The following table describes the labels in this screen. Table 9 System General LABEL DESCRIPTION System Setup Mode Select Router to set the ZyXEL Device to router mode. Select Bridge and configure the Manager IP Address to set the ZyXEL Device to bridge mode.
Chapter 4 Maintenance 4.2 Auto-Provision Click Maintenance > System > Auto Provision to open this screen. If you need to provision more than one ZyXEL Device, use this screen to back up (save) the ZyXEL Device’s current configuration to a text file on your computer. Edit the configuration file using a text editor and put it on an auto-provisioning server.
Chapter 4 Maintenance Table 10 Auto Provision (continued) LABEL DESCRIPTION FTP Password If you select to transmit the auto-provisioning configuration file using FTP, enter your FTP account password for authentication. File Path Specify the location of the auto-provisioning file you want to download. Expiration Time Specify how long the ZyXEL Device waits after it successfully receives an auto-provisioning file before it requests another.
Chapter 4 Maintenance Click Maintenance > System > TR069 Setting to open this screen. Use this screen to configure your ZyXEL Device to be managed by an ACS. Figure 13 TR069 Setting The following table describes the labels in this screen. Table 11 TR069 Setting LABEL DESCRIPTION General ACS Client Enable Select Enabled to activate remote management via TR-069 on the WAN. Otherwise, select Disabled. ACS URL Enter the URL or IP address of the auto-configuration server.
Chapter 4 Maintenance Table 11 TR069 Setting (continued) LABEL DESCRIPTION Password Enter the connection request password. When the ACS makes a connection request to the ZyXEL Device, this password is used to authenticate the ACS. 36 Apply Changes Click this to save your changes and then return to the previous screen. Reset Click this to reset the options in this screen to their defaults.
CHAPTER 5 Troubleshooting This chapter offers some suggestions to solve problems you might encounter. None of the lights turn on when I plug in the ZyXEL Device. • Make sure that you are using the power adaptor provided with the ZyXEL Device. • Check all the hardware connections. • Make sure the power source is turned on. • If the problem continues, contact your vendor. The POWER light is red. • Unplug the device, and plug it in again. • If the problem continues, contact your vendor.
Chapter 5 Troubleshooting My password is not working. or I forgot my password for the ZyXEL Device. • Make sure you enter the password correctly. It is case-sensitive. • If you changed the password and then forgot it, you can reset the device pressing down the ZyXEL Device’s Reset button and holding it for 3 seconds. The web configurator returns to the Login screen when I try to do something. By default, the Web Configurator times out after five minutes and you must log in again.
Chapter 5 Troubleshooting 5.0.1 Resetting the ZyXEL Device This changes all the ZyXEL Device’s settings to their original values. You will need to configure any custom settings again. Note: Make a note of your custom settings before you reset the ZyXEL Device. To reset the ZyXEL Device: 1 Press the RESET button until the POWER, PHONE 1, and PHONE 2/Lifeline lights starts to blink in sequence. (This usually takes ten seconds or less.) 2 Release the RESET button. 5.0.
Chapter 5 Troubleshooting And in the Web Configurator’s main Status screen under VoIP Status: Figure 15 The Status Screen Use the following table to determine your phone’s REG status: Table 12 REG Status 40 CODE STATUS 380 Alternative Service response 400 Bad Request response 401 Unauthorized response 402 Payment Required response 403 Forbidden response 404 Not Found response 405 Method Not Allowed response 407 Proxy AuthenticationRequired response 408 Request Timeout response 410
Chapter 5 Troubleshooting Table 12 REG Status CODE STATUS 421 Extension Required response 422 Session Timer IntervalToo Small response 423 Interval Too Brief response 428 Use Authentication Token response 429 Provide Referror Identity response 480 Temporarily Unavailable response 481 Dialog/Transaction Does Not Exist response 482 Loop Detected response 483 Too Many Hops response 484 Address Incomplete response 485 Ambiguous response 486 Busy Here response 487 Request Terminated r
Chapter 5 Troubleshooting 42 P-27XX Series User’s Guide
CHAPTER 6 Specifications Specifications are accurate at the time of writing. FEATURE SPECIFICATION Default IP address 192.168.1.1 Default subnet mask 255.255.255.
Chapter 6 Specifications 6.
Chapter 6 Specifications FEATURE DESCRIPTION Protocol Support TCP / IP UDP / IP DNS ICMP TELNET TFTP FTP HTTP NTP ARP Dynamic DNS RIP-1(RFC 1058), RIP-2(RFC1389) Security IP Filtering MAC Filtering URL Filtering Port Filtering Port Forwarding DMZ MD5 encryption Supervision and Control Two Tier WEB Interfaces Telnet Firmware Upgrade via FTP or TFTP or HTTP Backup and Restore Configuration Proprietary Auto-Provision Traffic Statistics Reset to Default Web Access Account Configuration Time Zone Configu
Chapter 6 Specifications FEATURE DESCRIPTION Audio Codec ITU-T G.711 (64 Kbps) ITU-T G.729 AB ITU-T G.726 (16/24/32/40 kbps) ITU-T G.723.1 (6.3K/5.3Kbps) Detection and Suppression of Silence (VAD) Comfort Noise Generation of (Comfort Noise) Echo Cancellation: G.168/G.165 Volume Adjustment Dynamic Jitter Buffer (Adaptive) PLC (Packet Loss Concealment) DTMF Detection and Generation DTMF: In-Band and Out-of-Band (PCM, RFC 2833, SIP INFO) G.
Chapter 6 Specifications 6.2 Wall Mounting Instructions To hang your ZyXEL Device on a wall: 1 Select a position free of obstructions on a sturdy wall. 2 Drill two holes for the screws. Make sure the distance between the centers of the holes and the size of screws match the following specifications: Note: Be careful to avoid damaging pipes or cables located inside the wall when drilling holes for the screws. 3 Do not screw the screws all the way into the wall. Leave a small gap of about 0.
Chapter 6 Specifications 48 5a For a horizontal installation, do not place the device in an inverted position; make sure the holes on the back of the ZyXEL Device are positioned at the top and that they match the positions of the holes drilled into the wall. Ensure that the two side vents remain unblocked. 5b For a vertical installation, ensure that the holes on the ZyXEL Device match the positions of the holes drilled into the wall and that the two side vents remain unblocked.
APPENDIX A Appendix Safety Warnings • • • • • • • • • • • • • • • • • • Do NOT use this product near water, for example, in a wet basement or near a swimming pool. Do NOT expose your device to dampness, dust or corrosive liquids. Do NOT store things on the device. Do NOT install, use, or service this device during a thunderstorm. There is a remote risk of electric shock from lightning. Connect ONLY suitable accessories to the device. Do NOT open the device or unit.
Chapter 6Appendix A SpecificationsAppendix 2.Ownership You have no ownership rights in the Software. Rather, you have a license to use the Software as long as this License Agreement remains in full force and effect. Ownership of the Software, Documentation and all intellectual property rights therein shall remain at all times with ZyXEL. Any other use of the Software by any other entity is strictly forbidden and is a violation of this License Agreement. 3.
Chapter 6Appendix A SpecificationsAppendix relating to confidentiality, proprietary rights, and non-disclosure shall survive the termination of this Software License Agreement. 12.General This License Agreement shall be construed, interpreted and governed by the laws of Republic of China without regard to conflicts of laws provisions thereof.
Chapter 6Appendix A SpecificationsAppendix Related Documentation Please go to http://www.zyxel.com for product news, firmware, documentation, and other support materials. Copyright Copyright © 2010 by ZyXEL Communications Corporation.