
HP Data Protector Configuring and integrating DP Cell Manager with Veritas Cluster Server on Windows


5
Installing Data Protector on cluster nodes
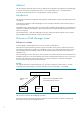
Unlike MSCS cluster, Data Protector does not recognize cluster availability during installation, so Data Protector is
installed as a standalone Cell Manager in all the nodes of the cluster, and then manually integrated with Veritas
Cluster Service Groups.
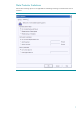
Install the Data Protector Software as a standalone Cell Manager in all the nodes of the cluster in turn, with the
Internal Database residing on the shared disk. Make sure that the shared disk is mounted on the node while
installing the Cell Manager.
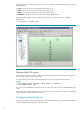
Here, the Internal Database is set as G:\DP, which is the shared disk mounted on the active node of the cluster.
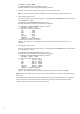
As the Data Protector is installed as a standalone server, configure it with the Virtual IP as follows:
1. Access the Internal Database catalog cell name as Virtual IP:
C:\Users\administrator.IPR>omnidbutil -show_cell_name
Catalog database owner: "ipr001155.ipr.home.net"
C:\Users\administrator.IPR>omnidbutil -change_cell_name IPR001154.ipr.home.net
-
force
DONE!
2. Check the Catalog cell name of the Data Protector:
C:\Users\administrator.IPR>omnidbutil -show_cell_name
Catalog database owner: "ipr001154.ipr.home.net"
3. Import the Virtual Host as a Data Protector client:
C:\Users\administrator.IPR>omnicc -import_host ipr001154.ipr.home.net –virtual
Import host successful.
C:\Users\administrator.IPR>omnisv –stop
HP Data Protector services successfully stopped.
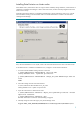
4. Manually change the client node registry entry of Cell Manager name:
Regpath:HKEY_LOCAL_MACHINE\SOFTWARE\Hewlett-Packard\OpenView\OmniBackII\Site