
Internet Express for Tru64 UNIX Version 6.8 Administration Guide (14233)


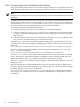

1. From the Manage User Self-Administration menu, choose Modify Web Server Configuration.
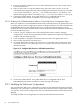
2. Select a Virtual Host from the list of virtual hosts or click on Remove Configurations to
remove all user self-administration configurations from the httpd.conf file (Figure 3-14:
Modify Web Server Configuration Page).
When you select a virtual host, it must be configured on your system. See Section 3.12.1.1:
Enabling User Self-Administration When No Web Server Configuration Exists for more
information.
Figure 3-14 Modify Web Server Configuration Page
3. Edit the alias name, if desired. The alias name must begin and end with a slash (/).
4. Click on Submit. If you chose to remove configurations, you will be prompted to confirm
that action. A status message is displayed.
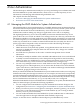
3.12.3 Enabling and Disabling Login Delays
By default, a security measure is in place which causes a delay in the processing of login requests
after a number of successive failed login attempts. This feature can be disabled, though not
recommended, because disabling will expose your system to security risks.
To enable or disable a delay in the processing of login requests:
1. From the Manage Users menu, choose Manage User Self–Administration.
The Manage User Self-Administration menu is displayed.
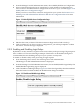
2. From the Manage User Self-Administration menu, choose Enable/Disable Login Delay. The
Enable/Disable Login Delay page is displayed.
3. Click on Enable to enable login delays. Figure 3-15 shows that login delays have been enabled.
Once this feature has been enabled, the Enable button changes to Disable.
Figure 3-15 Enable and Disable Login Delays
3.12 Managing the User Self-Administration Feature 65