-
DSA-3110 Hotspot Service Gateway User Manual Rev. 2.4.3 (Jun.
-
DSA-3110 Hotspot Edition – User Manual Contents GENERAL INFORMATION....................................................................4 About DSA-3110 Hotspot Edition...........................................................................4 Typical Connection Schemes....................................................................................5 NAT Function............................................................................................................
-
DSA-3110 Hotspot Edition – User Manual Users.........................................................................................................................34 Working with User Table.............................................................................................................34 Loading User Database from File................................................................................................35 Additional Information on Users Page..........................................
-
DSA-3110 Hotspot Edition – User Manual GENERAL INFORMATION About DSA-3110 Hotspot Edition The DSA-3110 Hotspot Edition is an access concentrator with HTTP authentication designed to connect users to global network services (e.g., the Internet). The device provides connection and authorization of users, as well as local delivery of connection statistics (to the web-based interface of the device).
-
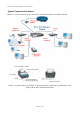
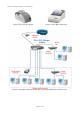
DSA-3110 Hotspot Edition – User Manual Typical Connection Schemes Pictures 1, 4, and 5 represent typical schemes for connecting the DSA-3110 Hotspot Edition. Picture 1. A general scheme of the DSA-3110 Hotspot Edition connection in a public access zone jointly with the DSA-3100P thermal printer.
-
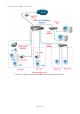
DSA-3110 Hotspot Edition – User Manual Picture 2.The UNS-SP1 printer. Picture 3.The CBM-910II printer. Picture 4. A sample connection of the DSA-3110 Hotspot Edition in an Internet cafe.
-
DSA-3110 Hotspot Edition – User Manual Picture 5. A sample connection of the DSA-3110 Hotspot Edition in a hotel.
-
DSA-3110 Hotspot Edition – User Manual NAT Function The NAT (Network Address Translation) service allows using a single private IP addresses in several internal subnets, thereby fewer registered IP addresses are required. A NAT-enabled device is located on the edge between the public and private networks and translates private IP addresses to unique global IP addresses before sending packets to the external network. The NAT service can perform static or dynamic translation.
-
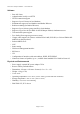
DSA-3110 Hotspot Edition – User Manual Software • • • • • • • • • • • • • • • • • • • Base OS: Linux Authentication: locally over HTTP HTTPS connection support Support of up to 250 users in local database Simultaneous support of local database and Radius DB users Radius accounting (for Radius DB users) Support of up to 100 user groups (tariffs) in local database Support of up to 50 or 80 (for DSA-3110/E/B Hotspot Edition) simultaneous users Time and traffic quota support Free Surfing Zone support (guest
-
DSA-3110 Hotspot Edition – User Manual DSA-3110 HOTSPOT EDITION INSTALLATION AND OPERATION Power On The DSA-3110 Hotspot Edition device provides configuration via the web-based interface, which allows using any computer with a web browser (regardless of OS) as a management station, and via SSH (for more details see the document “DSA-3110 СLIGuide”). Before you begin configuration of the DSA-3110 Hotspot Edition, you should establish a physical connection to the device.
-
DSA-3110 Hotspot Edition – User Manual Note: For security reasons, it is strongly recommended to change the administrator password. Please, go to the System > Administrator password page to change the password. After successful registration the system statistics page is displayed. Picture 6. The page displaying the system statistics. The device allows changing the web-based interface language in one click. To do so, click the English or Russian link in the right top corner of the screen.
-
DSA-3110 Hotspot Edition – User Manual Picture 7. The same page in Russian. Attention! 1. To keep the device settings in the non-volatile memory, you should save the changes on the System > Configuration page (click the Save button). 2. The factory default settings can be restored via the web-based interface (System > Configuration > Factory) or via the hardware Reset button. The hole of the button is located on the back panel of the device next to the power connector.
-
DSA-3110 Hotspot Edition – User Manual NET MENU This menu section is used to: • Configure the network parameters of the device's physical interfaces. • Configure p-t-p (point-to-point) interfaces (PPTP, PPPoE). • Display network statistics on both physical and p-t-p interfaces. • Configure NAT (network address translation). • Configure DNSs (domain name servers) and a search list of domains. • Configure the built-in DHCP server and create additional DHCP servers. • Configure static routes.
-
DSA-3110 Hotspot Edition – User Manual Network Interfaces This page is designed to modify the device settings and manage the physical interfaces of the device. To modify the settings of the network interfaces: • Go to the Net menu. Picture 8. The Net menu. • Follow the Network interfaces link. Picture 9. The Net > Network interfaces page. • You can enable, disable, stop, or start any physical interface by clicking the relevant button located in the Actions column of the interface line.
-
DSA-3110 Hotspot Edition – User Manual Configuring Static Interface For eth0 (LAN1) and eth1 (LAN2) interfaces, this interface type is the only available type. For eth2 (WAN1) and eth3 (WAN2) interfaces, both Static and DHCP types are available. Picture 10. Configuring a static IP address for LAN1 interface. You can modify the following fields: IP address The IP address assigned to the interface. Mask The subnet mask. MTU The maximum transmission unit in the interface. Optional.
-
DSA-3110 Hotspot Edition – User Manual Configuring DHCP Interface Picture 11. Configuring a DHCP client for the interface. You can modify the following fields: Interface type The type of configuration for this interface (DHCP). Start Select a radio button to enable or disable the interface auto-start upon the load of the device. Click the Save button. P-T-P Interfaces This page is designed to modify the device settings and manage the PPTP and PPPoE interfaces of the device. • Go to the Net menu.
-
DSA-3110 Hotspot Edition – User Manual • Open the P-t-p interfaces page. Picture 13. The Net > P-t-p interfaces page. • You can enable, disable, stop, or start any interface by clicking the relevant button located in the Actions column of the interface line. • To modify the settings of one of these interfaces, follow the corresponding link; to create a new p-t-p interface, click the Add link. • On the page displayed, select the interface type: PPTP or PPPoE.
-
DSA-3110 Hotspot Edition – User Manual Interface type The type of configuration for this interface (PPTP). Connection A name of the connection for easier identification. Username The login to register on the PPTP server. Password The password to register on the PPTP server. Server address The IP address of the PPTP server. Default route Select this checkbox to use the IP address of the server as the default route (the destination address for all packets, which routes have not been found).
-
DSA-3110 Hotspot Edition – User Manual Interface type The type of configuration for this interface (PPPoE). Connection A name of the connection for easier identification. Optional. Interface The name of the device physical interface, to which the configured PPPoE interface will be assigned. Username The login to register on the PPPoE server. Password The password to register on the PPPoE server. Access concentrator name The name of the provider’s PPPoE server.
-
DSA-3110 Hotspot Edition – User Manual After application of the new configuration, you can roll back to the previous configuration and use it until some new changes are applied. At that moment the New configuration turns into the Current one, and the Current configuration turns into the Previous one. This management scheme provides for so called “soft” application of configuration for all network interfaces. Picture 17. Rolling back to the previous configuration.
-
DSA-3110 Hotspot Edition – User Manual Remote Access This page is designed to configure access to the web-based and command-line interfaces of the device. It provides flexible organization of access from the local (LAN) and global interfaces (WAN) with filtering by IP address, as well as by an access protocol – HTTP, HTTPS, HTTP+HTTPS (to access the web-based interface), or SSH (to access the CLI). The page displays a set of rules that schedule access.
-
DSA-3110 Hotspot Edition – User Manual On the page displayed, specify the following: Protocol (HTTP, HTTPS, HTTP+HTTPS, or SSH). For global interfaces (WAN) we recommend you to use secure HTTPS protocol; a protocol for local interfaces can be chosen by the employee that is maintaining the device. Interface A physical interface, through which the web-based interface of the device is accessed. IP address A subnet to which the rule is applied.
-
DSA-3110 Hotspot Edition – User Manual Picture 21. Adding a new static route. Picture 22. Applying the newly created static route. Click the Apply button to apply the new configuration of routing.
-
DSA-3110 Hotspot Edition – User Manual Network Address Translation Proceed to the Address translation page to configure the NAT (Network Address Translation) function. This page is used to declare subnets which require address translation. A physical interface used for translating a network is selected automatically on the basis of network settings configured on the Net > Network interfaces page. The Off button is used to completely disable the NAT function in the device.
-
DSA-3110 Hotspot Edition – User Manual DNS This page is designed to add domain name servers (DNS) to the system and domains to the search list. Name servers are used to determine the IP address from the name of a server in Intranets or the Internet (as a rule, they are specified by an ISP or assigned by a network administrator). The search list is used to automatically add top-level and second-level domains when a user enters an incomplete URL (e.g., if the field value is .
-
DSA-3110 Hotspot Edition – User Manual DHCP This page is designed to configure internal DHCP servers of the device. These servers are used to automatically distribute IP addresses to Hotspot users. From version 2.4.0 of the firmware, the device can have several DHCP servers (e.g., separate DHCP servers for LAN1 and LAN2 interfaces). By default, one DHCP server for LAN1 interface is created in the device. For every DHCP server you can configure the following: • Directly add or remove.
-
DSA-3110 Hotspot Edition – User Manual When you have specified the settings for your new DHCP server, click the Save button on the Net > DHCP > Adding page, and then click the Apply button on the Net > DHCP page. Picture 26. Adding a new DHCP server.
-
DSA-3110 Hotspot Edition – User Manual RADIUS This page is designed to configure the device operation with an external centralized database via the RADIUS protocol. Such a scheme is useful if there are several devices (objects) that work with single database of users. In addition, the system performs traffic accounting for the users of the RADIUS database via the RADIUS protocol (RADIUS accounting).
-
DSA-3110 Hotspot Edition – User Manual Picture 28. Modifying the settings of the device operation with the RADIUS server. To modify the settings for operation with the RADIUS server, do the following: • Open the Net > RADIUS page. • Click the Edit button and change the following settings: Authentication server address The IP address of the RADIUS authentication server (the server where the external DB is kept). Authentication server password The password to access the RADIUS authentication server.
-
DSA-3110 Hotspot Edition – User Manual USERS AND GROUPS MENU This menu section is designed to create and handle the internal database of the device users. Picture 29. The Users and Groups page. Groups This page is used to handle the local database of groups. A group itself represents the description of an access tariff for public (Hotspot) users to a broadband communication channel.
-
DSA-3110 Hotspot Edition – User Manual Working with Group Table You can add groups to the local groups database, edit groups, or delete them. The Add button is designed to create new groups. (See the information on adding new groups below.) To handle a group that has already been created, left-click the relevant line of the group table. The line becomes highlighted. Picture 31. Selecting a group. In addition, the Change and Delete buttons appear on the page.
-
DSA-3110 Hotspot Edition – User Manual If a cheque printer is used, after pressing the Print button on the control panel of the DSA-3100P printer (or the SEL button in case of the Citizen CBM-910 printer), a default group user with a random name is created (with the parameters specified for the group). Attention! Do not remove the default group if you use a cheque printer. The printer will not function is there is no group named ‘default’ on the page.
-
DSA-3110 Hotspot Edition – User Manual • Enter the parameters for the group. Group Name A name of the group (tariff). It is recommended to specify meaningful group names to avoid confusion when there have been created a large number of groups. Measure A unit of measurement for the tariff. The values are: MIN (minute), HOUR, KB (kilobyte), MB (megabyte).
-
DSA-3110 Hotspot Edition – User Manual 2. A part of network connection bandwidth is often spent on service information (up to 7-8% of the bandwidth). Therefore, when a user whose bandwidth equals to 100 KBps copies a file from a remote server via FTP, the user’s actual band rate may be equal to 92-93 KBps. Users This page is used to handle the local user database. Note: In the previous firmware versions, the parameter group Username – IP address – MAC address served as a unique user key.
-
DSA-3110 Hotspot Edition – User Manual To work with a user that has already been created, select the needed user by left-clicking the relevant line in the user table. The line becomes highlighted. Picture 35. Selecting a user. In addition, the following buttons appear on the page: Change, Delete, Block, Unblock, Cheque preview, Print. The Delete and Change buttons serve to remove users that have already been created or to edit their settings. Also you can affect user accounts, e.g.
-
DSA-3110 Hotspot Edition – User Manual Spaces serve as delimiters; spaces in logins, passwords and group names are not allowed. To load a previously created file containing the list of users, click the Add from file button on the Users and Groups > Groups page; then click the “Choose…” button, select a file on your local computer, and click the Upload button. The system checks the syntax of the file; if the syntax is correct, the file is displayed in the Files with user lists section.
-
DSA-3110 Hotspot Edition – User Manual • The date and time of the latest billing action (the Last billing column). Billing is performed once a minute for all types of groups and users. Upon a regular billing action, when the number of tariff units is less than 1, the user’s public access is blocked. • The end date and time of the user expiration period (the Account end column). For an unlimited account, a dash is displayed in the column of the user line.
-
DSA-3110 Hotspot Edition – User Manual You can specify the following parameters: Group Name The name of the group to which this user account should be assigned. Login A name of the account. It is used to pass authentication. The Clear button is used to clear the value of the Login field. The Generate button is used generate the login automatically subject to the Generator settings (see the Options > Generator page). Password A password for the account.
-
DSA-3110 Hotspot Edition – User Manual Picture 39. The Users and Groups > Active users page. Working with Active User Table To handle the active user table, select the needed user by left-clicking the relevant line in the table. The line becomes highlighted, and the Block and Logout buttons appears. Picture 40. Working with the database of active users.
-
DSA-3110 Hotspot Edition – User Manual In the unprivileged mode, the IP address of the device’s LAN interfaces is used to access the webbased interface of the device. Unprivileged users cannot change the settings of the device and are able to view statistics on their accounts only (the same fields as on the Groups and Users > Active users page are displayed). The Refresh button is used to refresh the account statistics. Note that the statistics is refreshed at most once per minute. Picture 42.
-
DSA-3110 Hotspot Edition – User Manual OPTIONS MENU This menu section contains various additional settings and functions designed to ease the operation of the device. Picture 43. The Options page. Note the option of automatic logging in for users that have been logged out from the Hotspot network (the Automatic login for users checkbox).
-
DSA-3110 Hotspot Edition – User Manual To change the positions of cheque items or remove a line, left-click the line to select it, then click the relevant button. The values of the Select printer drop-down list represent all supported types of printers. Attention! 1. Not all printers support Cyrillic symbols. The printers that support Cyrillic symbols are labeled as (RUS) in the drop-down list.
-
DSA-3110 Hotspot Edition – User Manual Picture 45. The Options > Cheque printing page. Selecting a printer. Loading Templates This page is designed to specify templates for the homepage (this page opens when unauthorized users try to access the Internet; here users can enter their authentication data) and the statistics page. The owners of the system (administrators, etc.) are able to create their own home- and statistics pages for users, so they may create comfortable and useful interface.
-
DSA-3110 Hotspot Edition – User Manual Attention! The template files must have specific names. The names specified below are the only allowed names for template files. In other words, if you create a template and save it with, for example, the name 'my_login', the default template will be used. The predefined file names are: • udlogin_pc – the homepage (login page) custom file designed for a personal computer (PC). • udlogin_pda – the homepage (login page) custom file designed for a pocket PC (PDA).
-
DSA-3110 Hotspot Edition – User Manual Example of Custom Homepage (Login Page) Note: This is a demo template (see other templates on the D-Link website). The content of udlogin_pc: PAGE 46
DSA-3110 Hotspot Edition – User Manual The content of login.
-
DSA-3110 Hotspot Edition – User Manual border-right-width: 1px; border-top-width: 1px; border-bottom-width: 1px; } #A1, #A2{ width: 160px; background-color: #F0F0FF; color: #0A0A0A; cursor: text; } #id_div_login_buttons{ margin: auto; text-align: center; } The content of login.
-
DSA-3110 Hotspot Edition – User Manual Free Surfing Zones This page is used to specify separate IP addresses or IP networks, access to which is not charged (e.g., the website of the entity operating the device, guest access to a website). Enter the required IP addresses of IP address ranges (IP subnets) in the Free surfing nets field and click the Save button. When you enter several IP addresses or IP subnets, separate them by a space.
-
DSA-3110 Hotspot Edition – User Manual Generator This page is used to specify settings of the automatic username/password generator (this generator is used on the Users and Groups > Users page). This feature helps to generate local database users in accordance with the predefined format. Picture 50. The username/password generator. The settings are the same for both username (login) generator and password generator. Min length The minimal length of the login (username) or password, in characters.
-
DSA-3110 Hotspot Edition – User Manual Hotspot This page is designed to start or stop the engine for user authorization. You can use this page to open or close the public access zone, and to disconnect all users from the access network simultaneously. The Start button is used to enable the engine for user authorization. The Stop button is used to disable the engine for user authorization. The Restart button is used to suspend and then resume the engine for user authorization. Picture 51.
-
DSA-3110 Hotspot Edition – User Manual SYSTEM MENU This menu section is used to modify various system settings. Picture 52. The System page. The Reboot button is used to restart the device. Administrator Password Proceed to this page if you want to modify the settings of the administrator account used to access the web-based configuration interface. Picture 53. Changing the administrator password.
-
DSA-3110 Hotspot Edition – User Manual User The current name of the user with administrator rights. Three users types with different privileges exist in the system: admin: The administrator of the device. Full authority. owner: The owner of the device. Such a user can create and modify tariffs. cashier: The cashier. Such a user can only sell the Internet access service according to the predefined tariffs. Password Enter a new password for the selected user.
-
DSA-3110 Hotspot Edition – User Manual The Settings tab: Save Click this button to save the modified configuration of the device in the non-volatile memory. Attention! This button saves modifications made on all pages of this web-based interface in the non-volatile memory. Please, proceed to this page and click the Save button after every change of the device settings. Otherwise all changes will be lost upon reboot of the device. Factory Click this button to restore the factory defaults.
-
DSA-3110 Hotspot Edition – User Manual The User database tab: Restore Click this button to upload a previously saved user database. Click the “Choose…” button to select a saved database file located on your computer. Backup Click this button and follow the dialog box appeared to save the user database to your local computer. Firmware Upgrade Proceed to this page to upgrade the firmware (the built-in software) of the device. Picture 56. Upgrading the firmware through the web-based interface.
-
DSA-3110 Hotspot Edition – User Manual System Time Proceed to this page to set the date and time of the device manually. The device is also able to perform automatic synchronization of its clock. By default, automatic synchronization via NTP is specified. If you want to select another time server, enter its domain name in the NTP servers field. Picture 57. Configuring the system time.
-
DSA-3110 Hotspot Edition – User Manual System Log Proceed to this page to view the system log file. The following activities are logged: the results of the device load, the work of the internal operating system of the device, the time of users log-in and log-out. If you select the Remote logging checkbox and enter an IP address in the Server field, the log will be transmitted to UDP port 514 of the specified IP address. Picture 58. The System log page.
-
DSA-3110 Hotspot Edition – User Manual Status Log Proceed to this page to view the results of the last maintenance activities (the status log). Picture 59 displays a log describing the steps of upgrading the firmware. Picture 59. The Status log page. Ping (Echo Request) Proceed to this page to test whether an IP address is reachable directly via the web-based interface of the device. To ping an IP address, do the following: • Enter the relevant value in the Destination IP field.
-
DSA-3110 Hotspot Edition – User Manual Picture 60. The Ping page. SYSCTL This page is designed for advanced users only! On this page you can finely tune internal parameters of the Linux OS which is built in the DSA-3110 Hotspot Edition device. Attention! Incorrect settings may lead to complete malfunction of the system. Please study documentation on the Linux OS (man sysctl) before configuring settings on this page. Picture 61. System parameters of the Linux OS.
-
DSA-3110 Hotspot Edition – User Manual APPENDIX A. RULES AND RESTRICTIONS FOR CREATING CUSTOM TEMPLATES Page Format You can create custom pages with help of any markup language considering whether the selected language is supported by browsers (XHTML, HTML, WML, SGML, etc.). Below are examples of XHTML 1.0 Strict and XHTML Mobile Profile ( and
-
DSA-3110 Hotspot Edition – User Manual @LNG:hs_login@: @LNG:hs_password@: