HP Dynamic Smart Array RAID Controller User Guide Abstract This document is for the person who installs, administers, and troubleshoots servers and storage systems. HP assumes you are qualified in the servicing of computer equipment and trained in recognizing hazards in products with hazardous energy levels.
© Copyright 2012 Hewlett-Packard Development Company, L.P. The information contained herein is subject to change without notice. The only warranties for HP products and services are set forth in the express warranty statements accompanying such products and services. Nothing herein should be construed as constituting an additional warranty. HP shall not be liable for technical or editorial errors or omissions contained herein. Microsoft® and Windows® are U.S. registered trademarks of Microsoft Corporation.
Contents Overview ..................................................................................................................................... 5 Features ................................................................................................................................................... 5 Enabling and configuring the controller ........................................................................................... 6 Enabling the controller ........................................
Support and training information ............................................................................................................... 33 Electrostatic discharge ................................................................................................................. 34 Preventing electrostatic discharge .............................................................................................................. 34 Grounding methods to prevent electrostatic discharge ....................
Overview Features Supported feature B120i controller B320i controller Hot-plug SATA drives and SATA SSD Yes Yes Hot-plug SAS drives and SAS SSD No Yes1 Direct Connect drives Yes Yes Physical drives 6 8 Logical drives 8 8 Smart Carrier LED support Yes2 Yes2 Online spares Yes Yes Yes3 Yes RAID 0, 1, and 1+0 Yes Yes RAID 5 Yes Drive support Cache module support Optional 512 MB FBWC module RAID support 4 Yes4 Firmware and utility support SATA drive firmware flash Yes Yes SAS
Enabling and configuring the controller Enabling the controller IMPORTANT: For HP ProLiant DL160, SL230, and SL250 Gen8 Servers, be sure to update the BIOS to March 2012 or later. For the HP ProLiant DL160 Gen8 Server, the HP Dynamic Smart Array B120i RAID controller must be enabled manually in RBSU. For HP ProLiant SL230, SL250, and SL270 Gen8 Servers, the HP Dynamic Smart Array B320i RAID controller must be enabled manually in RBSU.
Installing the HP Smart Array SAS License Key When installed and activated on the B320i controller, the HP Smart Array SAS License Key provides support for SAS hard drives. To enter the license key, use ACU ("Array Configuration Utility" on page 30). After the license key is added, a Validating License Key screen appears, and you will receive confirmation that the license key has been successfully activated. SAS drives are now enabled. Use ACU to configure the drives.
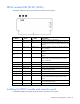
FBWC module LEDs (B120i, B320i) The FBWC module has three single-color LEDs (one amber and two green). 1 - Amber 2 - Green 3 - Green Interpretation Off Off Off The cache module is not powered. Off Flashing 0.5 Hz Flashing 0.5 Hz The cache microcontroller is executing from within its boot loader and receiving new flash code from the host controller. Off Flashing 1 Hz Flashing 1 Hz The cache module is powering up, and the capacitor pack is charging.
1. Power down the server. 2. Remove all power: a. Disconnect each power cord from the power source. b. Disconnect each power cord from the server. 3. Remove the access panel. 4. Remove all components as needed to access the FBWC module and capacitor pack. 5. Connect the capacitor pack cable to the cache module. CAUTION: When connecting or disconnecting the capacitor pack cable, the connectors on the cache module and cable are susceptible to damage.
9. Route the capacitor pack cable. For more information, see the server user guide. 10. Install or close the access panel. 11. Power up the server.
Installing device drivers and Management Agents Installing device drivers IMPORTANT: If necessary, enable the controller before installing device drivers. For more information, see "Enabling the controller (on page 6)." A device driver is required for the operating system to communicate with the disk drive controller. For more information on supported operating systems, see the product page for the appropriate controller on the HP website (http://www.hp.com/go/dynamicsa).
2. Confirm the boot device in RBSU. 3. Insert the operating system DVD. 4. Confirm that the hard drive or logical volume on the boot device is configured and present. 5. Boot the server. 6. Do one of the following: IMPORTANT: When you install the operating system from an optical device on a server that supports the B120i controller, you are prompted early in the installation process for the optical device driver. You must install the driver for the installation to continue.
o For servers that support the B120i controller and have a SATA optical drive, Windows prompts for the optical device driver. Insert the USB drive containing the driver, and then click Browse. o For all other servers, continue to the next step. 7. Follow the prompts for installation. 8. When Where do you want to install Windows? appears, confirm that the correct drive or logical volume is available.
If the drive or logical volume is not available, select Load Driver. Then, insert the USB drive containing the driver and follow the prompts for installation. IMPORTANT: If the intended boot volume is not detected after installing the driver, you may need to load other drivers for it at this time. For drives that are behind a Smart Array controller, use ACU (F5) or Intelligent Provisioning (F10) to create the volume. 9. Continue installing the operating system as normal.
Installing device drivers (Red Hat Enterprise Linux 5 or 6) 1. Enable the controller ("Enabling the controller" on page 6), if necessary. 2. Reboot the server. 3. Press the Tab key. 4. Insert the USB device containing the DUD image. 5. Enter linux dd. 6. For a B120i controller, append blacklist=ahci. If you are installing a 32-bit kernel, append vmalloc=384M to the line. IMPORTANT: The appended code vmalloc=384M is case sensitive. 7.
7. The following screen appears. If the correct controller appears on the list, the driver has been installed correctly. 8. After confirming that the driver is installed, remove the USB device. 9. Select Back, and then press Enter. 10. Proceed with operating system installation as normal. VMware ESX operating systems To obtain the device driver for VMware vSphere 5, you must obtain the HP custom image for VMware. To obtain the custom image, see the HP Software Depot website (http://software.hp.
— Install the driver during operating system installation ("Installing the device driver during OS installation (ESX 4.1)" on page 17). — Install the driver as an update ("Installing the device driver as an update (ESX 4.1)" on page 17). o For VMware ESXi 4.1, you must reinstall the operating system using a new install image that contains the updated device driver. o For VMware ESX 5.0, install the device driver as an update ("Installing the device driver as an update (ESXi 5.0)" on page 18).
a. Log in to ESX system console as root. b. Enter cd /tmp. c. Enter esxupdate -b --nodeps --nosigcheck --maintenancemode update. Example: esxupdate –b vmware-esx-drivers-scsi-hpvsa-400.4.1.0-4OEM.x86_64.vib --nodeps --nosigcheck --maintenancemode update 5. Reboot the server. Installing the device driver as an update (ESXi 5.0) To update the driver from the system console: 1. Prepare the system for remote access and ssh/scp: a. On ESXi 5.0 system console, Select F2 Customize System. b.
Replacing, moving, or adding hard drives Drive LEDs HP Dynamic Smart Array RAID controllers support drive LED illumination only on systems with backplane support for drive LEDs. In addition, HP Dynamic Smart Array RAID controllers support HP Smart Carrier LED illumination. However, LED functionality is provided only if the drives are authenticated through HP Smart Carrier. Item LED Status Definition 1 Locate Solid blue The drive is being identified by a host application.
CAUTION: Sometimes, a drive that has previously been failed by the controller may seem to be operational after the system is power-cycled or (for a hot-pluggable drive) after the drive has been removed and reinserted. However, continued use of such marginal drives may eventually result in data loss. Replace the marginal drive as soon as possible.
Compromised fault tolerance CAUTION: When fault tolerance is compromised, data loss can occur. However, it may be possible to recover the data. For more information, see "Recovering from compromised fault tolerance (on page 21)." If more drives fail than the fault-tolerance method can manage, fault tolerance is compromised, and the logical drive fails. If this failure occurs, the operating system rejects all requests and indicates unrecoverable errors.
In RAID 5 configurations, you can replace one failed drive. When a physical drive fails, data that was on the failed drive can be calculated from the remaining parity data and user data on the other drives in the array. This recovered data is usually written to an online spare in a process called a rebuild. Guidelines Before replacing hard drives, observe the following guidelines: • Be sure that the array has a current, valid backup.
• The amount of I/O activity during the rebuild operation • The rotational speed of the hard drives • The brand, model, and age of the drives • The amount of unused capacity on the drives • In RAID 5 configurations, the time required for a rebuild may be affected by data parity initialization. IMPORTANT: RAID 5 is available only when the optional 512 MB FBWC module is installed. For more information, see "Upgrading to 512 MB FBWC (on page 7).
Verify that the replacement drive is of the correct capacity and is a supported model. If these factors are not the cause of the problem, use a different drive as the replacement. Case 3: Another drive in the array has failed. A drive that has recently failed can sometimes be made temporarily operational again by cycling the server power. 1. Power down the server. 2. Remove the replacement physical drive (the one undergoing a rebuild), and reinstall the drive that it is replacing. 3.
• If the other controller is connected to one or more arrays of configured logical drives, the total number of logical drives on the controller after the drives have been moved must not exceed the number of logical drives that the controller supports. This number depends on the controller model and on the controller firmware version.
o Migrate the hard drives (Windows) ("Migrating hard drives to an optional Smart Array controller—Microsoft Windows" on page 26). o Migrate the hard drives (Linux) ("Migrating hard drives to an optional Smart Array controller—Linux" on page 27).
This action replaces the SATA connection. 9. Install components and cables removed previously. 10. Install the access panel. 11. Power up the server. Migrating hard drives to an optional Smart Array controller—Linux This section provides instructions to migrate hard drives from an embedded HP Dynamic Smart Array RAID controller to an optional Smart Array controller in a server with the Red Hat Enterprise Linux operating system or the SuSE Linux Enterprise Server operating system.
IMPORTANT: Be sure to change only the prefixes. 4. Download and the latest Smart Array cciss driver from the HP website (http://www.hp.com/go/support) or by using SPP ("HP Service Pack for ProLiant" on page 30). If downloading from the HP website, do the following: a. When prompted for product information, enter the Smart Array controller model number in the product field. b. Select Download drivers and software. c. Select the appropriate operating system. d. Download the Smart Array cciss driver rpm.
7. Install the access panel. 8. Reboot the server. At boot, press F5 for ACU or F10 for Intelligent Provisioning. 9. Select the newly installed card. 10. Set the preferred logical volume as the boot volume. 11. Exit ACU or Intelligent Provisioning, and then reboot the server. The optional Smart Array controller should appear at boot. It should have the same number of logical volumes that were configured for the Dynamic Smart Array controller.
Software and configuration utilities Array Configuration Utility ACU is a browser-based utility with the following features: • Runs as a local application or remote service accessed through the HP System Management Homepage • Suggests the optimum configuration for an unconfigured system • Provides different operating modes, enabling faster configuration or greater control over the configuration options • Remains available any time that the server is on • Displays on-screen tips for individual step
For more information or to download SPP, see the HP website (http://www.hp.com/go/spp). Intelligent Provisioning Several packaging changes have taken place with HP ProLiant Gen8 servers: SmartStart CDs and the Smart Update Firmware DVD will no longer ship with these new servers. Instead, the deployment capability is embedded in the server as part of HP iLO Management Engine’s Intelligent Provisioning.
• POST messages Smart Array controllers produce diagnostic error messages (POST messages) at reboot. Many POST messages suggest corrective actions. For more information about POST messages, see the appropriate troubleshooting guide for your product.
Support and other resources Support and training information HP offers a number of additional software support services, many of which are provided to customers at no additional charge: • Software Technical Support and Update Service—Insight Control and select Insight Management software products include one year of 24 x 7 HP Software Technical Support and Update Service. This service provides access to HP technical resources for assistance in resolving software implementation or operations problems.
Electrostatic discharge Preventing electrostatic discharge To prevent damaging the system, be aware of the precautions you need to follow when setting up the system or handling parts. A discharge of static electricity from a finger or other conductor may damage system boards or other static-sensitive devices. This type of damage may reduce the life expectancy of the device. To prevent electrostatic damage: • Avoid hand contact by transporting and storing products in static-safe containers.
Acronyms and abbreviations ACU Array Configuration Utility AMS agentless management services IML Integrated Management Log POST Power-On Self Test RBSU ROM-Based Setup Utility SAID Service Agreement Identifier SIM Systems Insight Manager SMH System Management Homepage SPP HP Service Pack for ProLiant VID Virtual Install Disk Acronyms and abbreviations 35
Index A activating an array 6 activation 6 Active Health System 31 ACU (Array Configuration Utility) 19, 22, 24, 30, 31, 32 adding drives 25 Array Configuration Utility (ACU) 19, 22, 24, 30, 31 array expansion 25 B boot order 6 C compromised fault tolerance 21 configuring an array 6, 7 controller read cache 7 D data recovery 21, 22 device drivers, installing 11, 14, 15, 16, 17, 18 diagnostic tools 31 drive failure, detecting 21 drive LEDs 19 drivers 11 E electrostatic discharge 34 enabling the controlle
R rebuild, abnormal termination of 23 rebuild, description of 22 rebuild, time required for 22 replacing hard drives 19 S Smart Array driver, installing 26, 27, 28 Smart Components for Remote ROM Flash 32 static electricity 34 support and training information 33 U Upgrading from a host bus adapter to a B320i controller 29 Index 37