
HP Remote Graphics Software 5.4.0 User Guide


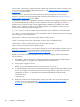

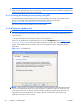
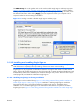


Figure 3-14 Using the rgadmin tool to enable Single Sign-on
3.1.2.9.3 Manually enabling Single Sign-on
Although the manual method is not the preferred method to enable Single Sign-on, it is provided so that
administrators will know exactly what parts of the operating system are being modified. To manually
enable Single Sign-on, perform the following steps:
1.
Install the Sender on the HP workstation. If the RGS Sender is not installed or installs with errors,
DO NOT perform the remaining steps. Doing so will put the computer in a state that requires a
complete re-installation of the operating system.
2.
After the RGS Sender is installed, confirm that hprgina.dll exists in the C:\WINDOWS\system32
directory. The Sender installer copies hprgina.dll directly into the system32 directory.
CAUTION: If the hprgina.dll does not exist in C:\WINDOWS\system32, do not perform the
remaining steps. Doing so will put the system in a state that requires a complete re-installation of
the operating system.
3.
Add the GinaDLL registry key if it does not already exist. If the GinaDLL key does not exist,
Microsoft's default GINA DLL (msgina.dll) is loaded by WinLogon. Adding the GinaDLL registry
key, and setting its value to hprgina.dll informs WinLogon to load hprgina.dll instead of the
default msgina.dll.
Adding the GinaDLL registry key is done using regedit, the Windows Registry Editor. Create the
key as type REG_SZ (a string type). The full path of the key is:
HKEY_LOCAL_MACHINE\Software\Microsoft\Windows NT\CurrentVersion\Winlogon\GinaDll
ENWW
Installing RGS on Windows
63