-
HP StoreAll Storage File System User Guide Abstract This guide describes how to configure and manage StoreAll software file systems and how to use NFS, SMB, FTP, and HTTP to access file system data. The guide also describes the following file system features: quotas, remote replication, snapshots, data retention and validation, data tiering, and file allocation. The guide is intended for system administrators managing 9300 Storage Gateway, 9320 Storage, X9720 Storage, and 9730 Storage.
-
© Copyright 2009, 2013 Hewlett-Packard Development Company, L.P. Confidential computer software. Valid license from HP required for possession, use or copying. Consistent with FAR 12.211 and 12.212, Commercial Computer Software, Computer Software Documentation, and Technical Data for Commercial Items are licensed to the U.S. Government under vendor's standard commercial license. The information contained herein is subject to change without notice.
-
Contents 1 Using StoreAll software file systems.............................................................10 File system operations..............................................................................................................10 File system building blocks.......................................................................................................12 Configuring file systems...........................................................................................................
-
Deleting file serving nodes and StoreAll clients.......................................................................48 Checking and repairing file systems..........................................................................................48 Analyzing the integrity of a file system on all segments...........................................................49 Clearing the INFSCK flag on a file system.............................................................................
-
Differences in locking behavior............................................................................................98 SMB shadow copy.............................................................................................................98 Permissions in a cross-protocol SMB environment.......................................................................100 How the SMB server handles UIDs and GIDs.......................................................................
-
Delete Container..............................................................................................................150 Set Container Permission...................................................................................................150 Get Container Permission..................................................................................................150 Create/Update Object.....................................................................................................
-
Resuming a remote replication task....................................................................................192 Querying remote replication tasks......................................................................................192 Replicating WORM/retained files...........................................................................................193 Configuring remote failover/failback.......................................................................................
-
Modifying a snapshot schedule.........................................................................................241 Managing software snapshots................................................................................................241 Taking an on-demand snapshot.........................................................................................241 Determining space used by snapshots................................................................................
-
21 Support and other resources...................................................................286 Contacting HP......................................................................................................................286 Related information...............................................................................................................286 HP websites.........................................................................................................................
-
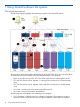
1 Using StoreAll software file systems File system operations The following diagram highlights the operating principles of the StoreAll file system. The topology in the diagram reflects the architecture of the HP 9320, which uses a building block of server pairs (known as couplets) with SAS attached storage. In the diagram: • There are four file serving nodes, SS1–SS4. These nodes are also called segment servers.
-
2. 3. (Specifically, a segment need not be a complete, rooted directory tree). Segments can be any size and different segments can be different sizes. The location of files and directories within particular segments in the file space is independent of their respective and relative locations in the namespace. For example, a directory (Dir1) can be located on one segment, while the files contained in that directory (File1 and File2) are resident on other segments.
-
1) 2) c. 8. The segment server initiating the operation can read files directly from the segment across the SAN; this is called a SAN READ. The segment server initiating the operation routes writes over the IP network to the segment server owning the segment. That server then writes data to the segment. All reads and writes must be routed over the IP network between the segment servers. Step 7 assumed that the server had to go to a segment to read a file.
-
attributes such as such as modification time, access time, file size, or file type. See “Using data tiering” (page 261). • File allocation. This feature allocates new files and directories to segments according to the allocation policy and segment preferences that are in effect for a client. An allocation policy is an algorithm that determines the segments that are selected when clients write to a file system. See “Using file allocation” (page 279).
-
2 Creating and mounting file systems This chapter describes how to create file systems and mount or unmount them. Creating a file system You can create a file system using the New Filesystem Wizard provided with the GUI, or you can use CLI commands. The New Filesystem Wizard also allows you to create an NFS export or an SMB share for the file system. File systems are created in 64–mode by default Prior to StoreAll 6.1, file systems were created by default with 32-bit compatibility mode enabled.
-
Configure Options dialog box. Enter a name for the file system, and specify the appropriate configuration options.
-
WORM/Data Retention dialog box. If data retention will be used on the file system, enable it and set the retention policy. See “Managing data retention” (page 196) for more information.
-
You can configure the following: • Default retention period. This period determines whether you can manage WORM (non-retained) files as well as WORM-retained files. (WORM (non-retained) files can be deleted at any time; WORM-retained files can be deleted only after the file's retention period has expired.) To manage only WORM-retained files, set the default retention period to a non-zero value.
-
• Report Data Generation. Select this option if you want to create data retention reports. Use the default schedule, or click Modify to open the Report Data Generation Schedule dialog box and configure your own schedule. • Express Query. Check this option to enable StoreAll Express Query on the file system. Express Query is a database used to record metadata state changes occurring on the file system. Auditing Options dialog box.
-
Default File Shares dialog box. Use this dialog box to create an NFS export and/or an SMB share at the root of the file system. The default settings are used. See “Using NFS” (page 55) and “Using SMB” (page 76) for more information. Review the Summary to ensure that the file system is configured properly. If necessary, you can return to a dialog box and make any corrections.
-
Configuring additional file system options The New Filesystem wizard creates the file system with the default settings for several options. You can change these settings on the Modify Filesystem Properties dialog box, and can also configure data retention, data tiering, and file allocation. To open the dialog box, select the file system on the Filesystems panel. Select Summary from the lower Navigator, and then click Modify on the Summary panel.
-
Creating a file system using the CLI The ibrix_fs command is used to create a file system. It can be used in the following ways: • Create a file system with the specified segments (segments are logical volumes): ibrix_fs -c -f FSNAME -s LVLIST [-t TIERNAME] [-a] [-q] [-o OPTION1=VALUE1,OPTION2=VALUE2,...] [-t TIERNAME] [-F FMIN:FMAX:FTOTAL] [-D DMIN:DMAX:DTOTAL] • Create a file system and assign specify segments to specific file serving nodes: ibrix_fs -c -f FSNAME -S LV1:HOSTNAME1,LV2:HOSTNAME2,...
-
File limit for directories The maximum number of files in a directory depends on the length of the file names, and also the names themselves. The maximum size of a directory is approximately 4 GB (double indirect blocks). An average file name length of eight characters allows about 12 million entries. However, because directories are hashed, it is unlikely that a directory can contain this number of entries. Files with a similar naming pattern are hashed into the same bucket.
-
IMPORTANT: Keep in mind: • Mount options do not persist, unless they are set at the mountpoint. Mount options that are not set at the mountpoint are reset to match the mount options on the mount point when the file system is rebooted or remounted. • The ibrix_fs —i and ibrix_mountpoint —l commands display only the mount options for the mount point. • The mount command displays the noatime option. Ignore the noatime option. It is no longer used.
-
• path: For StoreAll clients only, mount on the specified subdirectory path of the file system instead of the root. • remount: Remounts a file system without taking it offline. Use this option to change the current mount options on a file system. You can also view mountpoint information for a particular server. Select that server on the Servers panel, and select Mountpoints from the lower Navigator. To delete a mountpoint, select that mountpoint and click Delete.
-
Viewing mountpoint information To view mounted file systems and their mountpoints on all nodes, use the following command: ibrix_mountpoint -l Mounting a file system File system mounts are managed with the ibrix_mount command. The command options and the default file system access allowed for StoreAll clients depend on whether the optional Export Control feature has been enabled on the file system (see “Using Export Control” (page 27) for more information).
-
Mounting and unmounting file systems locally on StoreAll clients On both Linux and Windows StoreAll clients, you can locally override a mount. For example, if the Fusion Manager configuration database has a file system marked as mounted for a particular client, that client can locally unmount the file system. Linux StoreAll clients To mount a file system locally, use the following command on the StoreAll Linux client.
-
To remove a client access entry, select the affected file system on the GUI, and then select Client Exports from the lower Navigator. Select the access entry from the Client Exports display, and click Delete. On the CLI, use the ibrix_exportfs command to create an access entry: ibrix_exportfs -c -f FSNAME -p CLIENT:/PATHNAME,CLIENT2:/PATHNAME,...
-
3 Configuring quotas Quotas can be assigned to individual users or groups, or to a directory tree. Individual quotas limit the amount of storage or the number of files that a user or group can use in a file system. Directory tree quotas limit the amount of storage and the number of files that can be created on a file system located at a specific directory tree. Note the following: • You can assign quotas to a user, group, or directory on the GUI or from the CLI.
-
To change the quotas configuration, click Modify on the Quota Summary panel. On the CLI, run the following command to enable quotas on an existing file system: ibrix_fs -q -E -f FSNAME Setting quotas for users, groups, and directories Before configuring quotas, the quota feature must be enabled on the file system and the file system must be mounted. NOTE: For the purpose of setting quotas, no UID or GID can exceed 2,147,483,647. Setting user quotas to zero removes the quotas.
-
The User Quotas dialog box is used to create, modify, or delete quotas for users. To add a user quota, enter the required information and click Add. Users having quotas are listed in the table at the bottom of the dialog box. To modify quotas for a user, check the box preceding that user. You can then adjust the quotas as needed. To delete quotas for a user, check the box and click Delete. The Group Quotas dialog box is used to create, modify, or delete quotas for groups.
-
The Directory Quotas dialog box is used to create, modify, or delete quotas for directories. To add a directory quota, enter the required information and click Add. The Name (Alias) is a unique identifier for the quota, and cannot include commas. The new quota applies to all users and groups storing data in the directory. Directories having quotas are listed in the table at the bottom of the dialog box. To modify quotas for a directory, check the box preceding that directory.
-
Configuring quotas from the CLI In the commands, use -M SOFT_MEGABYTES and -m HARD_MEGABYTES to specify soft and hard limits for the megabytes of storage. Use -I SOFT_FILES and -i HARD_FILES to specify soft and hard limits for the number of files allowed.
-
From the CLI, use the following command to import quotas from a file, where PATH is the path to the quotas file: ibrix_edquota -t -p PATH -f FSNAME See “Format of the quotas file” (page 33) for information about the format of quota file. Exporting quotas to a file From the GUI, select the file system, select Quotas from the lower Navigator, and then click Export on the Quota Summary panel.
-
{id} The UID for a user quota or the GID for a group quota. {name} A user name, group name, or directory tree identifier. {path} The full path to the directory tree. The path must already exist. NOTE: When a quotas file is imported, the quotas are stored in a different, internal format. When a quotas file is exported, it contains lines using the internal format. However, when adding entries, you must use the A, B, or C format.
-
The Task Summary panel displays the progress of the scan. If necessary, select Stop to stop the scan.
-
Troubleshooting quotas Recreated directory does not appear in directory tree quota If you create a directory tree quota on a specific directory and delete the directory (for example, with rmdir/rm -rf) and then recreate it on the same path, the directory does not count as part of the directory tree, even though the path is the same. Consequently, the ibrix_onlinequotacheck command does not report on the directory.
-
4 Maintaining file systems This chapter describes how to extend a file system, rebalance segments, delete a file system or file system component, and check or repair a file system. The chapter also includes file system troubleshooting information. Best practices for file system performance It is important to monitor the space used in the segments making up the file system.
-
Viewing physical volume information The following command lists detailed information about physical volumes: ibrix_pv -i For each physical volume, the output includes the following information: # ibrix_pv -i PV_NAME SIZE(MB) ------- -------d1 3,072 d2 3,072 VG_NAME LUN_GROUP LV_NAME FILESYSTEM SEGNUM USED% SEGOWNER DEVICE ON SEGOWNER ------- --------- ------- ---------- ------ ----- -------- --------- -------ivg1 ilv1 ifs1 1 99 vm3 /dev/sdb ivg2 ilv2 ifs1 2 99 vm2 /dev/sdc The following command provides h
-
Field Description FREE(MB) Free (unallocated) space, in MB, available on this volume group. USED% Percentage of total space in the volume group allocated to logical volumes. FS_NAME File system to which this logical volume belongs. PV_NAME Name of the physical volume used to create this volume group. SIZE (MB) Size, in MB, of the physical volume used to create this volume group. LV_NAME Names of logical volumes created from this volume group.
-
Field Description GEN Number of times the structure of the file system has changed (for example, new segments were added). NUM_SEGS Number of file system segments. To view detailed information about file systems, use the ibrix_fs -i command. To view information for all file systems, omit the -f FSLIST argument. ibrix_fs -i [-f FSLIST] The following table lists the file system output fields reported by ibrix_fs -i. Field Description Total Segments Number of segments.
-
Field Description Root Segment Replica(s) Hint Possible segment numbers for root segment replicas. This value is used internally. Snap FileSystem Policy Snapshot strategy, if defined. The following table lists the per-segment output fields reported by ibrix_fs -i. Field Description SEGMENT Number of segments. OWNER The host that owns the segment. LV_NAME Logical volume name. STATE The current state of the segment (for example, OK or UsageStale). BLOCK_SIZE Default block size, in KB.
-
Viewing disk space information from a StoreAll Linux client Because file systems are distributed among segments on many file serving nodes, disk space utilities such as df must be provided with collated disk space information about those nodes. The Fusion Manager collects this information periodically and collates it for df. StoreAll software includes a disk space utility, ibrix_df, that enables Linux StoreAll clients to obtain utilization data for a file system.
-
On the CLI, use the ibrix_fs command to extend a file system. Segments are added to the file serving nodes in a round-robin manner. If tiering rules are defined for the file system, the -t option is required. Avoid expanding a file system while a tiering job is running. The expansion takes priority and the tiering job is terminated.
-
How rebalancing works During a rebalance operation on a file system, files are moved from source segments to destination segments. StoreAll software calculates the average aggregate utilization of the selected source segments, and then moves files from sources to destinations to bring each candidate source segment as close as possible to the calculated utilization threshold. The final absolute percent usage in the segments depends on the average file size for the target file system.
-
The Rebalance All dialog box allows you to rebalance all segments in the file system or in the selected tier. The Rebalance Advanced dialog box allows you to select the source and destination segments for the rebalance operation.
-
Rebalancing segments from the CLI To rebalance all segments, use the following command. Include the -a option to run the rebalance operation in analytical mode.
-
Viewing the status of rebalance tasks Use the following commands to view status for jobs on all file systems or only on the file systems specified in FSLIST: ibrix_rebalance -l [-f FSLIST] ibrix_rebalance -i [-f FSLIST] The first command reports summary information. The second command lists jobs by task ID and file system and indicates whether the job is running or stopped. Jobs that are in the analysis (Coordinator) phase are listed separately from those in the implementation (Worker) phase.
-
For example, to delete segments ilv1 and ilv2: ibrix_lv -d -s ilv1,ilv2 To delete volume groups: bin/ibrix_vg -d -g VGLIST For example, to delete volume groups ivg1 and ivg2: ibrix_vg -d -g ivg1,ivg2 To delete physical volumes: ibrix_pv -d -p PVLIST [-h HOSTLIST] For example, to delete physical volumes d1, d2, and d3: ibrix_pv -d -p d[1-3] Deleting file serving nodes and StoreAll clients Before deleting a file serving node, unmount all file systems from it and migrate any segments that it owns to a dif
-
NOTE: During an ibrix_fsck run, an INFSCK flag is set on the file system to protect it. If an error occurs during the job, you must explicitly clear the INFSCK flag (see “Clearing the INFSCK flag on a file system” (page 49)), or you will be unable to mount the file system. Analyzing the integrity of a file system on all segments Observe the following requirements when executing ibrix_fsck: • Unmount the file system for phases 0 and 1 and mount the file system for phases 2 and 3.
-
1. Disable the Express Query and auditing feature for the file system, including the removal of any StoreAll REST API shares. Disable the auditing feature before you disable the Express Query feature. a. To disable auditing, enter the following command: ibrix_fs -A [-f FSNAME] -oa audit_mode=off b. Remove all StoreAll REST API shares created in the file system by entering the following command: ibrix_httpshare -d -f c.
-
NFS clients cannot access an exported file system An exported file system has been unmounted from one or more file serving nodes, causing StoreAll software to automatically disable NFS on those servers. Fix the issue causing the unmount and then remount the file system. User quota usage data is not being updated Restart the quota monitor service to force a read of all quota usage data and update usage counts to the file serving nodes in your cluster.
-
4. StoreAll Command Line Reference Guide. You can manually fail over the file serving node. See the administration guide for your system for more information about this procedure. If you have set Fusion Manager to make the segment available after failover, the segment automatically becomes available after failover. For more information, see the ibrix_fm_tune command in the HP StoreAll Command Line Reference Guide. To manually make the segment available: a.
-
used files (f_files - f_ffree).. 1064 Segment statistics for 690812.89 seconds : n_reads=0, kb_read=0, n_writes=0, kb_written=0, n_creates=2, n_removes=0 Also run the following command: /usr/local/ibrix/bin/rtool enumfs For example: rtool enumfs ibfs1 1:---------------fsname ......................... ibfs1 fsid ........................... 7b3ea891-5518-4a5e-9b08-daf9f9f4c027 fsnum .......................... 1 fs_flags........................ operational total_number_of_segments ....... 4 mounted .
-
Iad error on host glory2 To work around the problem, recreate the segment on the failing LUN.
-
5 Using NFS To allow NFS clients to access a StoreAll file system, the file system must be exported. You can export a file system using the GUI or CLI. By default, StoreAll file systems and directories follow POSIX semantics and file names are case-sensitive for Linux/NFS users. If you prefer to use Windows semantics for Linux/NFS users, you can make a file system or subdirectory case-insensitive. NOTE: The latest release of NFS supported by current version of the StoreAll software is NFS version 3.
-
Use the Settings window to specify the clients allowed to access the share. Also select the permission and privilege levels for the clients, and specify whether the export should be available from a backup server. The Advanced Settings window allows you to set NFS options on the share. On the Host Servers window, select the servers that will host the NFS share. By default, the share is hosted by all servers that have mounted the file system.
-
The Summary window shows the configuration of the share. You can go back and revise the configuration if necessary. When you click Finish, the export is created and appears on the File Shares panel. Export a file system using the CLI To export a file system from the CLI, use the ibrix_exportfs command: ibrix_exportfs -f FSNAME -h HOSTNAME -p CLIENT1:PATHNAME1,CLIENT2:PATHNAME2,.. [-o "OPTIONS"] [-b] The options are as follows: Option Description -f FSNAME The file system to be exported.
-
Unexporting a file system A file system should be unexported before it is unmounted. To unexport a file system: • On the GUI, select the file system, select NFS Exports from the lower Navigator, and then select Unexport. • On the CLI, enter the following command: ibrix_exportfs -U -h HOSTNAME -p CLIENT:PATHNAME [-b] Using case-insensitive file systems By default, StoreAll file systems and directories follow POSIX semantics and file names are case-sensitive for Linux/NFS users.
-
To set case insensitivity from the CLI, use the following command: ibrix_caseinsensitive -s -f FSNAME -c [ON|OFF] -p PATH Viewing the current setting for case insensitivity Select Report Current Case Insensitivity Setting on the New Case Insensitivity Task dialog box to view the current setting for a file system or directory. Click Perform Recursively to see the status for all descendent directories of the specified file system or directory.
-
2:0:/fs_test1/samename-T/samename: TRUE 2:0:DONE The next sample log file is for a change in case insensitivity: 0:0:31849:Case Insensitivity is turned ON for the following directories 1:0:/fs_test2/samename-true 2:0:/fs_test2/samename-true/samename 3:0:/fs_test2/samename-true/samename/samename-snap 3:0:DONE The first line of the output contains the PID for the process and reports the action taken. The first column specifies the number of directories visited.
-
6 Configuring authentication for SMB, FTP, and HTTP StoreAll software supports several services for authenticating users accessing shares on StoreAll file systems: • Active Directory (supported for SMB, FTP, and HTTP) • Active Directory with LDAP ID mapping as a secondary lookup source (supported for SMB) • LDAP (supported for SMB) • Local Users and Groups (supported for SMB, FTP, and HTTP) Local Users and Groups can be used with Active Directory or LDAP.
-
Using LDAP as the primary authentication method Requirements for LDAP users and groups StoreAll supports only OpenLDAP. Configuring LDAP for StoreAll software To configure LDAP, complete the following steps: 1. Update a configuration file template that ships as part of the StoreAll LDAP software. This updated configuration file is then passed to a configuration utility, which uses LDAP commands to modify the remote enterprise's OpenLDAP server. 2. 3.
-
Required attributes for Samba/POSIX templates Nonvirtual attribute name Value Description VERSION Any arbitrary string Helps identify the configuration version uploaded. Potentially used for reports, audit history, and troubleshooting. LDAPServerHost IP Address string A FQDN or IP. Typically, it is a front-ended switch or an IP LDAP proxy/balancer name/address for multiple backend high-availability LDAP servers.
-
Click Authentication Wizard to start the wizard. On the Configure Options page, select the authentication service to be applied to the servers in the cluster. NOTE: SMB. CIFS in the GUI has not been rebranded to SMB yet. CIFS is just a different name for The wizard displays the configuration pages corresponding to the option you selected. 64 • Active Directory. See “Active Directory” (page 65). • LDAP. See “LDAP” (page 67). • LDAP ID Mapping. See “LDAP ID mapping” (page 66). • Local Groups.
-
• Share Administrators. See “Windows Share Administrators” (page 71). • Summary. See “Summary” (page 71). Active Directory Enter your domain name, the Auth Proxy username (an AD domain user with privileges to join the specified domain; typically a Domain Administrator), and the password for that user. These credentials are used only to join the domain and do not persist on the cluster nodes.
-
LDAP ID mapping If LDAP ID mapping is enabled and the system cannot locate a UID/GID in Active Directory, it searches for the UID/GID in LDAP. On the LDAP ID Mapping dialog box, specify the appropriate search parameters. Enter the following information on the dialog box: LDAP Server Host Enter the server name or IP address of the LDAP server host. Port Enter the LDAP server port (TCP port 389 for unencrypted or TLS encrypted; 636 for SSL encrypted). Base of Search Enter the LDAP base for searches.
-
LDAP To configure LDAP as the primary authentication mechanism for SMB shares, enter the server name or IP address of the LDAP server host and the password for the LDAP user account. NOTE: LDAP cannot be used with Active Directory. Enter the following information in the remaining fields: Bind DN Enter the LDAP user account used to authenticate to the LDAP server to read data, such as cn=hp9000-readonly-user,dc=entx,dc=net. This account must have privileges to read the entire directory.
-
NOTE: If LDAP is the primary authentication service, Windows clients such as Explorer or MMC plug-ins cannot be used to add new users. Local Groups Specify local groups allowed to access shares. On the Local Groups page, enter the group name and, optionally, the GID and RID. If you do not assign a GID and RID, they are generated automatically. Click Add to add the group to the list of local groups. Repeat this process to add other local groups.
-
NOTE: If Local Users and Groups is the primary authentication service, Windows clients such as Explorer or MMC plug-ins cannot be used to add new users. Local Users Specify local users allowed to access shares. On the Local Users page, enter a user name and password. Click Add to add the user to the Local Users list. When naming local users, you should be aware of the following: • User names must be unique. The new name cannot already be used by another user or group.
-
To provide account information for the user, click Advanced. The default home directory is /home/ and the default shell program is /bin/false.
-
NOTE: If Local Users and Groups is the primary authentication service, Windows clients such as Explorer or MMC plug-ins cannot be used to add new users. Windows Share Administrators If you will be using the Windows Share Management MMC plug-in to manage SMB shares, enter your share administrators on this page. You can skip this page if you will be managing shares entirely from the StoreAll Management Console.
-
You cannot change the UID or RID for a Local User account. If it is necessary to change a UID or RID, first delete the account and then recreate it with the new UID or RID. The Local Users and Local Groups panels allow you to delete the selected user or group. Configuring authentication from the CLI You can configure Active Directory, LDAP, LDAP ID mapping, or Local Users and Groups.
-
IMPORTANT: Before using ibrix_ldapconfig to configure LDAP on the cluster nodes, you must configure the remote LDAP server. For more information, see “Configuring LDAP for StoreAll software” (page 62). IMPORTANT: Linux Static User mapping is not supported if LDAP is configured as the primary authentication service.
-
This command automatically enables LDAP RFC 2307 ID Mapping. The options are: -h LDAPSERVERHOST The LDAP server host (server name or IP address). -B LDAPBASEOFSEARCH The LDAP base for searches (for example, ou=people,cd=enx,dc=net). -P LDAPSERVERPORT The LDAP server port (TCP port 389). -b LDAPBINDDN The LDAP bind Distinguished Name (the default is anonymous). For example: cn=hp9000-readonly-user,dc=entx,dc=net. -p LDAPBINDDNPASSWORD The LDAP bind password.
-
Add a Local User account: ibrix_localusers -a -u USERNAME -g DEFAULTGROUP -p PASSWORD [-h HOMEDIR] [-s SHELL] [-i USERINFO] [-U USERID] [-S RID] [-G GROUPLIST] Modify a Local User account: ibrix_localusers -m -u USERNAME [-g DEFAULTGROUP] [-p PASSWORD] [-h HOMEDIR] [-s SHELL] [-i USERINFO] [-G GROUPLIST] View information for all Local User accounts: ibrix_localusers -L View information for a specific Local User account: ibrix_localusers -l -u USERNAME Delete a Local User account: ibrix_localusers -d -u USER
-
7 Using SMB The SMB server implementation allows you to create file shares for data stored on the cluster. The SMB server provides a true Windows experience for Windows clients. A user accessing a file share on a StoreAll system will see the same behavior as on a Windows server. IMPORTANT: SMB and StoreAll Windows clients cannot be used together because of incompatible AD user to UID mapping. You can use either SMB or StoreAll Windows clients, but not both at the same time.
-
appropriate server. Select CIFS in the lower Navigator to display the CIFS panel, which shows SMB activity statistics on the server. You can start, stop, or restart the SMB service by clicking the appropriate button. NOTE: Click CIFS Settings to configure SMB signing on this server. See “Configuring SMB signing ” (page 83) for more information.
-
The command output reports status as follows: Health Status Condition Up All monitored SMB services are up and running Degraded The lwio service is running but one or more of the other services are down Down The lwio service is down and one or more of the other services are down Not Monitored Monitoring is disabled N/A The active Fusion Manager could not communicate with other file serving nodes in the cluster Disable monitoring and stop the SMB monitoring daemon: ibrix_cifsmonitor -u [-h HOSTLI
-
IMPORTANT: • Keep in mind the following: ◦ If files are handled over a different protocol or directly on the StoreAll server via PowerShell, the alternate data streams could be lost. ◦ If you rename the master file table while archiving and auto commit is enabled, the alternative data streams associated with the Master File Table are missing after the rename.
-
On the Permissions page, specify permissions for users and groups allowed to access the share.
-
Click Add to open the New User/Group Permission Entry dialog box, where you can configure permissions for a specific user or group. The completed entries appear in the User/Group Entries list on the Permissions page. On the Client Filtering page, specify IP addresses or ranges that should be allowed or denied access to the share. NOTE: This feature cannot be used if your network includes packet filters, a NAT gateway, or routers.
-
bitmask is 1-32. The completed entry appears on the Client IP Filters list on the Client Filtering page. On the Advanced Settings page, enable or disable Access Based Enumeration and specify the default create mode for files and directories created in the share. The Access Based Enumeration option allows users to see only the files and folders to which they have access on the file share. On the Host Servers page, select the servers that will host the share.
-
Configuring SMB signing The SMB signing feature specifies whether clients must support SMB signing to access SMB shares. You can apply the setting to all servers, or to a specific server. To apply the same setting to all server, select File Shares from the Navigator and click Settings on the File Shares panel. To apply a setting to a specific server, select that server on the GUI, select CIFS from the lower Navigator, and click Settings. The dialog is the same for both selection methods.
-
When configuring SMB signing, note the following: • SMB2 is always enabled. • Use the Required check box to specify whether SMB signing (with either SMB1 or SMB2) is required. • The Disabled check box applies only to SMB1. Use this check box to enable or disable SMB signing with SMB1. You should also be aware of the following: • The File Share Settings dialog box does not display whether SMB signing is currently enabled or disabled.
-
On the CIFS Shares panel, click Add or Modify to open the File Shares wizard, where you can create a new share or modify the selected share. Click Delete to remove the selected share. Click CIFS Settings to configure global file share settings; see “Configuring SMB signing ” (page 83)) for more information. You can also view SMB shares for a specific file system. Select that file system on the GUI, and then select CIFS Shares from the lower Navigator.
-
NOTE: You cannot create an SMB share with a name containing an exclamation point (!) or a number sign (#) or both. Use the -A ALLOWCLIENTIPSLIST or -E DENYCLIENTIPSLIST options to list client IP addresses allowed or denied access to the share. Use commas to separate the IP addresses, and enclose the list in quotes. You can include an optional bitmask to specify entire subnets of IP addresses (for example, ibrix_cifs -A "192.186.0.1,102.186.0.2/16").
-
Linux permissions on files created over SMB The Linux permissions on files and folders created over SMB are not generally of interest to Windows users and administrators, but some insight is useful when considering multiprotocol access and for StoreAll system administrators. See “Permissions in a cross-protocol SMB environment” (page 100). The HP SMB server maps Windows user and group credentials to Linux UIDs and GIDs.
-
Gid: 1060635137 SID: S-1-5-21-3681183244-3700010909-334885885-513 We can find the GID assigned by the StoreAll CIFS server for any Active Directory Group.
-
3. 4. 5. On the Add/Remove Snap-in window, click Add. On the Add Standalone Snap-in window, select Shared Folders and click Add. On the Shared Folders window, select Another computer as the computer to be managed, enter or browse to the computer name, and click Finish. 6. 7. 8. Click Close > OK to exit the dialogs. Expand Shared Folders (\\
). Select Shares and manage the shares as needed. Windows Vista, Windows 2008, Windows 7: Complete the following steps: 1.
-
6. 7. 8. Click OK to exit the Add or Remove Snap-ins window. Expand Shared Folders (\\
). Select Shares and manage the shares as needed. Saving MMC settings You can save your MMC settings to use when managing shares on this server in later sessions. Complete these steps: 1. On the MMC, select File > Save As. 2. Enter a name for the file. The name must have the suffix .msc. 3. Select Desktop as the location to save the file, and click Save. 4. Select File > Exit.
-
NOTE: The Browse button cannot be used to locate the file system. • The directory to be shared will be created if it does not already exist. • The permissions on the shared directory will be set to 777. It is not possible to change the permissions on the share. • Do not include any of the following special characters in a share name. If the name contains any of these special characters, the share might not be set up properly on all nodes in the cluster.
-
To add a new share, select Shares > New Share and run the Create A Shared Folder Wizard. On the Folder Path panel, enter the path to the share, being sure to include the file system name. When you complete the wizard, the new share appears on the Computer Management window. Deleting SMB shares To delete an SMB share, select the share on the Computer Management window, right-click, and select Delete.
-
Best Practices when mapping shares: • A share should always be mapped using the User Virtual Interface (the User VIF) of a file serving node as that interface will be migrated to the node’s HA partner in event of the first node failing. • A share should never be mapped using the Admin IP address of a node as that interface cannot migrate to the node’s HA partner. • A share should never be mapped using the StoreAll Virtual Management Interface.
-
1. 2. 3. 4. Click Start, click Run, type mmc, and then click OK. On the MMC Console menu, click Add/Remove Snap-in. Click Add, and then click Active Directory Schema. Click Add, click Close, and then click OK. Adding uidNumber and gidNumber attributes to the partial-attribute-set To make modifications using the Active Directory Schema MMC snap-in, complete these steps: 1. Click the Attributes folder in the snap-in. 2.
-
The following article provides more information about modifying attributes in the Active Directory global catalog: http://support.microsoft.com/kb/248717 Assigning attributes To set POSIX attributes for users and groups, start the Active Directory Users and Computers GUI on the Domain Controller. Open the Administrator Properties dialog box, and go to the UNIX Attributes tab. For users, you can set the UID, login shell, home directory, and primary group. For groups, set the GID.
-
Synchronizing Active Directory 2008 with the NTP server used by the cluster It is important to synchronize Active Directory with the NTP server used by the StoreAll cluster.
-
4. Create the new shares on the cluster storage and assign each share the appropriate path. For example, assign srv1-DATA to /srv1/data, and assign srv2-DATA to /srv2/data. Because SRV3 originally pointed to the same share as SRV1, we will assign the share srv3-DATA the same path as srv1-DATA, but set the permissions differently. 5. Optionally, create a share having the original share name, DATA in our example. Assign a path such as /ERROR/DATA and place a file in it named SHARE_MAP_FAILED.
-
SMB clients SMB clients access shares on the StoreAll software cluster in the same way they access shares on a Windows server. Viewing quota information When user or group quotas are set on a file system exported as an SMB share, users accessing the share can see the quota information on the Quotas tab of the Properties dialog box. Users cannot modify quota settings from the client end. SMB users cannot view directory tree quotas.
-
Access Control Lists (ACLs) StoreAll SMB shadow copy behaves in the same manner as Windows shadow copy with respect to ACL restoration. When a user restores a deleted file or folder using SMB shadow copy, the ACLs applied on the individual files or folders are not restored. Instead, the files and folders inherit the permissions from the root of the share or from the parent directory where they were restored.
-
SMB shadow copy support. StoreAll software does not have any control over the behavior of other clients. NOTE: HP recommends that the share root is not at the same level as the file system root, and is instead a subdirectory of the file system root. This configuration reduces access and other permissions-related issues, as there are many system files (such as lost+found, quota subsystem files, and so on) at the root of the file system.
-
access to and security for Windows clients. The SMB server maintains the ACLs as requested by the Windows clients, and emulates the inheritance of ACLs identically to the way Windows servers maintain inheritance. This creates a true Windows experience around accessing files from a Windows client. This mechanism works well for pure Linux environments, but (like the SMB server) Linux applications do not understand any permissions mechanisms other than their own.
-
Working with new files and directories The inheritance rules of Windows assume that all directories are created on a Windows machine, where they inherit ACLs from their parent; the top level of a directory tree (the root of the file system) is assigned ACLs by the file system formatting process from the defaults for the system. This process is not in place on file serving nodes.
-
Robocopy errors occur during node failover or failback If Robocopy is in use on a client while a file serving node is failed over or failed back, the application repeatedly retries to access the file and reports the error The process cannot access the file because it is being used by another process. These errors occur for 15 to 20 minutes. The client's copy will then continue without error if the retry timeout has not expired.
-
8 Using FTP The FTP feature allows you to create FTP file shares for data stored on the cluster. Clients access the FTP shares using standard FTP and FTPS protocol services. IMPORTANT: Before configuring FTP, select an authentication method (either Local Users or Active Directory). See “Configuring authentication for SMB, FTP, and HTTP” (page 61) for more information. An FTP configuration consists of one or more configuration profiles and one or more FTP shares.
-
On the File Share page, select FTP as the File Sharing Protocol. Select the file system, which must be mounted, and enter the default directory path for the share. If the directory path includes a subdirectory, be sure to create the subdirectory on the file system and assign read/write/execute permissions to it. NOTE: StoreAll software does not create the subdirectory if it does not exist, and for anonymous shares only, adds a /pub/ directory to the share path instead.
-
On the Host Servers page, select the servers that will host the configuration profile.
-
On the Settings page, configure the FTP parameters that apply to the share. The parameters are added to the file serving nodes hosting the configuration profile. Also enter the IP addresses and ports that clients will use to access the share. For High Availability, specify the IP address of a VIF having a VIF backup. NOTE: The allowed ports are 21 (FTP) and 990 (FTPS). NOTE: If you need to allow NAT connections to the share, use the Modify FTP Share dialog box after the share is created.
-
To define permissions for a user, click Add to open the Add User to Share dialog box. Managing the FTP configuration Select File Shares > FTP from the Navigator to display the current FTP configuration. The FTP Config Profiles panel lists the profiles that have been created. The Shares panel shows the FTP shares associated with the selected profile.
-
Use the buttons on the panels to modify or delete the selected configuration profile or share. You can also add another FTP share to the selected configuration profile. Use the Modify FTP Share dialog box if you need to allow NAT connections on the share. Managing FTP from the CLI FTP is managed with the ibrix_ftpconfig and ibrix_ftpshare commands. For detailed information, see the HP StoreAll Storage CLI Reference Guide.
-
Modify a configuration profile: ibrix_ftpshare -m SHARENAME -c PROFILENAME [-f FSNAME -p dirpath] -I IP-Address:port [-u USERLIST] [-S SETTINGLIST] Delete a configuration profile: ibrix_ftpconfig -d PROFILENAME View an FTP share: ibrix_ftpshare -i SHARENAME -c PROFILENAME [-v level] List FTP shares associated with a specific profile: ibrix_ftpshare -l -c PROFILENAME [-v level] List FTP shares associated with a specific file system: ibrix_ftpshare -l -f FSNAME [-v level] Modify an FTP share: ibrix_ftpshare -
-
Accessing shares Clients can access an FTP share by specifying a URL in their Web browser, such as Internet Explorer. In the following URLs, IP_address:port is the IP (or virtual IP) and port configured for the share.
-
Table 3 Download a file by using the FTP protocol Use this command when... Command You do not need to specify the user name and password curl ftp://IP_address/pub/server.pem -o \ You must provide the default user name and password (“ftp” for the username and “ftp” for the password) curl ftp://IP_address/pub/server.pem -o \ -u ftp:ftp Table 4 Download a file by using the FTPS protocol Use this command when...
-
Table 6 Upload a file by using the FTPS protocol for local user Use this command when...
-
9 Using HTTP The HTTP feature allows you to create HTTP file shares for data stored on the cluster. Clients access the HTTP shares using standard HTTP and HTTPS protocol services. IMPORTANT: Before configuring HTTP, select an authentication method (either Local Users or Active Directory). See “Configuring authentication for SMB, FTP, and HTTP” (page 61) for more information. The HTTP configuration consists of a configuration profile, a virtual host, and an HTTP share.
-
Uses for the StoreAll REST API Although the StoreAll REST API is not generally intended for your end users, it lets you create applications using the StoreAll file systems and Express Query. You can develop applications that: • Gather user input and send requests programmatically to StoreAll • Digest responses from StoreAll and present results to user in a readable format • Can be coded in any language for example, Java or python, on any client operating system, such as Windows or Linux.
-
• You must assign read, write, and execute permissions to the share’s directory path and all parent directories up to the file system mount point to allow accounts to be created by their owners through the API. For example, if your share’s directory path is /objFS1/objStore, and the file system objFS1 is mounted at /objFS1, both directories must be set to read, write, and execute permissions. • Do not set the directory path of the file-compatible mode share to a subdirectory of the mount point.
-
Table 11 Checklist for creating HTTP shares (continued) Step applies only to REST API Shares nl Step 4 Step applies to all HTTP share types. Task Step applies to all HTTP share types. Step completed? Create or select an exiting HTTP config profile through • CLI:“Creating HTTP the GUI or through the CLI (ibrix_httpconfig). shares from the CLI” (page 131) IMPORTANT: Each server can have only one HTTP profile. 5 Where to find more information • GUI: “Creating HTTP shares from the GUI” (page 118).
-
Creating HTTP shares from the GUI Use the Add New File Share Wizard to create the HTTP share. You can then view or modify the configuration as necessary. To create HTTP shares: Table 12 Creating HTTP shares from the GUI Type of share to create See Standard HTTP share “Creating standard HTTP shares ” (page 118) StoreAll REST API share “Creating StoreAll REST API shares” (page 123) Creating standard HTTP shares To create a standard HTTP share: 1.
-
4. Configure a new profile on the Config Profile dialog box, specifying a name and the appropriate parameters for the profile. Select Host servers on the “Host Servers” page. Click Next.
-
5. On the “Virtual Host” page, enter the vhost name. Select the false option from the Enable StoreAll REST API menu. Fill in remaining details of SSL certificate, domain and IP address. Click Next.
-
6. On the “Settings” page, enter the URL path and fill in the remaining details. Click Next. On the Settings page, set the appropriate parameters for the share. Note the following: • When specifying the URL Path, do not include http:// or any variation of this in the URL path. For example, /reports/ is a valid URL path. The beginning and ending slashes of the path are optional. For example, /reports/, reports, and /reports are valid entries and will be stored as /reports/.
-
7. On Summary page, ensure that the right parameters are displayed. Ensure that: 122 • In the Virtual Host summary section, the value of IBRIX REST API is displayed as Disabled • In the File Share summary section, the value of IBRIX REST API Mode as disabled.
-
8. Click Finish. When the wizard is complete, users can access the share from a browser. For example, if you configured the share with the anonymous user, specified 99.226.50.92 as the IP address on the Create Vhost dialog box, and specified /reports/ as the URL path on the Add HTTP Share dialog box, users can access the share using the following URL: http://99.226.50.
-
1. 2. 3. 124 On the GUI, select File Shares from the Navigator to open the File Shares panel, and then click Add to start the Add New File Share Wizard. On the File Share page, select HTTP from the File Sharing Protocol menu. Select the file system, which must be mounted, and enter a share name and the default directory path for the share. Select an existing profile or configure a new profile on the Config Profile dialog box, specifying a name and the appropriate parameters for the profile.
-
4. The Host Servers dialog box displays differently whether you selected a previous profile or you are create a new one. If you selected the option Create a new HTTP Profile, you are prompted to select the file server nodes on which the HTTP service will be active. Only one configuration profile can be in effect on a particular server.
-
5. If you selected an existing profile on the Config Profile dialog box, you are shown the hosts defined for that profile, as shown in the following figure. 6. The Virtual Host dialog box displays differently whether you selected a previous profile or you are create a new one. If you are creating a new profile, the Virtual Host dialog box prompts you to enter additional information, as shown in the following figure. Enter a name for the virtual host.
-
7. If you selected a previous profile, the Virtual Host prompts you to select a pre-existing Vhost or create an HTTP Vhost. 8. 9. If you already have Vhosts defined, you can select an existing Vhost. On the Settings page, set the appropriate parameters for the share. Note the following: • When specifying the URL Path, do not include http:// or any variation of this in the URL path. For example, /reports/ is a valid URL path. The beginning and ending slashes of the path are optional.
-
• Set the Anonymous field to false only if you want to restrict access to specific users. The Anonymous field must be set to false when an HTTP-StoreAll REST API share in object mode is to be created.
-
11. To allow specific users read access, write access, or both, click Add. On the Add Users to Share dialog box, assign the appropriate permissions to the user. When you complete the dialog, the user is added to the list on the Users page. The Summary panel presents an overview of the HTTP configuration. You can go back and modify any part of the configuration if necessary. When the wizard is complete, users can access the API HTTP share from a client.
-
Use the buttons on the panels to modify or delete the selected configuration profile or virtual host. To view HTTP shares on the GUI, select the appropriate profile on the HTTP Config Profiles top panel, and then select the appropriate virtual host from the lower navigator tree. The Shares bottom panel shows the shares configured on that virtual host. Click Add Share to add another share to the virtual host.
-
Creating HTTP shares from the CLI On the command line, HTTP shares are managed by the ibrix_httpconfig, ibrix_httpvhost, and ibrix_httpshare commands. The ibrix_httpshare command is also used for creating a StoreAll REST API-enabled HTTP share. For detailed information, see the HP StoreAll Storage CLI Reference Guide. Table 13 Creating HTTP shares from the CLI Step Task Command/Pointer 1 Add a configuration profile. ibrix_httpconfig -a PROFILENAME [-h HOSTLIST] [-S SETTINGLIST] 2 Add a virtual host.
-
Creating HTTP shares See “Checklist for creating HTTP shares” (page 116) for a list of prerequisites that must be completed before creating an HTTP share. IMPORTANT: mode: Keep in mind the following when creating StoreAll REST API shares in file-compatible • Do not create file-compatible mode and object mode REST API shares on the same file system. Use separate file systems for each type of REST API share. • Do not create an object mode REST API share on any file system where Express Query is enabled.
-
ibrix_httpvhost -i VHOSTNAME -c PROFILENAME [-v level] Modify a virtual host: ibrix_httpvhost -m VHOSTNAME -c PROFILENAME -I IP-Address:port [-S SETTINGLIST] IMPORTANT: Once an HTTP vhost is created, you cannot change the value of the StoreAll REST API mode (ibrixRestApiMode).
-
If the pathname ends with a filename, the browser either opens the file or prompts the user to open or save the file, depending on the browser settings. You can also use curl commands to access an HTTP share. NOTE: When a file is uploaded into an HTTP share, the file is owned by the user who uploaded the file to the share. If a user uploads a file to an HTTP share and specifies a subdirectory that does not already exist, the subdirectory will be created.
-
Configuring Windows clients to access HTTP WebDAV shares Complete the following steps to set up and access WebDAV enabled shares: • Verify the entry in the Windows hosts file. Before mapping a network drive in Windows, verify that an entry exists in the c:\Windows\ System32\drivers\etc\hosts file. For example, IP address 10.2.4.200 is assigned to a Vhost named vhost1, and if the Vhost name is not being used to map the network drive, the client should be able to resolve the domain name such as www.storage.
-
• Consider the assigned IP address when mapping a network drive on Windows. When mapping a network drive in Windows, if the IP address assigned to the Vhost is similar to the format 10.2.4.200, there should be a corresponding entry in the Windows hosts file. Instead of using the IP address in the mapping, use the name specified in the hosts file. For example, 10.2.4.200 can be mapped as srv1vhost1, and you can issue the URL https:// srv1vhost1/share when mapping the network drive. • Unlock locked files.
-
disconnected and re-mapped through Windows Explorer. The files are accessible on the file serving node and through BitKinex. Use 1. 2. 3. 4. 5. 6. 7. the following workaround to resolve this condition: Disconnect the network drive. In Windows, select Start > Run and enter regedit. Increase FileAttributeLimitInBytes from the default value of 1000000 to 10000000 (by a factor of 10). Increase FileSizeLimitInBytes 10 times by adding one extra zero. Save the registry and quit. Reboot the Windows system.
-
10 HTTP-REST API object mode shares The StoreAll REST API share in object mode provides concepts similar to OpenStack Object Storage API to support programmatic access to user-stored files. Users create containers within each account to hold objects (files), and the user's string identifier for the object maps to a hashed path name on the file system.
-
Tutorial for using the HTTP StoreAll REST API object mode This section walks you through using the major components of object mode. You will be shown how to: • Create a container. • Set permissions for the container. • Upload and create objects for the container. • View the contents of the container. • Download contents from the container. It is assumed you have already created an HTTP StoreAll REST API share in object mode.
-
1. Create a container. When you first create a container, the account directory, named as the numeric user ID of the user creating the container, is automatically created as a subdirectory of the root of the HTTP share. See “Terminology for StoreAll REST API object mode” (page 138) for a list of requirements for creating the container name. The curl format for this command is the following: NOTE: • If secure HTTP is configured, replace the http with https. • Enter the following command on one line.
-
As shown in the following example: curl -X PUT http://192.168.2.
-
3. Add items to your newly created container. NOTE: • Enter the following commands on one line. To create an empty object in your new container, enter the following command: NOTE: Object names support UTF-8. curl -X PUT http://// // --user : The object ID can be any string uniquely identifying the object in this container. See Object ID in Table 15 (page 138) for details.
-
5. Download files from your share: NOTE: Enter the following commands on one line. curl -o http:/// /// -u : For example: curl -o C:\temp\myLocalFile.txt http://192.168.2.2/ obj/qa1\\administrator/container-a/mydir1/mysubdir2/ myobj.
-
in the container. In this example, the permissions for container-a are the default 700, but the permissions for container-b have been changed by qa1\\administrator to 775. Viewing the contents of a container You can request a list of all of the objects in a container, and certain metadata of those objects. To view the contents of a container: NOTE: Enter the following command on one line.
-
Finding the corresponding object ID from a hash name NOTE: These steps are for someone with administrator privileges. The HTTP StoreAll REST API object mode saves files on files system with hashed names which are generated while uploading objects/files and not with their actual name, specified by the user during their initial uploading. In the steps below, assume your user name is jsmith, and that you know the location of the hash reference to which you want to find the corresponding file name.
-
In this instance newcontainer is the container containing the hash reference. 7. Enter the following command to list the contents of newcontainer. [root@bv07-07 newcontainer]# ls -l total 4 drwxrwxrwx 3 jsmith objectapi_group 4096 Dec 7 15:49 45 In this instance 45 is the first-level directory created from the 11th to 20th least significant bits of the 40-byte hexadecimal value that was created when the file was uploaded or created on the share. 8.
-
The first time a user creates a container, a directory with the numeric user ID of the user representing that account, is created to hold the container. The container directory within this account directory is the container name provided by the user in the container creation request. Subsequent containers created by that user are also stored under the same account directory.
-
1. Enter the following command on the StoreAll server: echo -n '' | openssl dgst -sha1 For example, if your object identifier string is mydir1/mysubdir2/myobj.xyz, the command would be the following: echo -n 'mydir1/mysubdir2/myobj.xyz' | openssl dgst -sha1 The SHA-1 hash code for the string will be returned, for example: c610260e3075673aadec3afc4983101449db2f05. This hash name is the name of the file on the StoreAll file system that contains the object contents.
-
HTTP command: PUT /// HTTP/1.1 CURL command (Enter on one line: curl -X PUT http:///// -u : You can use a number of different formats for Active Directory users: NOTE: Enter commands on one line.
-
Delete Container Type of Request: Container services Description: Deletes the container. IMPORTANT: The container must be empty before it can be deleted. HTTP command: DELETE /// HTTP/1.1 CURL command (Enter on one line): curl -X DELETE http:///// -u : Set Container Permission Type of Request: Container services Description: Sets the permission of a container.
-
Retrieve Object Type of Request: Object Requests Description: Returns the list of containers for a user account. HTTP command: GET /// HTTP/1.1 CURL command (Enter on one line): curl -o http://// // -u : Delete Object Type of Request: Object Requests Description: Deletes an object. HTTP command: DELETE //// HTTP/1.
-
11 HTTP-REST API file-compatible mode shares The StoreAll REST API share in file-compatible mode provides programmatic access to user-stored files and their metadata. The metadata is stored on the HP StoreAll Express Query database in the StoreAll cluster and provides fast query access to metadata without scanning the file system. For more information on managing Express Query, see “Express Query” (page 217).
-
the user can query all files in that directory only, or all files in all subdirectories of that directory recursively. Retention properties assignment You can issue StoreAll REST API commands to change a file to the WORM (and optionally retained) state and set its retention expiration time, subject to the file system’s retention policy settings.
-
• All HTTP query responses generated by the API code follow the JSON standard. No XML response format is provided at this time. • HTTP request messages have a practical limit of about 2000 bytes, and it can be less if certain proxy servers are traversed in the network path. URL encoding HTTP query strings are URL-decoded by the API code.
-
error. Any request with the version field and a value less than or equal to the current version, is handled correctly by the new API version unless the capability has been removed or is beyond the support lifetime of the product.
-
File content transfer Files can be uploaded and downloaded with the normal StoreAll HTTP shares feature with WebDAV enabled, as described in earlier sections. In addition, the API defines an HTTP DELETE command to delete a file. The delete command is only for WebDAV enabled shares. Upload a file (create or replace) This command transfers the contents of a file from the client to the HTTP share. If the file identified does not already exist on the share, it will be created.
-
Download a file This command transfers the contents of a file to the client from the HTTP share. Download capability already exists in the StoreAll HTTP shares feature, and it is documented here for completeness. If the file does not exist, a 404 Not Found HTTP error is returned, in addition to HTML output such as the following:
404 Not Found Not Found
The requested URL /api/myfile.
-
HTTP syntax The HTTP request line format is: DELETE // HTTP/1.1 The equivalent curl command format is: curl -X DELETE http[s]://:// See “Using HTTP” (page 114) for information about the IP address, port, and URL path. Parameter Description pathname The pathname of the existing file on the HTTP share to be deleted. Example curl -X DELETE http://99.226.50.92/ibrix_share1/lab/images/xyz.jpg This example deletes the existing file called xyz.
-
HTTP syntax The HTTP request line format is: NOTE: Enter the following commands on a single line. PUT command PUT /[/]?[version=1]assign=='' [,=''…] HTTP/1.1 curl command The equivalent curl command format is: curl -g -X PUT "http[s]://:/[/]? assign==[,…"] See “Using HTTP” (page 114) for information about the IP address, port, and URL path.
-
Delete custom metadata This command removes one or more metadata attributes from an existing file or directory in the HTTP share. Up to 15 metadata attributes may be removed in one command. The ability to delete custom metadata is not currently constrained by WORM/retention settings. The ability to delete custom metadata is not currently constrained by file permissions or the file's WORM setting.
-
System and custom metadata Two types of metadata are supported for queries, and both can be referenced in the same query: • System metadata applies to all files and directories. Each file and directory stored in StoreAll includes a fixed set of attributes comprising its system metadata. System metadata attributes are distinguished from custom metadata attributes by the system:: prefix. System metadata attributes cannot be deleted by the user through the API.
-
System attribute (key) Type Description Example system::onDiskAtime numeric The date/time recorded • Query criteria in the atime field of the (seconds): file inode in the file 1334642962 system. See “system::onDiskAtime” • JSON response (page 165). (including nanoseconds): Writable no 334642962.556708192 See “API date formats” (page 155). system::lastChangedTime numeric The date/time of the last status change (ctime). See “API date no formats” (page 155).
-
System attribute (key) Type Description Example system::retentionState numeric The current WORM/retention state of the file, which is a combination of these bit values: A decimal number, partial (see such as 11 for the bit system::worm) value 0x0B (under legal hold, and retained, and WORM) 0x01: WORM 0x02: Retained 0x04: (not used) 0x08: Under legal hold Writable nl nl nl This attribute applies only to files, returning 0 for directories.
-
System attribute (key) Type Description Example Writable system::lastActivityTime numeric The latest date/time of the following 5 attributes of the file or directory: See “API date no formats” (page 155). system::createTime nl system::lastModifiedTime nl system::lastChangedTime nl system::deleteTime The system attribute, system::lastActivityTime, is useful for determining the last date/time at which a file had any modification activity.
-
system::onDiskAtime The atime inode field in StoreAll can be accessed as the system::onDiskAtime attribute from the API. This field represents different concepts in the lifetime of a WORM/retained file, and it often represents a concept other than the time of the file’s last access, which is why the field was named onDiskAtime rather than (for example) lastAccessedTime. (See “Retention properties assignment” (page 153) for a description of this life cycle).
-
Wildcards The StoreAll REST API provides three wildcards: Wildcard Description * A single attribute name of * returns all system and custom metadata attributes for the files and directories matching the query. system::* A single attribute name of system::* returns all system metadata attributes for the files and directories matching the query. It does not include any custom metadata entries.
-
curl -g "http[s]://:/[/[]]? nl [version=1][attributes=[,,…]]&query= nl [&recurse][&skip=][&top=][&ordered]" See “Using HTTP” (page 114) for information about the IP address, port, and URL path.
-
Regular expressions The arguments to the regular expression operators (~ and !~) are POSIX regular expressions, as described in POSIX 1003.1-2008 at http://pubs.opengroup.org/onlinepubs/9699919799/, section 9, Regular Expressions. JSON response format The result of the query is an HTTP response in JSON format, as in the following example: [ { "mydir" : { "system::ownerUserId" : 1701, "system::size" : 0, "system::ownerGroupId" : 650, "system::onDiskAtime" : 1346895723.
-
Example queries Get selected metadata for a given file The following is one command line: curl -g "http://99.226.50.92/ibrix_share1/lab/images/xyz.jpg? nl attributes=system::size,physician" This example queries only the file called xyz.jpg in the lab/images subdirectory on the ibrix_share1 HTTP share. A JSON document is returned containing the system size value and the custom metadata value for the physician attribute, for this file only.
-
issued queries to receive the first 2000 results. The client usually issues further queries until no more results are returned. Get selected metadata for all files in a given directory tree that matches a system metadata query The following is one command line: curl -g "http://99.226.50.
-
Get all files that match a name pattern The following is one command line: curl -g "http://99.226.50.92/ibrix_share1/lab/images?query= nl system::path~'.*\.(gif|jpg)$'" This example returns a JSON document that contains all files in the lab/images directory that end in .gif or .jpg. Get all activity-related times for files with recent activity The following is one command line: curl -g "http://99.226.50.
-
HTTP syntax The commands provided in this section should be entered on one line. The HTTP request line format is the following on one line: PUT //?assign=[system::retentionExpirationTime=] [,system::worm='true'] HTTP/1.
-
As part of processing this command, the file may also be set to the retained state. This will occur if the atime has already been set into the future, or if the file system’s default retention period is non-zero. The retention expiration time will be set to the atime (if in the future) or the default. Example: Set a file to WORM and retained with a retention expiration date/time curl -g -X PUT "https://99.226.50.92/ibrix_share1/lab/images/xyz.
-
12 Managing SSL certificates Servers accepting FTPS and HTTPS connections typically provide an SSL certificate that verifies the identity and owner of the web site being accessed. You can add your existing certificates to the cluster, enabling file serving nodes to present the appropriate certificate to FTPS and HTTPS clients. StoreAll software supports PEM certificates. When you configure the FTP share or the HTTP vhost, select the appropriate certificate.
-
1. Generate a private key: openssl genrsa -des3 -out server.key 1024 You will be prompted to enter a passphrase. Be sure to remember the passphrase. 2. Remove the passphrase from the private key file (server.key). When you are prompted for a passphrase, enter the passphrase you specified in step 1. cp server.key server.key.org openssl rsa -in server.key.org -out server.key rm -f server.key.org 3. Generate a Certificate Signing Request (CSR): openssl req -new -key server.key -out server.csr 4.
-
Adding a certificate to the cluster To add an existing certificate to the cluster, click Add on the Certificates panel. On the Add Certificate dialog box, enter a name for the certificate. Use a Linux command such as cat to display your concatenated certificate file. For example: cat server.pem Copy the contents of the file to the Certificate Content section of the dialog box. The copied text must include the certificate contents and the private key in PEM encoding.
-
Exporting a certificate If necessary, you can display a certificate and then copy and save the contents for future use. This step is called exporting. Select the certificate on the Certificates panel and click Export. To export a certificate from the CLI, use this command: ibrix_certificate -e -c CERTNAME Deleting a certificate To delete a certificate from the GUI, select the certificate on the Certificates panel, click Delete, and confirm the operation.
-
13 Using remote replication This chapter describes how to configure and manage the Continuous Remote Replication (CRR) service. NOTE: Keep in mind that when you set up CRR, the Express Query database is not replicated. You must set up periodic exports as described in “Metadata and continuous remote replication” (page 221).
-
Run-once replication. This method replicates a single directory sub-tree or an entire file system from the source file system to the target file system. Run-once is a single-pass replication of all files and subdirectories within the specified directory or file system. All changes that have occurred since the last replication task are replicated from the source file system to the target file system. File systems specified as the replication source or target must exist.
-
• A cluster can be a target for multiple replication tasks. For example, C1 can replicate /c1ifs1 to C3:/c3ifs1/target1 and C2 can replicate /c2ifs1 to C3:/c3ifs1/target2, with both replications occurring at the same time. • Continuous Remote Replication tasks can be linked. For example: ◦ C1 replicates /c1ifs1 to C2:/c2ifs1/target1. ◦ C2 replicates /c2ifs1/target1 to C3:/c3ifs2/target2. NOTE: cluster.
-
Because of the way StoreAll replication works it is important to understand how applications using the system will modify files to avoid unexpectedly large amounts of data being replicated. Applications typically behave in one of the following ways: • The application rarely changes files, so most files are replicated only once. • The application completely replaces the old file when saving changes. Some applications create a local temporary copy of a file in memory or on disk while you are working on it.
-
The Server Assignments section allows you to specify server assignments for the export. Check the box adjacent to Server to use the default assignments. If you choose to assign particular servers to handle replication requests, select those servers and then select the appropriate NICs. If the remote cluster does not appear in the selection list for Export To (Cluster), you will need to register the cluster. Select New to open the Add Remote Cluster dialog box and then enter the requested information.
-
The Remote Replication Exports panel lists the replication exports you created for the file system. Expand Remote Replication Exports in the lower Navigator and select the export to see the configured server assignments for the export. You can modify or remove the server assignments and the export itself. CLI procedure NOTE: This procedure does not apply to intracluster replication. Use the following commands to configure the target file system for remote replication: 1.
-
FSNAME is the target file system to be exported. The -p option exports a directory located under the root of the specified file system (the default is the root of the file system). The -C option specifies the source cluster containing the file system to be replicated. Include the -P option if you do not want this command to set the server assignments. You will then need to identify the server assignments manually with ibrix_crr_nic, as described in the next section.
-
You can use CRR health reports to check the status of CRR activities on the source and target cluster. To see a list of health reports for active replication tasks, click List Report on the Remote Replication Tasks panel. Select a report from the CRR Health Reports dialog box and click OK to see details about that replication task.
-
If the health check finds an issue in the CRR operation, it generates a critical event. Reports are generated on the source cluster. If the target cluster is running a version of StoreAll software earlier than 6.2, only the network connectivity check is performed. It takes approximately two minutes to generate a CRR health report. Reports are updated every 10 minutes. Only the last five CRR health reports are preserved.
-
Starting a replication task To start a replication task, click New on the Remote Replication Tasks panel and then use the New Replication Task Wizard to configure the replication. Replication Settings dialog box Define the replication method on the Replication Settings dialog box. Source Settings dialog box for continuous replications For continuous replications, the Source Settings dialog box lists the file system selected on the Filesystems panel.
-
Source Settings dialog box for run-once replications For a run-once replication of data other than a snapshot, specify the source directory on the Source Settings dialog box. Specify a comma-separated list of file and directory exclude patterns in the Exclude patterns text box. You can specify at most 16 patterns. If you are replicating a snapshot, click Use a snapshot and then select the appropriate Snap Tree and snapshot.
-
Target Settings dialog box For replications to a remote cluster, select the target cluster on the Target Settings dialog box. This cluster must already be registered as a target export. If the remote cluster is not in the Target Cluster selection list, select New to open the Add Remote Cluster dialog box and register the cluster as a target export. (See “Configuring the target export for replication to a remote cluster” (page 180) for more information.) Then enter the target file system.
-
For replications to the same cluster and file system, the Target Settings dialog box asks only for the target directory. This field is required. Specifying a target directory Specifying a target directory is optional for remote cluster and same cluster/different file system replications. It is required for same cluster/same file system replications.
-
Use the -s option to start a continuous remote replication task. The applicable options are: -f SRC_FSNAME The source file system to be replicated. -C TGT_CLUSTERNAME The remote target cluster. -F TGT_FSNAME The remote target file system. -X TGTEXPORT The remote replication target (exported directory). The default is the root of the file system. NOTE: This option is used only for replication to a remote cluster.
-
Use the -o option to start a run-once task. The -S option specifies a directory under the source file system to synchronize with the target directory. Starting a run-once directory replication task Use the following command to start a run-once directory replication for file system SRC_FSNAME. The -S option specifies the directory under the source file system to synchronize with the target directory. The -P option specifies the target directory.
-
Replicating WORM/retained files When using remote replication for file systems enabled for data retention, the following requirements must be met: • The source and target file systems must use the same data retention mode (Enterprise or Relaxed). • The default, maximum, and minimum retention periods must be the same on the source and target file systems. • A clock synchronization tool such as ntpd must be used on the source and target clusters.
-
3. 4. When the Run-Once replication is complete, restore shares to their original configuration on the local site, and verify that clients can access the shares. Redirect write traffic to the local site. Understanding the ibrcfrworker log file (ibrcfrworker.log) The format used by ibrcfrworker to log messages is "%t,<%p>,%i,%n%L". In this instance: • %t is the date and time the file/directory was replicated.
-
◦ – t means the modification time is different and is being updated to the sender’s value (requires --times). An alternate value of T means that the time will be set to the transfer time (without --times). – p means the permissions are different and are being updated to the sender’s value (requires --permissions). – o means the owner is different and is being updated to the sender’s value (requires --owner and super-user privileges).
-
14 Managing data retention Data retention is intended for sites that need to archive read-only files for business purposes, and ensures that files cannot be modified or deleted for a specific retention period. Data retention includes the following optional features: • Data validation scans to ensure that files remain unchanged. • Data retention reports. Overview This section provides overview information for data retention and data validation scans.
-
Default retention period. If a specific retention period is not applied to a file, the file will be retained for the default retention period. The setting for this period determines whether you can manage WORM (non-retained) files as well as WORM-retained files: • To manage both WORM (non-retained) files and WORM-retained files, set the default retention period to zero. To make a file WORM-retained, you will need to set the atime to a date in the future.
-
storage. A scheduled scan will quit immediately if it detects that a scan of the same file system is already running. You can schedule periodic data validation scans, and you can also run on-demand scans. Enabling file systems for data retention You can enable a new or an existing file system for data retention and, optionally, other features that require a retention-enabled file system, including validation, reporting, and Express Query.
-
period. The minimum value for the autocommit period is five minutes, and the maximum value is one year. If you plan to keep normal files on the file system, do not set the autocommit period. Enable Data Validation. Check this option to schedule periodic scans on the file system. Use the default schedule, or select Modify to open the Data Validation Scan Schedule dialog box and configure your own schedule. Enable Report Data Generation. Check this option to generate data retention reports.
-
Enable Express Query. Check this option to enable Express Query on the file system. See “Express Query” (page 217), for details. Enabling data retention from the CLI You can also enable data retention when creating a new file system from the CLI. Use ibrix_fs -c and include the following-o options: -o "retenMode=,retenDefPeriod=,retenMinPeriod=, retenMaxPeriod=,retenAutoCommitPeriod=" The retenMode option is required and is either enterprise or relaxed.
-
The following example creates a file system with Enterprise mode retention, with a default retention period of 1 month, a minimum retention period of 3 days, a maximum retention period of 5 years, and an autocommit period of 1 hour: ibrix_fs -o "retenMode=Enterprise,retenDefPeriod=1M,retenMinPeriod=3d, retenMaxPeriod=5y,retenAutoCommitPeriod=1h" -c -f ifs1 -s ilv_[1-4] -a Configuring data retention on existing file systems NOTE: Data retention cannot be enabled on a file system created on StoreAll software
-
To view the retention profile from the CLI, use the ibrix_fs -i command, as in the following example: ibrix_fs -i -f ifs1 FileSystem: ifs1 ========================= { … } RETENTION : Enterprise [default=15d,mininum=1d,maximum=5y] Changing the retention profile for a file system The file system must be unmounted when you make changes to the retention profile.
-
Autocommit period is set and the default retention period is zero seconds: • Files remaining unchanged during the autocommit period automatically become WORM but are not retained and can be deleted. To make a WORM file retained, set the atime to a time in the future, either before or after the file becomes WORM.
-
NOTE: For SMB users setting the access time manually for a file, the maximum retention period is 100 years from the date the file was retained. For NFS users setting the access time manually for a file, the retention expiration date must be before February 5, 2106. The access time has the following effect on the retention period: • If the access time is set to a future date, the retention period of the file is set so that retention expires at that date.
-
To administer files from the CLI, use the ibrix_reten_adm command. IMPORTANT: Do not use the ibrix_reten_adm command on a file system that is not enabled for data retention. Specifying path lists When using the Management Console or the ibrix_reten_adm command, you need to specify paths for the files affected by the retention action. The following rules apply when specifying path lists: • A path list can contain one or more entries, separated by commas.
-
find /ibrixFS/mydir -type d -exec ibrix_reten_adm -h -f ibrixFS -P {/*,{}/.??*,.[!.]* Setting or removing a legal hold When a legal hold is set on a retained or WORM file, the file cannot be deleted until the hold is released, even if the retention period has expired. On the WORM/Data Retention – File Administration dialog box, select Set a Legal Hold and specify the appropriate file. To remove a legal hold from a file, Remove a Legal Hold and specify the appropriate file.
-
To reset the expiration time using the CLI: ibrix_reten_adm -e expire_time -f FSNAME -P PATHLIST If you specify an interval such as 20m (20 minutes) for the expire_time, the retention expiration time is set to that amount of time in the future starting from now, not that amount of time from the original start of retention. If you specify an exact date/time such as 19:20:02 or 2/16/2012 for the expire_time, the command sets the retention expiration time to that exact time.
-
To delete a file using the CLI: ibrix_reten_adm -d -f FSNAME -P PATHLIST Running data validation scans Scheduling a validation scan When you use the Management Console to enable a file system for data validation, you can set up a schedule for validation scans. You might want to run additional scans of the file system at other times, or you might want to scan particular directories in the file system.
-
Starting an on-demand validation scan You can run a validation scan at any time. Select the file system on the Management Console, and then select Active Tasks from the lower navigator. Click New to open the Starting a New Task dialog box. Select Data Validation as the Task Type. When you click OK, the Start a new Validation Scan dialog box appears. Change the path to be scanned if necessary and click OK.
-
To start an on-demand validation scan from the CLI, use the following command: ibrix_datavalidation -s -f FSNAME [-d PATH] Viewing, stopping, or pausing a scan Scans in progress are listed on the Active Tasks panel on the Management Console. If you need to halt the scan, click Stop or Pause on the Active Tasks panel. Click Resume to resume the scan. To view the progress of a scan from the CLI, use the ibrix_task command. The -s option lists scheduled tasks.
-
Following is a sample validation summary file: # cat /fsIbrix/.archiving/validation/history/4-0.sum JOB_ID=4 FILESYSTEM_NAME=fsIbrix FILESYSTEM_MOUNT_DIR=/fsIbrix PATH=/fsIbrix/.
-
Checksum corruption: If the checksums of the and are identical, the .archiving directory may have been corrupted (a checksum corruption). If this is the case, you must restore the checksums: • If only a few files are inconsistent and you want to postpone restoring the checksums, you can back up the files with a checksum inconsistency, delete those files from the file system, and restore the backed up files to the file system.
-
The utilization report summarizes how storage is utilized between retention states and free space. The next example shows the first page of a utilization report broken out by tiers. The results for each tier appear on a separate page. The total size scales automatically, and is reported as MB, GB, or TB, depending on the size of the file system or tier. A data validation report shows when files were last validated and reports any mismatches. A mismatch can be either content or metadata.
-
Generating and managing data retention reports To run an unscheduled report from the Management Console, select Filesystems in the upper Navigator and then select WORM/Data Retention in the lower Navigator. On the WORM/Data Retention panel, click Run a Report. On the Run a WORM/Data Protection Summary Report dialog box, select the type of report to view, and then specify the output format. If an error occurs during report generation, a message appears in red text on the report. Simply run the report again.
-
Generating data retention reports from the CLI You can generate reports at any time using the ibrix_reports command. Scheduled reports can be configured only on the Management Console.
-
• When a legal hold is applied to a file, the legal hold is not replicated on the target. If the file on the target should have a legal hold, you will also need to set the legal hold on that file. • If a file has been replicated to a target and you then change the file's retention expiration time with the ibrix_reten_adm -e command, the new expiration time is not replicated to the target. If necessary, also change the file's retention expiration time on the target.
-
15 Express Query Express Query provides a per-file system database of system and custom metadata, and audit histories of system and file activity. When Express Query is enabled on the file system, you can manage the metadata service, configure auditing, create reports from the audit history, assign custom metadata and certain system metadata to files and directories, and query for selected metadata from files. NOTE: Express Query can only be enabled on file systems which have Data Retention enabled.
-
Start the metadata service: ibrix_archiving -s Stop the metadata service: ibrix_archiving -S [-F] [-t timeout secs] The -t option specifies the time (in seconds) to wait for the service to stop gracefully. The -F option forcefully stops the archiving daemons and disables database access to all file systems enabled for Express Query. When you restart the service after using -F, the database enters in recovery mode, which can take a long time to complete depending on the size of the database.
-
Restore to an existing file system that has Express Query enabled To restore a backup to an existing file system that has Express Query enabled: 1. Disable the express query feature for the file system, including the removal of any StoreAll REST API shares. Disable auditing feature before you disable the express query feature. a. To disable auditing, enter the following command: ibrix_fs -A [-f FSNAME] -oa audit_mode=off b.
-
The options specify the following: Options Description --dbconfig The metadata configuration file. Use only this path and file name. /usr/local/Metabox/scripts/startup.xml --database The database containing the metadata. is the name of the file system. --outputfile The CSV output file used to save the metadata. --user ibrix The username for accessing the database. Use only the “ibrix” username. Use perl to invoke the script. For example: perl /usr/local/ibrix/bin/MDExport.
-
The next command imports audit metadata exported by the ibrix_audit_reports command: MDimport -f target -t audit -n simple_report_for_source_at_1341513594723.csv The ibrix_audit_reports command automatically generates the file name simple_report_for_source_at_1341513594723.csv.
-
Managing auditing Auditing lets you: • Find out which events you have already captured in the Express Query database and control what gets captured in regards to file changes in the Express Query database. See “Audit log” (page 222) for more information. • Gather information from audit reports as to what is in the Express Query database. See “Audit log reports” (page 223) for more information. Audit log The audit log provides a detailed history of activity for specific file system events.
-
Audit log reports Audit log reports include metadata for selected file system events that occurred during a specific time period. To generate an audit log report, click Run a Report on the Audit Log panel. Specify the parameters for the report on the Run an Audit Log Report dialog box. NOTE: Although you can select any of the events for a report, an event must be selected for auditing to appear in the report. Use ibrix_fs -A or the Modify Audit Settings dialog box to change the events selected for auditing.
-
The audit reports are in CSV (comma-separated) format and are placed in the following directory: /.archiving/reports The file names have this format: _report_for__at_.csv For example: file_report_for_ibrixFS_at_1343771410270.csv simple_report_for_ibrixFS_at_1343772788085.csv nl Following are definitions for the less obvious fields in an audit report.
-
Field Description *time[n]sec The seconds and nanoseconds of that time, in UNIX epoch time, which is the number of seconds since the start of Jan 1, 1970 in UTC mode The Linux mode/permission bits (a combination of the values shown by the Linux man 2 stat command) *hash, content*, meta* Currently unused To generate reports from the command line, use the ibrix_audit_reports command: ibrix_audit_reports -t SORT_ORDER -f FILESYSTEM [-p PATH] [-b BEGIN_DATE] [-e END_DATE] [-o class1[,class2,...
-
16 Configuring Antivirus support The StoreAll Antivirus feature can be used with supported Antivirus software, which must be run on systems outside the cluster. These systems are called external virus scan engines. To configure the Antivirus feature on a StoreAll cluster, complete these steps: 1. Add the external virus scan engines to be used for virus scanning. You can schedule periodic updates of virus definitions from the virus scan engines to the cluster nodes. 2. Enable Antivirus on the file systems.
-
On the CLI, use the ibrix_avconfig command to configure Antivirus support. Use the ibrix_av command to update Antivirus definitions or view statistics. Adding or removing external virus scan engines The Antivirus software is run on external virus scan engines. You will need to add these systems to the Antivirus configuration.
-
To remove an external virus scan engine from the configuration, select that system on the Virus Scan Engines panel and click Delete. To add an external virus scan engine from the CLI, use the following command: ibrix_avconfig -a -S -I IPADDR -p PORTNUM The port number specified here must match the ICAP port number configured on the virus scan engines.
-
NOTE: All virus scan engines should have the same virus definitions. Inconsistencies in virus definitions can cause files to be rescanned. Be sure to coordinate the schedules for updates to virus definitions on the virus scan engines and updates of virus definitions on the cluster nodes. On the CLI, use the following commands: Schedule cluster-wide updates of virus definitions: ibrix_av -t [-S CRON_EXPRESSION] The CRON_EXPRESSION specifies the time for the virus definition update.
-
Defining protocol-specific policies For certain file sharing protocols (currently only SMB/CIFS), you can specify the file operations that trigger a scan (open, close, or both). There are three policies: • OPEN (Default). Scan on open. • CLOSE. Scan on close. • BOTH. Scan on open and close. NOTE: If you configure the protocol specific policy to CLOSE – Scan on close, older written files are not scanned automatically whenever the virtual scan engine is updated with newer virus definitions.
-
IMPORTANT: The exclusion by file extension feature is not supported for files objects stored under an HTTP StoreAll REST API share created in the object mode. If the share is created under the file system on which you created the exclusion, the exclusion still does not apply to the file objects present under that share in object mode. This situation occurs because the HTTP StoreAll REST API object mode references file objects with hash names. To configure exclusions by using the Management Console: 1.
-
5. Select the appropriate type of rule: • Inherited Rule/Remove Rule. Use this option to reset or remove exclusions that were explicitly set on the child directory. The child directory will then inherit exclusions from its parent directory. You should also use this option to remove exclusions on the top-most level directory where exclusions rules have been are set. • No rule. Use this option to remove or stop exclusions at the child directory.
-
On the CLI, use the following options to specify exclusions with the ibrix_avconfig command: • -x FILE_EXTENSION — Excludes all files having the specified extension, such as .jpg. If you specify multiple extensions, use commas to separate the extensions. • -s FILE_SIZE — Excludes all files larger than the specified size (in MB). • -N — Does not exclude any files in the directory hierarchy.
-
Recommendations for Antivirus scans: • Run Antivirus scans when the system is not being heavily used. • Configure your Antivirus scans so that a huge number of files in a subtree are not assigned to an Antivirus scan. • Do not run Antivirus scans on many file systems at the same time as there is a resource limitation on the AV daemon.
-
6. On the Schedule tab, click Schedule this task and then select the frequency (once, daily, weekly, monthly) and specify when the scan should run. CLI On the CLI, use the following command to start an Antivirus scan: ibrix_avscan -s -f FSNAME -p PATH [-d DURATION] The scan runs immediately.
-
then select Active Tasks > Antivirus Scan from the lower Navigator. The Antivirus Task Summary panel then shows current information for the scan. Stopping or pausing an active task Use the buttons on the Antivirus Task Summary panel to stop or pause a running task, or to resume a paused task. Viewing the results of an inactive task To view inactive Antivirus scan tasks for a file system, select the file system on the Filesystems panel and then select Inactive Tasks on the lower Navigator.
-
Stop the specified Antivirus scan task: ibrix_avscan -k -t TASKID [-F] Pause the specified Antivirus scan task: ibrix_task -p -n TASKID Resume the specified Antivirus scan task: ibrix_task -r -n TASKID Run the ibrix_avscan -l command to obtain the task ID. Viewing Antivirus statistics Antivirus statistics are accumulated whenever a scan is run. To view statistics, select Statistics from the lower Navigator. Click Clear Stats to clear the current statistics and start accumulating them again.
-
Limitation 2: When the following sequence of events occurs: • A virus file is created inside the snap root • A snap is taken • The original file is renamed or moved to another path • The snap file is read The quarantine utility cannot track the original file because the link was not created with its name. That file cannot be listed, reset, moved, or deleted by the quarantine utility.
-
17 Creating StoreAll software snapshots The StoreAll software snapshot feature allows you to capture a point-in-time copy of a file system or directory for online backup purposes and to simplify recovery of files from accidental deletion. Software snapshots can be taken of the entire file system or selected directories. Users can access the file system or directory as it appeared at the instant of the snapshot. NOTE: To accommodate software snapshots, the inode format was changed in the StoreAll 6.
-
To enable a directory tree for snapshots, click Add on the Snap Trees panel. You can create a snapshot directory tree for an entire file system or a directory in that file system. When entering the directory path, do not specify a directory that is a parent or child of another snapshot directory tree. For example, if directory /dir1/dir2 is a snapshot directory tree, you cannot create another snapshot directory tree at /dir1 or /dir1/dir2/dir3. IMPORTANT: StoreAll reliably supports up to 1,024 snapshots.
-
IMPORTANT: A snapshot reclamation task is required for each file system containing snap trees that have scheduled snapshots. If a snapshot reclamation task does not already exist, you will need to configure the task. See “Reclaiming file system space previously used for snapshots” (page 245). Modifying a snapshot schedule You can change the snapshot schedule at any time. On the Snap Trees panel, select the appropriate snap tree, select Modify, and make your changes on the Modify Snap Tree dialog box.
-
To take a snapshot from the CLI, use the following command: ibrix_snap -c -f FSNAME -P SNAPTREEPATH -n NAMEPATTERN SNAPTREEPATH is the full directory path starting from the root of the file system. The name that you specify is appended to the date of the snapshot. The following words cannot be used in the name, as they are reserved for scheduled snapshots: Hourly Daily Weekly Monthly You will need to manually delete on-demand snapshots when they are no longer needed.
-
The following example lists snapshots created on an hourly schedule for snap tree /ibfs1/users. Using ISO 8601 naming ensures that the snapshot directories are listed in order according to the time they were taken. [root@9000n1 ~]# # cd /ibfs1/users/.snapshot/ [root@9000n1 .
-
Restoring files from snapshots Users can restore files from snapshots by navigating to the appropriate snapshot directory and copying the file or files to be restored, assuming they have the appropriate permissions on those files. If a large number of files need to be restored, you may want to use Run Once remote replication to copy files from the snapshot directory to a local or remote directory (see “Starting a replication task ” (page 187)).
-
Reclaiming file system space previously used for snapshots Snapshot reclamation tasks are used to reclaim file system space previously used by snapshots that have been deleted. IMPORTANT: A snapshot reclamation task is required for each file system containing snap trees that have scheduled snapshots. Using the Management Console, you can schedule a snapshot reclamation task to run at a specific time on a recurring basis.
-
On the General tab, select a reclamation strategy: • Maximum Space Reclaimed. The reclamation task recovers all snapped space eligible for recovery. It takes longer and uses more system resources than Maximum Speed. This is the default. • Maximum Speed of Task. The reclamation task reclaims only the most easily recoverable snapped space.
-
To stop a running reclamation task, click Stop on the Task Summary panel. Managing reclamation tasks from the CLI To start a reclamation task from the CLI, use the following command: ibrix_snapreclamation -r -f FSNAME [-s {maxspeed | maxspace}] [-v] The reclamation task runs immediately; you cannot create a recurring schedule for it.
-
Moving files between snap trees Files created on, copied, or moved to a snap tree directory can be moved to any other snap tree or non-snap tree directory on the same file system, provided they are not snapped. After a snapshot is taken and the files have become part of that snapshot, they cannot be moved to any other snap tree or directory on the same file system. However, the files can be moved to any snap tree or directory on a different file system. Backing up snapshots Snapshots are stored in a .
-
18 Creating block snapshots The block snapshot feature allows you to capture a point-in-time copy of a file system for online backup purposes and to simplify recovery of files from accidental deletion. The snapshot replicates all file system entities at the time of capture and is managed exactly like any other file system. NOTE: You can use either the software method or the block method to take snapshots on a file system. Using both snapshot methods simultaneously on the same file system is not supported.
-
Setting up snapshots This section describes how to configure the cluster to take snapshots. Preparing the snapshot partition The block snapshot feature does not require any custom settings for the partition. However, HP recommends that you provide sufficient storage capacity to support the snapshot partition. NOTE: If the snapshot store is too small, the snapshot will eventually exceed the available space (unless you detect this and manually increase storage).
-
A snapshot scheme specifies the number of snapshots to keep and the number of snapshots to mount. You can create a snapshot scheme from either the Management Console or the CLI. The type of storage array determines the maximum number of snapshots you can keep and mount per file system.
-
Under Snapshot Configuration, select New to create a new snapshot scheme. The Create Snapshot Scheme dialog box appears.
-
On the General tab, enter a name for the strategy and then specify the number of snapshots to keep and mount on a daily, weekly, and monthly basis. Keep in mind the maximums allowed for your array type. Daily means that one snapshot is kept per day for the specified number of days. For example, if you enter 6 as the daily count, the snapshot feature keeps 1 snapshot per day through the 6th day. On the 7th day, the oldest snapshot is deleted.
-
For either template, enter one or more of the following variables. The variables must be enclosed in braces ({ }) and separated by underscores (_). The template can also include text strings. When a snapshot is created using the templates, the variables are replaced with the following values. Variable Value fsname File system name shortdate yyyy_mm_dd fulldate yyyy_mm_dd_HHmmz + GMT When you have completed the scheme, it appears in the list of snapshot schemes on the Create Snapshot dialog box.
-
Creating an automated snapshot scheme from the CLI You can create an automated snapshot scheme with the ibrix_vs_snap_strategy command. However, you will need to use the Management Console to create a snapshot schedule. To define a snapshot scheme, execute the ibrix_vs_snap_strategy command with the -c option: ibrix_vs_snap_strategy -c -n NAME -k KEEP -m MOUNT [-N NAMESPEC] [-M MOUNTSPEC] The options are: -n NAME The name for the snapshot scheme. -k KEEP The number of snapshots to keep per file system.
-
Viewing automated snapshot schemes On the Management Console, you can view snapshot schemes on the Create Snapshot dialog box. Select Recurring as the Snapshot Type, and then select a snapshot scheme. A description of that scheme will be displayed.
-
Deleting snapshots Delete snapshots to free up resources when the snapshot is no longer needed or to create a new snapshot when you have already created the maximum allowed for your storage system. On the Management Console, select the snapshot on the Block Snapshots panel and click Delete.
-
0.00 4 0.00 5 0.00 6 0.00 0.00 ib50-243 0.00 ib50-243 0.00 ib50-243 0.00 0 0 0 ilv14_msa_snap9__snap 0 0 0 ilv15_msa_snap9__snap 0 0 0 ilv16_msa_snap9__snap 0 0 0 MIXED OK, SnapUsed=8% MIXED OK, SnapUsed=6% MIXED OK, SnapUsed=5% MIXED 7 Hrs 56 4,096 7 Hrs 56 4,096 7 Hrs 56 4,096 7 Hrs 56 Mins 46 Secs ago 0.00 Mins 46 Secs ago 0.00 Mins 46 Secs ago 0.00 Mins 46 Secs ago NOTE: For P4000 G2 storage systems, the state is reported as OK, but the SnapUsed field always reports 0%.
-
The next window shows an SMB client accessing the snapshot file system .fs1_snap1. The original file system is mapped to drive X.
-
Troubleshooting block snapshots Snapshot reserve is full and the MSA2000 is deleting snapshot volumes When the snapshot reserve is full, the MSA2000 will delete snapshot volumes on the storage array, leaving the device entries on the file serving nodes. To correct this situation, take the following steps: 1. Stop I/O or any applications that are reading or writing to the snapshot file systems. 2. Log on to the active Fusion Manager. 3. Unmount all snapshot file systems. 4.
-
19 Using data tiering A data tier is a logical grouping of file system segments. After creating tiers containing the segments in the file system, you can use the data tiering migration process to move files from the segments in one tier to the segments in another tier. For example, you could create a primary data tier for SAS storage and another tier for SATA storage. You could then migrate specific data from the SAS tier to the lower-cost SATA tier.
-
For a new tier, on the Manage Tier dialog box, choose Create New Tier, enter a name for the tier, and select one or more segments to be included in the tier. To modify an existing tier, choose Use Existing Tier, select the tier, and make any changes to the segments included in the tier. Segments not currently included in a tier are specified as Unassigned. If you select a segment that is already mapped to a tier, the segment will be unassigned from that tier and reassigned to the tier you specified.
-
You can work on only one tier at a time. However, when you click Next, you will be asked if you want to manage more tiers. If you answer Yes, the Manage Tier dialog box will be refreshed and you can work on another tier. All new files are written to the primary tier. On the Primary Tier dialog box, select the tier that should receive these files. You can also select cluster servers and any StoreAll clients whose I/O operations should be redirected to the primary tier.
-
patterns (such as access and modification times), file size, and file type. Rules can be constrained to operate on files owned by specific users and groups and to specific paths. Logical operators can be used to combine directives. The Tiering Policy dialog box displays the existing tiering policy for the file system. To add a new tiering policy, click New. On the New Data Tiering Policy dialog box, select the source and destination tiers. Initially RuleSet1 is empty.
-
To delete a ruleset, check the box in the rule set and click Delete. The Tiering Schedule dialog box lists all executed and running migration tasks. Click New to add a new schedule, click Edit to reschedule the selected task, or click Delete to delete the selected schedules. Use the Enabled and Disabled buttons to enable or disable the selected schedule. When a schedule is enabled, it is put in a runnable state. When a schedule is disabled, it is put in a paused state.
-
When you click New to create a new schedule, the default frequency for migration tasks is displayed. For an existing schedule, the current frequency is displayed. To change the frequency, click Modify. On the Data Tiering Schedule Wizard dialog box, select a time to run the migration task.
-
Viewing tier assignments and managing segments On the Management Console, select Filesystems from the Navigator and select a file system in the Filesystems panel. In the lower Navigator, select Segments. The Segments panel displays the segments in the file system and specifies whether they are assigned to a tier.
-
You can assign, reassign, or unassign segments from tiers using the Data Tiering Wizard. The Management Console also provides additional options to perform these tasks. Assign or reassign a segment: On the Segments panel, select the segments you are assigning and click Assign to Tier. On the Assign to Tier dialog box, specify whether you are assigning the segment to an existing tier or a new tier and specify the tier.
-
When you click OK, the rule is checked for correct syntax. If the syntax is correct, the rule is saved and appears on the Data Tiering Rules panel. The following example shows the three rules created for the example. You can delete rules if necessary. Select the rule on the Data Tiering Rules panel and click Delete. Additional rule examples The following rule migrates all files from Tier2 to Tier1: name="*" The following rule migrates all files in the subtree beneath the path.
-
The next example migrates all mpeg4 files in the subtree. A logical “and” operator combines the rules: path=testdata4 and name="*mpeg4" The next example narrows the scope of the rule to files owned by users in a specific group. Note the use of parentheses. gname=users and (path=testdata4 and name="*mpeg4") For more examples and detailed information about creating rules, see “Writing tiering rules” (page 275). Running a migration task You can use the Data Tiering Wizard to schedule and run migration tasks.
-
Configuring tiers and migrating data using the CLI Use the ibrix_tier command to manage tier assignments and to list information about tiers. Use the ibrix_migrator command to create or delete rules defining migration policies, to start or stop migration tasks, and to list information about rules and migrator tasks. Assigning segments to tiers First determine the segments in the file system and then assign them to tiers.
-
1 2 3 4 . . ibrix01b ibrix01a ibrix01b ibrix01a ilv1 ilv2 ilv3 ilv4 OK OK OK OK 4,096 4,096 4,096 4,096 3,811.11 3,035.67 3,811.11 3,035.67 . . . Use the following command to assign segments to a tier. The tier is created if it does not already exist.
-
The following rule migrates all files that have not been modified for 30 minutes from Tier1 to Tier2: [root@ibrix01a ~]# ibrix_migrator -A -f ifs1 -r 'mtime older than 30 minutes' -S Tier1 -D Tier2 Rule: mtime
-
To view summary information after the task has completed, run the ibrix_migrator -i command again and include the -n option, which specifies the task ID. (The task ID appears in the output from ibrix migrator -i.
-
To unassign all segments and delete the tier, use the following command: ibrix_tier -d -f FSNAME -t TIERNAME Deleting a tiering rule Before deleting a rule, run the ibrix_migrator -l [-f FSNAME] -r command and note the ID assigned to the rule. Then use the following command to delete the rule: ibrix_migrator -d -f FSNAME -r RULE_ID The -r option specifies the rule ID.
-
When specifying an absolute date and/or time, the rule must use a compare type operator (< | <= | = | != | > | >=). For example: ibrix_migrator -A -f ifs2 -r "atime > '2010-09-23' " -S TIER1 -D TIER2 Use the following qualifiers for relative times and dates: • Relative time: Enter in rules as year or years, month or months, week or weeks, day or days, hour or hours. • Relative date: Use older than or younger than.
-
Use the following command to write a rule. The rule portion of the command must be enclosed in single quotes. ibrix_migrator -A -f FSNAME -r 'RULE' -S SOURCE_TIER -D DEST_TIER Examples: The rule in the following example is based on the file’s last modification time, using a relative time period. All files whose last modification date is more than one month in the past are moved.
-
# ibrix_migrator -A -f ifs2 -r ' name = "*.doc" ' -S T1 -D T2 # ibrix_migrator -A -f ifs2 -r ' name = "*.jpg" ' -S T2 -D T1 For example, if tier 1 is filled with .doc files to 70% capacity and tier2 is filled with .jpg files to 80% capacity, then tiering might terminate before it is able to fully "swap" the contents of tier 1 and tier 2. The files are processed in no particular order; therefore, it is possible that more .
-
20 Using file allocation This chapter describes how to configure and manage file allocation. Overview StoreAll software allocates new files and directories to segments according to the allocation policy and segment preferences that are in effect for a client. An allocation policy is an algorithm that determines the segments that are selected when clients write to a file system. File allocation policies File allocation policies are set per file system on each file serving node and on the StoreAll client.
-
Standard segment preferences and allocation policies Name Description Comment ALL Prefer all of the segments available in the file system for new files and directories. This is the default segment preference. It is suitable for most use cases. LOCAL Prefer the file serving node’s local segments for new files and directories. No writes are routed between the file serving nodes in the cluster.
-
A StoreAll client or StoreAll file serving node (referred to as “the host”) uses the following precedence rules to evaluate the file allocation settings that are in effect: • The host uses the default allocation policies and segment preferences: The RANDOM policy is applied, and a segment is chosen from among ALL the available segments.
-
Setting file and directory allocation policies from the CLI Allocation policy names are case sensitive and must be entered as uppercase letters (for example, RANDOM). Set a file allocation policy: ibrix_fs_tune -f FSNAME {-h HOSTLIST|-g GROUPLIST} -s LVNAMELIST -p POLICY [-S STARTSEGNUM] The following example sets the ROUNDROBIN policy for files only on the file system ifs1 on file serving node s1.hp.com, starting at segment ilv1: ibrix_fs_tune -f ifs1 -h s1.hp.
-
Both methods can be in effect at the same time. For example, you can prefer a segment for a user and then prefer a pool of segments for the clients on which the user will be working. On the Management Console, open the Modify Filesystem Properties dialog box and select the Segment Preferences tab. Creating a pool of preferred segments from the CLI A segment pool can consist of individually selected segments, all segments local to a file serving node, or all segments.
-
ibrix_fs_tune -f FSNAME {-h HOSTLIST|-g GROUPLIST} -S {SEGNUMLIST|ALL|LOCAL} Restoring the default segment preference The default is for all file system segments to be preferred. Use the following command to reset the file system policy to the default value on HOSTLIST: ibrix_fs_tune -f FSNAME {-h HOSTLIST|-g GROUPLIST} -p -U Tuning allocation policy settings To optimize system performance, you can globally change the following allocation policy settings for a file system: • File allocation policy.
-
Restore the default file allocation policy: ibrix_fs_tune -f FSNAME {-h HOSTLIST|-g GROUPLIST} -p -U Listing allocation policies Use the following command to list the preferred segments (the -S option) or the allocation policy (the -P option) for the specified hosts, hostgroups, or file system. ibrix_fs_tune -l [-S] [-P] [-h HOSTLIST | -g GROUPLIST] [-f FSNAME] HOSTNAME mak01.hp.
-
21 Support and other resources Contacting HP For worldwide technical support information, see the HP support website: http://www.hp.
-
22 Documentation feedback HP is committed to providing documentation that meets your needs. To help us improve the documentation, send any errors, suggestions, or comments to Documentation Feedback (docsfeedback@hp.com). Include the document title and part number, version number, or the URL when submitting your feedback.
-
Glossary ACE Access control entry. ACL Access control list. ADS Active Directory Service. ALB Advanced load balancing. BMC Baseboard Management Configuration. CIFS Common Internet File System. The protocol used in Windows environments for shared folders. CLI Command-line interface. An interface comprised of various commands which are used to control operating system responses. CSR Customer self repair. DAS Direct attach storage.
-
SELinux Security-Enhanced Linux. SFU Microsoft Services for UNIX. SID Secondary controller identifier number. SMB Server Message Block. The protocol used in Windows environments for shared folders. SNMP Simple Network Management Protocol. TCP/IP Transmission Control Protocol/Internet Protocol. UDP User Datagram Protocol. UID Unit identification. VACM SNMP View Access Control Model. VC HP Virtual Connect. VIF Virtual interface. WINS Windows Internet Name Service. WWN World Wide Name.
-
Index Symbols /etc/likewise/vhostmap file, 97 A Active Directory configure, 65 configure from CLI, 72 Linux static user mapping, 93 synchronize with NTP server, 96 use with LDAP ID mapping, 61 Antivirus configure, 226 enable or disable, 228 file exclusions, 230 protocol scan settings, 230 scans, start or schedule, 233 scans, status, 235 statistics, 237 unavailable policy, 229 virus definitions, 228 virus scan engine, 226 add, 227 remove, 228 audit log, 222 authentication Active Directory, 61 configure from
-
documentation providing feedback on, 287 E Export Control, enable, 20, 27 Express Query export metadata, 219 HTTP-StoreAll REST API shares.
-
M mapping SMB shares, 92 Microsoft Management Console manage SMB shares, 88 migration, files, 270 mounting, file system, 22, 25 mountpoints create from CLI, 24 delete, 24 view, 22, 25 N New Filesystem Wizard, 14 NFS case-insensitive filenames, 58 configure NFS server threads, 55 export file systems, 55 support, 55 unexport file systems, 58 O object mode commands, 148 data retention, 117 finding hash name, 146 finding object ID, 145 terminology, 138 tutorial, 139 uses, 138 viewing container contents, 144 v
-
validation scan results, 210 view retention information, 204 WORM file, 196 S SegmentNotAvailable alert, 51 SegmentRejected alert, 52 segments defined, 10 delete, 47 rebalance, 43 stop tasks, 47 track progress, 46 view task status, 47 SMB Active Directory domain, configure, 93 activity statistics per node, 76 authentication, 61 configure nodes, 76 Linux permissions, 87 Linux static user mapping, 93 monitor SMB services, 77 permissions management, 100 RFC2037 support, 93 shadow copy, 98 share administrators
-
on-demand scans, 209 resolve scan errors, 211 schedule scans, 208 stop or pause, 210 view scan results, 210 volume groups delete, 47 view information, 38 W websites HP Subscriber's Choice for Business, 286 294 Index