
Guide


3/7/2018 SparkFun Inventor's Kit for micro:bit Experiment Guide - learn.sparkfun.com
https://learn.sparkfun.com/tutorials/sparkfun-inventors-kit-for-microbit-experiment-guide/all#introduction-to-microsoft-makecode 53/63
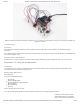
While the image shows black momentary pushbuttons, you can use any colored button as long as it is momentary pushbutton to
trigger the sounds!
Troubleshooting
No Sound
Given the size and shape of the piezo buzzer, it is easy to miss the right holes on the breadboard. Try double-checking its
placement.
Also, double check to make sure the push button is wired correctly. If you miswired it, then the circuit will never be completed even
if you press the button or not.
Feeling Let Down and Deserted
Create your own song using just the tone blocks rather than the standard song options given from the start melody block.
Experiment 10: Using the Accelerometer
Introduction
In this experiment you will look at combining the use of the accelerometer on the micro:bit to measure the orientation of the
micro:bit and use it to control the angle of a servo.
Ready to shake, rattle and roll?
Parts Needed
You will need the following parts:
1x micro:bit
1x Micro B USB Cable
1x micro:bit Breakout (with Headers)
1x Breadboard
5x Jumper Wires
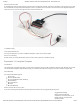
1x Servo
Didn’t Get the SIK for micro:bit?
If you are conducting this experiment and didn’t get the Inventor’s Kit, we suggest using these parts:
Introducing the Accelerometer
The accelerometer is a component
that you won’t find in the kit’s bag of