-
-
Before You Use Surveillance devices may be prohibited by law in your country. Though Network Camera is not only a high performance web equipped camera but also a flexible surveillance system, ensure that the operation of such devices are legal before installing this unit for surveillance. It is important to carefully check the contents with the "Package Contents" chapter after opening the package.
-
Table of Contents Before You Use..................................................................................... 1 Package Contents................................................................................. 5 Installation .......................................................................................... 5 Hardware installation...........................................................................5 Software installation...................................................................
-
FTP ...........................................................................................43 Video codec parameters.....................................................................45 Video codec parameters.....................................................................45 Motion detection...............................................................................47 Application setup ..............................................................................48 Weekly schedule .............
-
Homepage layout configuration URL...............................................68 D. Technical specifications..................................................................69 -4www.vivotek.
-
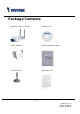
Package Contents Network C amera IP3133 Software C D Power adapter Quick installation guide C amera stand Warranty card -5www.vivotek.
-
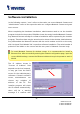
Installation Hardware installation All necessary accessories can be found in the product package except for the Ethernet cable that depends on the user’s environment. The Ethernet cable should meet UTP category 5 that cannot exceed 100 meters. C onnect the jack of the power adapter to MiniAVServer prior to plugging the utility end into the utility power socket. It will reduce accidental electric surge shock.
-
configuration. Network Camera will automatically detect and operate in the available network interface with the priority of Ethernet than WLAN. Operating in either network mode, the LED will flash every second as heartbeat to indicate alive. Network Camera provides a general I/O terminal block with one digital input and one relay switch for device control. Pin 1 and pin 2 can be connected to an external sensor and the state of voltage will be monitored from the initial state 'LOW'.
-
Software installation In the following content, "user" refers to those who can access Network Camera and "administrator" refers to the supervisor who can configure Network Camera and grant users access. When completing the hardware installation, administrators need to run the Installer program included in the product CDROM to locate the newly installed Network Cameras. Any Network C amera standby for software installation will be captured by the Installer program.
-
others. If administrators want to use another IP address, modify the IP address text field. -9www.vivotek.
-
If the administrator wants to fix the IP address of the unit, check the option "Use system this boots" IP to whenever skip future installation procedures. Otherwise the unit will need installation whenever it is restarted. C lick on “Set IP Address” button to proceed. Enter the wireless LAN settings according to the access point in infrastructure or Ad Hoc master. The connection mode, SSID, WEP settings are required.
-
After clicking on “Save”, a progressive bar will indicate the installation process. Congratulations! Now Network Camera is ready for access. After clicking on in the successful dialog, the "Assigned" field will be labeled "Yes". Administrators should keep the address information for users’ request. If there is any error dialog rather than “Set IP OK”, please follow the next page. Administrators may click directly to access the on newly installed server in the default browser. - 11 www.
-
When administrators choose “Use this IP whenever system boots” or fill any wireless network settings, the local FTP server port and root password of Network Camera will be utilized. If they have been changed prior to the installation, a confirmation window will pop out to request correct settings. After entering the correct settings, press “Retry”. If the “Server FTP Port” or “Server Root Password” is lost, click “C ancel” to exit.
-
First access to Network Camera Check network settings even if connected already Although Network C amera already can be connected after software installation from Local Area Network, administrators should complete the network settings in the configuration page including the correct subnet mask and IP address of gateway and DNS. Ask for the network administrator or Internet service provider for the detail information. By default Network Camera will need administrator's installation every time it reboots.
-
How to Use Authentication After opening the Web browser and typing in the URL of Network C amera, a dialogue window may pop up to request a username and password except that the administrator does not save any password. Upon successful authentication, the main page will display like the figure below. In the figure, the foreground is the login window and the background shows the message when authentication fails. The user may check the option to save the password for future convenience. - 14 www.vivotek.
-
Installing plug-in If it is initial access to Network Camera in Windows, the web browser may prompt for permission to install a new plug-in that is provided by Network Camera. Prompt or not and the prompt message depend on the Internet security settings of user’s PC or notebook. The highest security level may prohibit any installation and execution attempt even the plug-in is safe. This plug-in has been registered for certificate and is used to display the motioned pictures in the browser.
-
Primary user’s capability Main screen with camera view There is a logo image shown in the upper left corner. It can link to other web sites or resources depending on the settings in configuration. The assigned caption and system date/time will display in the banner above the image window. There might be some windows enclosed by red lines shown in the image as soon as motion is detected in the related windows. C lick on the configuration link to the right of the image window to enter the configuration page.
-
Connection type If it is the first access to “Connection type” page in Windows, the web browser will ask to install a new plug-in that is provided by Network C amera. This plug-in has been registered for certificate and is used to change the parameters at the client side. Users may click on to install the plug-in. If the web browser does not allow the user to install, check the Internet security to lower the security level or contact network supervisors. There are two settings for the client side.
-
display will more accurate. But the real-time effect is worse than UDP protocol. If the network is protected by a firewall and it opens HTTP port (80) only, HTTP protocol must be selected. In this mode, audio will not be sent and you can see the video only. If you have no special needs and no idea to choose one among them, simply choose UDP. Generally the client will automatically try these protocols by the following order, UDP → TC P → HTTP.
-
Administrator’s capability Tune the best performance The best performance means the image refresh rate should be the fastest as possible and the video quality should be the best as possible at the lowest network bandwidth as possible. Three factors, “Maximum frame rate”, “Fix bit rate”, and “Fix quality” in the Video configuration page, are correlative to the performance.
-
bandwidth and try out the best performance by tuning the maximum frame rate. The larger frame rate in slow network will blur the images. You may also try to choose “Half” in size option for better images or “Halfx2” for larger image size. Note that even you have well tuned the parameters, the performance may still vary from person to person when multiple users view at the same time.
-
Open accounts for users Protect Network Cam era by passwords Network Camera is shipped without any password by default. That means everyone can access Network C amera including the configuration as long as the IP address is known. It is necessary to assign a password if Network Camera is intended to be 1 to enable protection. This password is accessed by others. Type a new word twice in ○ used to identify the administrator. Then add an account with user name and password 2 .
-
Change homepage layout How to change the subject text of hom epage 1. C lick on “C onfiguration” on homepage, 2. C hange the text in “Host name”, 3. C lick on “Save” button. - 22 www.vivotek.
-
How to change the font color 1. C lick on “C onfiguration” on homepage, 2. C lick on “Homepage layout” at the left column, 3. Find “Font color” and pull down the list to choose any color you like, 4. C lick on “Save” button. * The font color is better to contrast with the background. How to change the background 1. C lick on “C onfiguration” on homepage, 2. C lick on “Homepage layout” at the left column, If you want to display simple color without any image, 3.
-
If you want to use the image from another web site as background, 3. Find “Background graph” and choose “Url”, 4. Type the URL of the image on the Internet in the edit box, for example, “http://dgl.microsoft.com/thumbnails/j023/j0235217(t).gif”, 5. C lick on “Save” button. If you want to change the default background image stored in Network C amera, 3. Find “Background graph” and choose “default”, 4. C lick on “Save” button, 5. Prepare an image file with size less than 131000 bytes and rename it to wallppr.
-
How to change the im age logo at the upper left corner of hom epage 1. C lick on “C onfiguration” on homepage, 2. C lick on “Homepage layout” at the left column, If you want to remove any logo, 3. Find “Logo graph” and choose “blank”, 4. C lick on “Save” button. If you want to use the image from another web site as logo, 3. Find “Logo graph” and choose “Url”, 4. Type the URL of the image on the Internet in the edit box, for example, “http://dgl.microsoft.com/thumbnails/j023/j0234430(t).gif”, 5.
-
5. Prepare an image file with size less than 65000 bytes and rename it to logo.gif, 6. Open an FTP client program and connect to Network C amera. The user name and password is as same as the administrator’s. 7. Transfer logo.gif in local folder to Network C amera, 8. C lose the FTP program and reload the homepage of Network C amera. If you want to add hyperlink to the logo image, 3. Find “Logo link” and type the hyperlink in the edit box, for example, http://www.yahoo.com, 4. C lick on “Save” button.
-
How to design m y own hom epage to replace the current one 1. Prepare your own homepage with size less than 65000 bytes and rename it to user.htm, 2. Insert the html codes of video object, the bold Italian text in the following example, into the appropriate position in user.htm. Note that the codes of video object must be copied exactly the same including the letter case. ****** Example homepage begin ******
Example – custom homepage PAGE 29
3. Open an FTP client program and connect to Network C amera. The user name and password is as same as the administrator’s. 4. Transfer user.htm in local folder to Network C amera, 5. C lose the FTP program and reload the homepage of Network C amera, 6. C lick on “C onfiguration” on homepage, 7. C lick on “Homepage layout” at the left column, 8. C heck “Use the customized homepage”. 9. C lick on “Save” button and return to homepage. * The user.
-
Build a multimedia web attraction site Show off to m y friends – m id- scale serv ice Network C amera can allow ten visitors on-line simultaneously. Just follow the installation, focus Network Camera on any view you would like friends to share and tell them the address to type in the web browser. Of course you have to maintain your friend list in the security configuration page to filter unexpected strangers. No need to have the geeks’ skill and equipments, no need to find suitable software.
-
If you want to expand the viewers tremendously, host a powerful web site that can handles large network traffic and attract eyeballs with the picture refreshed often by Network C amera. If the web space has FTP service, Setup Network C amera as an FTP client to upload the pictures. The advantage is the access of Network C amera is independent of the viewers to ensure the quality. 1. C lick on “C onfiguration” on homepage, 2. C lick on “Network” at the left column, 3.
-
successfully uploaded to the correct folder, 10. Prepare a homepage with the embedded image reference to the image file uploaded via FTP in advance. If the web space has no FTP service, An auto-refresh homepage can be used to periodically poll the newest image from Network Camera. It is mostly useful in the free web space provider as their FTP service may be limited to use. 1. Prepare an auto-refresh homepage like the following example.
-
****** Example homepage begin ******
Example - auto refresh MiniAVServer Demo