
HP StorageWorks 2000 G2 Modular Smart Array Controller Module Replacement Instructions (500916-003, July 2010)


NOTE:
To reduce impact on system performance, perform all
maintenance tasks during periods of low system activity or
during a system maintenance window.
Verifying module failure
Use the following methods to verify failure:
• Check the Fault/Service Required LED (back):
• Amber = Fault condition
• Check that the OK LED (back) is off.
• Check the event log for errors.
Recording configuration settings
IMPORTANT:
When replacing the controller in slot A, configuration settings
may be reset to the values of the replacement controller. (This
does not occur when replacing the controller in slot B.)
To obtain key settings using the CLI, enter the following commands:
• For system information:
show system
• For user information:
show users
• For date and time settings:
show controller-date
• For email and SNMP notification settings:
show snmp-parameters
• For NTP configuration:
show ntp-status
• For volume mapping information:
show volume-maps
• For information about scheduled tasks:
show schedules
• For host IDs and nicknames:
show hosts
Enabling Partner Firmware Upgrade
nl
(dual-controller configurations only)
In a dual-controller configuration, the Partner Firmware Upgrade option
ensures that both controllers have the most recent version. HP
recommends enabling this feature.
To see the current Partner Firmware Upgrade setting, enter the following
command:
show advanced-settings
If Partner Firmware Upgrade is disabled, enter the following command:
set advanced-settings partner-firmware-upgrade
enabled
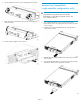
Removing the failed module
CAUTION:
• In a single-controller configuration, if transporting the Com-
pactFlash to a replacement controller, remove the controller
only after the cache is copied to CompactFlash, which is indic-
ated by the Cache Status LED being off.
• In a single-controller environment, I/O must be stopped and
the enclosure must be powered off prior to the replacement.
• In a dual-controller environment, if the failed controller is first
shut down, the controller may be hot-replaced in an operation-
al enclosure.
1. In a dual-controller configuration, shut down the failed controller
by entering the command:
shutdown a|b, where a or b represents the controller.
The blue OK to Remove LED (back) illuminates to indicate that the
controller can be removed safely.
2. Illuminate the UID (Unit Identification) LED of the enclosure that
contains the controller module to remove by entering the command:
set led enclosure 1 on
3. Locate the enclosure whose UID LED (front right ear) is blue, and
within it, the controller module whose OK to Remove LED is blue.
4. In a single-controller environment, stop all I/O and remove power
from the enclosure.
5. Disconnect cables connected to the module. Label each cable to
facilitate reconnection.
Page 2