
Internet Express for Tru64 UNIX Version 6.8 Administration Guide (14233)


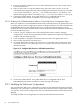
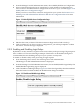

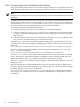

Figure 3-16 Adding Groups
3.12.4.2 Deleting and Modifying Groups
To modify the properties for an existing group or delete an existing group:
1. From the Manage User Self-Administration menu, choose Manage Groups. The Manage
Groups forms is displayed. Existing groups are listed in the Existing Group Descriptions
field.
2. Select the group you want to delete or modify from this list.
• To delete a group, click on the Delete button. This will remove the group definition and
menu item from the user's main menu but will not remove any files. A status message
is displayed.
• To modify group attributes, click on the Modify button. For built-in groups, you can
only modify the Enabled status and the description string. All group attributes, except
ID, are available for custom groups.
a. Change the group description in the Description field.
b. Change the name for the main page. This name should be relative to User
Self-Administration home directory. For example, if the file is located at
$selfadmin_home/data/foo.php, then its name should be set to
data/foo.php.
c. Select the Create Template check box if you want a template created for the main
page. Use the template file as the basis for all files you create in this group. Existing
templates will not be overwritten.
d. Select the Enabled check box to enable the group. When a group created with the
User Self-Administration feature is disabled, users cannot access the pages and the
link is not available from the menu.
e. Click on Submit. A status message is displayed when the group modifications are
processed.
3.12.4.3 Enabling and Disabling Groups
To enable or disable groups and not edit other properties, do the following:
1. From Manage User Self-Administration menu, choose Enable/Disable Groups. A list of
existing group descriptions is displayed. Each description is followed by a check box.
A checked box indicates that the group is enabled and an unchecked box indicates it is
disabled. Enable or disable a group as desired.
2. Click on Submit. A status message is displayed.
3.12 Managing the User Self-Administration Feature 67