
Migrating vPar Systems to Integrity VM


4 of 13
Collect and Save Mass Storage Configuration
Preserving the mass storage configuration across the transition will make things much smoother.
Fortunately, the vPars product is architected so that HW paths are consistent between the vPars on a
system (nPar) and the system itself. Thus, the HW path shown inside a vPar will be the same HW
path after all the vPars are removed. Three basic sets of information should be collected (well, four
actually but one is a special case of another).
HW Path Information
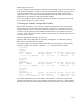
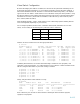
Collect the ioscan output for the vPar’s storage, so that the hardware path is clearly identified:
# ioscan –funC disk
Class I H/W Path Driver S/W State H/W Type Description
=======================================================================
disk 0 0/0/2/0.0.0.0 sdisk CLAIMED DEVICE TEAC DV 28E-C
/dev/dsk/c0t0d0 /dev/rdsk/c0t0d0
disk 1 0/1/1/0.0.0 sdisk CLAIMED DEVICE HP 146 GST314
/dev/dsk/c2t0d0 /dev/rdsk/c2t0d0
…
General Volume Group Information
The process for moving volume groups and, hence, the file systems residing on them from one system
to another differs depending on whether you use the Logical Volume Manager (LVM) that is built into
HP-UX or VERITAS Volume Manager (VxVM). The steps to perform such a move are well
documented, depending on which volume manager was used.
For LVM, refer to Managing Systems and Workgroups, A Guide for HP-UX System Administrators.
The section “Moving and Reconfiguring Your Disks” is required reading for converting a system from
vPars to a VM (and vice-versa) if the system uses LVM.
For VxVM, refer to VERITAS Volume Manager Administrator’s Guide. The section “Moving Disk
Groups Between Systems” should be treated as a prerequisite for converting a vPar system to a VM
(and vice-versa) if the system has logical volumes created with VxVM.
Read the pertinent sections of the documents referenced above before continuing with the migration.
Root Volume Group Information
By default, the root volume group is created with LVM. However, it can be created with other volume
management technologies such as VxVM. In this paper, it is assumed that the root volume group is
created with the default volume manager, LVM. The following steps are necessary to move the root
volume group – created with LVM – from the vPar system to the new virtual machine. For details on
how to transition a root volume group created with VxVM, consult the VERITAS Volume Manager
Administrator’s Guide.
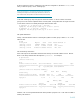
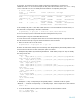
Be sure the root volume group information is collected and saved to the root file system. Verify the
volume group contains the boot configuration:
# lvlnboot -v /dev/vg00
Boot Definitions for Volume Group /dev/vg00:
Physical Volumes belonging in Root Volume Group:
/dev/dsk/c2t1d0s2 (0/1/1/0.1.0) -- Boot Disk
Boot: lvol1 on: /dev/dsk/c2t1d0s2
Root: lvol3 on: /dev/dsk/c2t1d0s2
Swap: lvol2 on: /dev/dsk/c2t1d0s2
Dump: lvol2 on: /dev/dsk/c2t1d0s2, 0
Examine the output of lvlnboot to verify that Boot and Swap logical volumes are on the same
device. In the above example, they are on same device. If they are not, you should contact HP