
Installation Manual


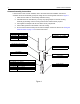

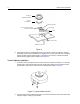


Table Of Contents
- Foreword
- Product Safety and RF Exposure Compliance
- Before using this product, read the operating instructions for safe usage contained in the Product Safety and RF Exposure booklet enclosed with your radio.
- ATTENTION!
- This radio is restricted to occupational use only to satisfy FCC RF energy exposure requirements. Before using this product, read the RF energy awareness information and operating instructions in the Product Safety and RF Exposure booklet enclosed wi...
- For a list of Motorola-approved antennas, batteries, and other accessories, visit the following website: http://www.motorola.com/governmentandenterprise
- Document Copyrights
- Disclaimer
- Trademarks
- Spectrum Series™ Base Loaded Mobile Antennas Installation Manual
- Spectrum™ Series Base Loaded Mobile Antennas
- Introduction
- Mobile Antenna Installation
- Spectrum™ by Motorola
- Spectrum™ by Motorola
- Product Safety and RF Exposure Compliance

Mobile Antenna Installation 5
Antenna Mount Installation Instructions
Roof (Permanent 3/4” Hole) Mount Instructions
Tools Required:
• Safety glasses
• Hole saw (Motorola part # RPX-4378A)
• 15/16” open-end wrench
• Solder, 60/40 rosin flux
• Crimp tool, Motorola part # 66-80388A26 (Mini-UHF Connector only)
• Electric drill
• Spanner wrench, Motorola part # 66-80371A75
• Soldering iron, 40 – 75 watts
1. Drill a 3/4” hole in the vehicle with antenna hole cutting saw, Motorola part # RPX-4378A, and
remove all burrs. The antenna hold saw will remove paint in a narrow ring around hole to
assure good metal contact between vehicle and mount.
2. Apply generous amounts of silicon grease to inner and outer threads of brass lock nut. Feed
coaxial cable and mount through hole as shown in Figure 2.
Figure 2.
3. Thread locking nut onto mount and pull up mount base to properly align in hole. While pulling
up, finger tighten the locking nut against roof top as show in Figure 3.
Figure 3.
MAEPF-27629-O