
Logic HE Range Conventional Flue Log Effect Installation User Instructions


7
User Instructions
Programming the Modes
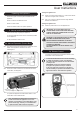
2b.9 Holding the handset to unlock, press and hold the SET
button until a beep is heard to indicate the command has
been received.
2b.10 Release the SET button. PROG and a flashing thermometer
symbol will be displayed at the top of the display.
2b.11 Press and release the SET button to enter Day Mode.
The current temperature setting and mode will be displayed-
for example the Sun symbol on the left shows it is in Day
Mode and the default temperature is 24ºC.
2b.12 To change the temperature press + or - whilst the set
temperature is displayed to alter the setting.
2b.13 Press and release the SET button to confirm and to scroll to
the Night Mode.
2b.14 To change the temperature press + or - whilst the set
temperature is displayed to alter the setting.
2b.15 Press and release the SET button to confirm and to scroll to
Frost Protection mode.
2b.16 To change the temperature press + or - whilst the set
temperature is displayed to alter the setting.
2b.17 When finished press the SET button again and the new
settings will be accepted.
The display will return to the time of day screen.
Choosing a Mode
When choosing a mode during operation the
temperature can be temporarily changed, however these
settings will reset to the previously set programmed
settings when the fire is turned off.
2b.18 Holding the handset to unlock, press and release the MODE
button several times until a thermometer symbol flashes at
the top of the display.
2b.19 Press the SET button to enter the Thermostatic mode.
2b.20 Press the Set button again to see the current temperature
setting and mode - for example the a Sun symbol on the left
shows it is Day Mode and the default temperature is 24.
2b.21 With the temperature displayed, press + or - to alter the
setting.
2b.22 Press the MODE button repeatedly to scroll through the
settings and to select Night mode or Frost Protection.
The handset must be left in the chosen mode for it to
operate.
2b.23 When finished press SET again and the new setting will be
accepted.
The display will return to the time of day screen.
If at any time the power button is operated during Thermostatic
Mode the control will cancel any thermostat operation and return
the handset to Manual Mode.
Setting Timer Mode (in Thermostatic Operation)
Timer Mode will turn the appliance off after a set period of time has
elapsed.
Timer Mode can be set before or during thermostatic operation of
the fire.
2b.24 Hold the handset to unlock, press and release the MODE
button until the word MAN and the Zzz symbols are flashing
at the top of the display.
2b.25 Press and release the SET button.
This will activate the Timer mode.
The default time period is 1 hour, unless altered in
2b.39.
2b.26 Pressing the SET button again will show the remaining
Time.
This can be altered by pressing the + or - buttons.
The timer can be set between 1 minute and 24 hours.
2b.27 After adjusting the time press SET again to confirm the time
setting desired.
Once the countdown has reached zero the fire will turn off.
Note: If Timer mode is activated and the fire is
manually turned off, the timer will be cancelled.
Changes to the Timer will reset to the default time
on next use.
If the fire is off when the Timer mode is set then the
timer will automatically start when the fire is turned
on.
Setting the Clock
To adjust the time on the handset after initial set up:
Holding the remote to keep the green light on and the
handset unlocked:
2b.28 Press and hold the SET button until a beep is heard to
indicate the command has been received.
2b.29 Release the SET button. PROG will be displayed at the top
left of the display.
2b.30 Press the MODE button twice until SET UP flashes in the
top right of the display.
2b.31 Press and release the SET button. The handset will display
an H:24, see Diagram 5.
5
24 denotes a 24 hour clock and 12 denotes a 12 hour clock.