
Specifications


4
Installing Display Manager
Check the instructions and cautions posted on the Web site before downloading and installing the Software.
To Install the Software
1 Check that the PC on which the Software is to be installed is compatible with the Software.
For more information, see "Hardware and Software Requirements" (page 2).
2 Turn the PC power "ON".
• Log into the system using an administrator login name.
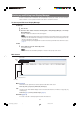
3 Exit from all active applications.
4 Double-click the downloaded installer.
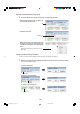
After a while, the "Choose Setup Language" dialog box appears.
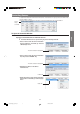
5 Select "English" and click the "OK" button.
The "InstallShield Wizard" dialog box appears.
6 Click the "Next >" button.
The "Choose Destination Location" dialog box appears.
• Change the installation folder only if necessary.
(Changing the folder is not normally required).
7 Click the "Next >" button.
The "Select Program Folder" dialog box appears.
• Change the program folder only if necessary.
(Changing the folder is not normally required.)
8 Click the "Next >" button.
The installation starts.
Once the installation is complete, the "InstallShield Wizard Complete" dialog box appears.
9 Click the "Finish" button.
The installation of the Software has been completed.
Disp_Manager_E_p02-05.p65 08.4.18, 15:574