Website Payments Pro Hosted Solution Integration Guide Last updated: July 2012
Website Payments Pro Hosted Solution Integration Guide Document Number: 10112.en_GB-201207 © 2012 PayPal, Inc. All rights reserved. PayPal is a registered trademark of PayPal, Inc. The PayPal logo is a trademark of PayPal, Inc. Other trademarks and brands are the property of their respective owners. The information in this document belongs to PayPal, Inc. It may not be used, reproduced or disclosed without the written approval of PayPal, Inc. Copyright © PayPal. All rights reserved. PayPal (Europe) S.à r.
Contents Preface . . . . . . . . . . . . . . . . . . . . . . . . . . . . . . . . . . 7 About This Guide. . . . . . . . . . . . . . . . . . . . . . . . . . . . . . . . . . . . . . . . 7 Intended Audience . . . . . . . . . . . . . . . . . . . . . . . . . . . . . . . . . . . . . . . 7 Revision History . . . . . . . . . . . . . . . . . . . . . . . . . . . . . . . . . . . . . . . . 7 Documentation Feedback . . . . . . . . . . . . . . . . . . . . . . . . . . . . . . . . . . .
Contents Chapter 5 Integrating Your Website Using API . . . . . . . . . . . . . 39 Button Hosting . . . . . . . . . . . . . . . . . . . . . . . . . . . . . . . . . . . . . . . . 39 Using the Button Manager API with Hosted Solution Checkout . . . . . . . . . . . . . . . 40 Using URL Returned in the Response (Recommended) . . . . . . . . . . . . . . . . 40 Using Form POST . . . . . . . . . . . . . . . . . . . . . . . . . . . . . . . . . . . . 41 Encrypting Buttons Using Public and Private Key . . . . . . .
Contents GetTransactionDetails API . . . . . . . . . . . . . . . . . . . . . . . . . . . . . . . . . . 63 GetTransactionDetails Request . . . . . . . . . . . . . . . . . . . . . . . . . . . . . 63 GetTransactionDetails Response . . . . . . . . . . . . . . . . . . . . . . . . . . . . 64 RefundTransaction API . . . . . . . . . . . . . . . . . . . . . . . . . . . . . . . . . . . 73 RefundTransaction Request RefundTransaction Response . . . . . . . . . . . . . . . . . . . . . . . . . . . . . . 73 . . . . . .
Contents 6
P Preface About This Guide The Website Payments Pro Hosted Solution Integration Guide describes how to integrate with Hosted Solution. It includes information about: Features and benefits of Hosted Solution. Value-added services. Moving from Website Payments Standard to Hosted Solution. Integrating your website with Hosted Solution. Customising your hosted payment page. Testing your integration in the Sandbox environment.
P Preface Documentation Feedback Documentation Feedback Help us improve this guide by sending feedback to: documentationfeedback@paypal.
1 Getting Started with Website Payments Pro Hosted Solution Overview Website Payments Pro provides an all-in-one package of a gateway, a merchant account, and a virtual terminal. There are a number of options to integrate Website Payments Pro, either through a shopping cart, through Direct Payment API, or using a PayPal hosted integration Website Payments Pro Hosted Solution. Hosted Solution is the fast and easy way to add transaction processing to your website.
Getting Started with Website Payments Pro Hosted Solution How Hosted Solution Works Support for 3-D Secure Buyer Authentication Protocol - 3-D Secure can help to add an extra layer of fraud protection for online credit and debit card payments from your buyers. It can benefit your business by helping to reduce the number of unauthorised chargebacks you receive and the time it takes to resolve them.
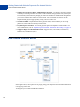
Getting Started with Website Payments Pro Hosted Solution Value-Added Services 1. Generate a button in your website checkout flow using HTML or API solution. The button could be labeled Pay or Buy or similar. When the buyer clicks this button, they are redirected to the payment page hosted by PayPal. 2. On the payment page, the buyer enters their debit or credit card information and clicks the Pay Now button.
Getting Started with Website Payments Pro Hosted Solution PayPal Express Checkout Transaction Processing Recurring Payments Recurring Payments is a scheduled payment solution that enables you to automatically bill a buyer for a fixed amount of money on a fixed schedule. When you create recurring payments for a buyer, you create a recurring payments profile. The profile contains information about the recurring payments, including details for an optional trial period and a regular payment period.
Getting Started with Website Payments Pro Hosted Solution Introduction to Integrating with Hosted Solution For complete details on PayPal Express Checkout, refer to Express Checkout Integration Guide. Introduction to Integrating with Hosted Solution After signing up for Hosted Solution, follow these steps to integrate your website withHosted Solution: 1.
Getting Started with Website Payments Pro Hosted Solution Introduction to Integrating with Hosted Solution 14
2 Integrating Your Website Using HTML This chapter provides instructions for a simple integration that enables you to begin processing transactions using Hosted Solution. N OTE : PayPal recommends that you implement the simple integration to familiarise yourself with Hosted Solution before implementing a more customised integration. As part of a simple integration, you get the default settings on your payment page.
Integrating Your Website Using HTML Simple Hosted Solution Integration The return URL is appended with a Transaction ID on the query string during the redirect back from the payment page to your website. This Transaction ID can be used to retrieve the status and verify the authenticity of the transaction. For detailed information on verifying the authenticity of the transaction before fulfilling the order, refer to Chapter 7, “Order Processing.
Integrating Your Website Using HTML HTML Variables HTML Variables The table below lists the Hosted Solution HTML variables you can use to send in additional transaction information along with your web request. For a list of HTML variables that you can use to customise the look and feel of your payment page, refer to Table 3.1, “HTML Variables for Look and Feel of Payment Page. N OTE : The values you pass must not contain any of these special characters (){}<>\"; N OTE : Some merchants are required to pa
Integrating Your Website Using HTML HTML Variables TABLE 2.1 HTML Variables for Settings of Payment Page (Continued) Variable Description Required cancel_return The browser will be redirected to this URL if the buyer clicks “Return to Merchant” link. Be sure to enter the complete URL, including http:// or https://. No cbt Sets the text for the “Return to Merchant” link on the PayPal confirmation page.
Integrating Your Website Using HTML HTML Variables TABLE 2.1 HTML Variables for Settings of Payment Page (Continued) Variable Description Required return The URL to which the buyer’s browser is redirected to after completing the payment. Be sure to enter the complete URL, including http:// or https://. No shipping Shipping charged. This amount is added to subtotal for the total amount. No state State of the shipping address. No subtotal Amount charged for the transaction.
Integrating Your Website Using HTML HTML Variables 20
3 Customising Your PayPal Payment Page You can customise the look and feel of the PayPal payment page in the following two ways: Modifying Your PayPal Account Settings Adding HTML Variables N OTE : HTML variables will override the settings you save on your profile page. Modifying Your PayPal Account Settings In your Profile section on PayPal.com, you can change the look and feel of the payment page by modifying the settings on the following pages under the Website Payment Settings section.
Customising Your PayPal Payment Page Modifying Your PayPal Account Settings 22
Customising Your PayPal Payment Page Modifying Your PayPal Account Settings Settings This page allows you to select the information you want to collect and display on your payment page and where you want to display the payment confirmation. Although we offer many options on this page, we recommend that you display as few options as possible on the payment page.
Customising Your PayPal Payment Page Modifying Your PayPal Account Settings What information do you want to show on your Website Payments Pro Hosted Solution payment page? You can select the fields that are displayed on your hosted payment page. You have the following options: Card Information - Buyer's credit card information. This field is always displayed and selected by default.
Customising Your PayPal Payment Page Modifying Your PayPal Account Settings Customisation This page allows you to customise your payment page. You can customise the header, background, title, button, and the order summary column of your payment page. PayPal offers three design templates for you to choose. Template A is the default template, however, you can choose from any of the templates offered.
Customising Your PayPal Payment Page Modifying Your PayPal Account Settings N OTE : Your buyers will not see the payment page until you have completed the HTML integration with your website. Preview the design of your payment page. You can either change the design of your template, or select and customise a different template on this page. To make changes, left-click on the section you are trying to modify or the corresponding Click to Edit button for that section.
Customising Your PayPal Payment Page Modifying Your PayPal Account Settings Choosing a Template Choose from the following three design templates: Template A Template B Template C Template A. Selected by default - you can customise the header. FIGURE 3.
Customising Your PayPal Payment Page Modifying Your PayPal Account Settings Template B. Customise the header, background, title, button, and the order summary column. FIGURE 3.
Customising Your PayPal Payment Page Modifying Your PayPal Account Settings Template C. Customise the header, background, title, and the button. FIGURE 3.
Customising Your PayPal Payment Page Modifying Your PayPal Account Settings Customising Your Template Consider the following when you customise your template: Header (applicable to Template A, B, and C) - By default, the business name from your profile is shown in the header.
Customising Your PayPal Payment Page Adding HTML Variables Adding HTML Variables The table below lists the Hosted Solution HTML variables you can use to customise the look and feel of your payment page. N OTE : The values you pass must not contain any of these special characters (){}<>\"; TABLE 3.1 HTML Variables for Look and Feel of Payment Page Variable Description bodyBgColor Color of the surrounding background of the payment page.
Customising Your PayPal Payment Page Adding HTML Variables TABLE 3.1 HTML Variables for Look and Feel of Payment Page 32 Variable Description showCustomerName Display customer name (first name and last name). Default Value: true Allowable Value: true or false, where true = show and false = hide. showBillingAddress Display billing address information. Default Value: true Allowable Value: true or false, where true = show and false = hide. showBillingPhone Display billing phone number.
4 Integrating iFrame in Your Website PayPal offers a compact payment form that can be integrated in an iFrame on your website. Since this form is integrated on your website, the buyer never leaves your website, thereby reducing potential drop-offs. You can also maintain your checkout look and feel in the master frame that surrounds the compact payment form. The credit card fields are part of the compact payment form so you do not have to collect this information separately.
Integrating iFrame in Your Website Integrating iFrame Integrating iFrame Choose one of the following methods to integrate the compact payment form in your website: Manual Integration API Integration IMPO RTANT: For optimal performance, PayPal recommends that you load the iFrame asset before other assets such as images and JavaScripts. If there are too many assets running on your payment page when you load iFrame, the request for the iFrame may not be placed or might get delayed.
Integrating iFrame in Your Website Integrating iFrame 3. Ensure that the target name matches the iFrame name, as highlighted in the example below: